Paper Output
Finishing
[Off], [Collate], [Group]*, [Rotate+Collate], [Rotate+Group], [Offset+Collate], [Copies], [Offset+Group], [Staple+Collate], [Staple+Group]
Copies to Offset (Offset+Collate):
1 to 9999; 1*
Staple Position (Staple+Collate):
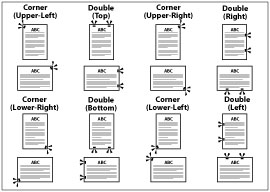
Corner (Upper-L), Double (Top), Corner (Upper-R), Double (Right), Corner (Lower-R), Double (Bottom), Corner (Lower-L), and Double (Left)
Staple Position (Staple+Group):
Grp Upp L-Corner, Grp Double (Top), Grp Upp R-Corner, Grp Double (R), Grp Lwr R-Corner, Grp Double (Btm), Grp Lwr L-Corner, and Grp Double (L)
Some of the above options require specific delivery trays and may not be available unless appropriate delivery trays are attached.
 : Available - : Unavailable
 |
No Options
|
Shift Tray-E1, Copy Tray-Q1
|
Staple Finisher-P1, Booklet Finisher-P1
|
|
Collate
|
 |
 |
 |
|
Group
|
 |
 |
 |
|
Rotate+Collate
|
 |
 |
-
|
|
Rotate+Group
|
 |
 |
-
|
|
Offset+Collate
|
-
|
-
|
 |
|
Offset+Group
|
-
|
-
|
 |
|
Staple+Collate
|
-
|
-
|
 |
|
Staple+Group
|
-
|
-
|
 |
[Off]
This setting prints all copies of the same page before printing the next page.
[Collate]
This setting prints all pages of each copy before printing the next copy.
[Group]
This setting prints all copies of the same page before printing the next page.
[Rotate+Collate]
This setting prints all pages of each copy (collating), and rotates every other complete copy 90 degrees to indicate where each copy starts.
[Rotate+Group]
This setting prints all copies of the same page before printing the next page. It rotates every other complete set of pages to indicate where each new set starts.
[Offset+Collate]
This setting prints all pages of each copy (collating). It offsets every other complete copy by the number specified with this setting to indicate where each copy starts.
[Offset+Group]
This setting prints all copies of the same page before printing the next page. It offsets every other complete set of pages to indicate where each new set starts.
[Staple+Collate]
This setting prints all copies of the same page before printing the next page, and prepares them for stapling according to the option selected for [Staple+Group].
[Staple+Group]
This setting prints all copies of the same page before printing the next page, and prepares them for stapling according to the option selected for [Staple+Group].
Examples of each Finishing option when printing three copies of a three page document:
|
Off
|
Collate
|
Group
|
 |
 |
 |
|
Rotate+Collate
|
Rotate+Group
|
|
 |
 |
|
|
Offset+Collate
|
Offset+Group
|
|
 |
 |
|
|
Staple+Collate
|
Staple+Group
|
|
 |
 |
|
IMPORTANT
|
|
A large print job may be automatically cancelled by the machine. The maximum number of pages that can be printed at one time is approximately 20,000 pages. However, this number may be fewer than 20,000 if other functions (such as registering a form) are in use, or other jobs are being processed.
|
|
NOTE
|
|
[Rotate+Collate] and [Rotate+Group] are available if the paper size is LTR, LTRR, A4, A4R, B5, or B5R.
If [Rotate+Collate] or [Rotate+Group] is selected, part of the print image may be cut off when the image is rotated. You need to load the same size paper as the original in the paper drawers in both landscape and portrait positions. If you do not, all the sheets will be printed in the orientation that the loaded paper is in.
[Offset+Collate] and [Offset+Group] are available if the following paper size is selected.
- When the Shift Tray-E1 is attached: 11" x 17", LGL, LTR, LTRR, STMTR, EXEC, A3, B4, A4, A4R, B5, B5R, or A5R - When the Staple Finisher-P1 or the Booklet Finisher-P1 is attached: 11" x 17", LGL, LTR, LTRR, EXEC, A3, B4, A4, A4R, or B5 |
When you select [Staple+Collate] or [Staple+Group], you can select the stapling position.

|
NOTE
|
|
When you are stapling paper in landscape orientation, the image orientation and the staple position may not match.
|
Staple Finisher-P1/Booklet Finisher-P1
 : Available - : Unavailable
 |
Corner (Upper-Left)
|
Double (Top)
|
Corner (Upper-Right)
|
Double (Right)
|
Corner (Lower-Right)
|
Double (Bottom)
|
Corner (Lower-Left)
|
Double (Left)
|
|
11" x 17"
|
 |
 |
 |
-
|
 |
 |
 |
-
|
|
LGL
|
 |
 |
 |
-
|
 |
 |
 |
-
|
|
LTR
|
 |
-
|
 |
 |
 |
-
|
 |
 |
|
LTRR
|
 |
 |
 * * |
-
|
 |
 |
 * * |
-
|
|
EXEC
|
 |
-
|
 |
 |
 |
-
|
 |
 |
|
A3
|
 |
 |
 |
-
|
 |
 |
 |
-
|
|
B4
|
 |
 |
 |
-
|
 |
 |
 |
-
|
|
A4
|
 |
-
|
 |
 |
 |
-
|
 |
 |
|
A4R
|
 |
 |
 * * |
-
|
 |
 |
 * * |
-
|
|
B5
|
 |
-
|
 |
 |
 |
-
|
 |
 |
* Will be stapled parallel to the edge of the paper.
|
NOTE
|
|
For the Staple Finisher-P1 and the Booklet Finisher-P1, the maximum number of sheets of thin or plain type paper that can be stapled at one time is:
A3, B4, A4R, 11” x 17”, LGL, LTRR: 25 sheets
A4, B5, LTR, EXEC: 50 sheets
Make sure to select compatible settings when using Staple and Punch simultaneously. If conflicting settings are selected, such as the staple setting for the right side of the paper and the punch setting for the left, the printer will use neither Staple nor Punch.
|
Punch
[Off]*, [Top], [Bottom], [Left], [Right]
This setting enables you to specify the desired paper position for holes to be punched for binding.
|
NOTE
|
|
This function is available for selection if the External 2 Hole Puncher-A1/External 2/4 Hole Puncher-A1/External 4 Hole Puncher-A1 is attached to the Staple Finisher-P1 or Booklet Finisher-P1.
The following paper sizes can be hole punched:
When the External 2 Hole Puncher-A1/External 4 Hole Puncher-A1 is attached
A3, B4, A4, A4R, B5, B5R, 11" x 17", LGL, LTR, LTRR, EXEC
When the External 2/4 Hole Puncher-A1 is attached
Two holes: A3, A4
Four holes: A3, A4
Make sure to select compatible settings when using Staple and Punch simultaneously. If conflicting settings are selected, such as the staple setting for the right side of the paper and the punch setting for the left, the machine will use neither Staple nor Punch.
Holes can only be punched in Thin, Plain, Recycled, Colour, Heavy, Letterhead, Coated, Tab, and Bond.
|
Fold
[Off]*, [Z-Fold], [C-Fold]
This setting selects whether the printouts should be Z-folded or C-folded.
[Off]
The printouts are not folded.
[Z-Fold]
This setting enables you to specify whether the printouts should be Z-folded.

|
IMPORTANT
|
|
Paper with a Z-fold may be wrinkled depending on the type of paper and the environment used.
You cannot use this setting in combination with 'Booklet' or 'Saddle Stitch'.
|
|
NOTE
|
|
This function is available for selection if the Document Insertion/Folding Unit-H1 is attached to the Staple Finisher-P1 or Booklet Finisher-P1.
You can select Z-fold for the following paper sizes and types:
Paper sizes: 11" x 17", LGL, LTRR, A3, B4, A4R
Paper types: Thin, Plain, Recycled, Colour, Bond
The maximum number of sheets that can be output to the paper tray is 30 for the middle and lower.
If you use this setting in combination with [Staple+Collate] or [Staple+Group], the maximum number of sheets that can be stapled is 10. If the number of sheets is greater than this, they will be collated, but not stapled.
You can adjust the width to fold paper with [Adjust Z-Fold Position] in Adjustment/Cleaning settings (from the Additional Functions screen). For details on this setting, see "Adjusting the Paper Folding Position."
|
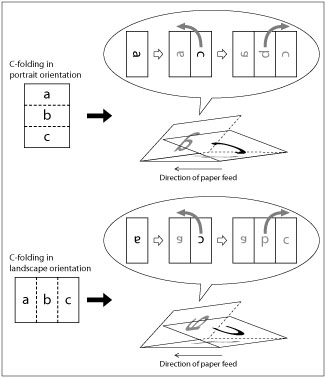
[C-Fold]
This setting enables you to specify whether the printouts should be C-folded.
This is a handy function for folding printouts to be inserted in an envelope.

|
NOTE
|
|
This menu is only displayed for selection if the Document Insertion/Folding Unit-H1 is attached.
C-folded paper might be wrinkled depending on the type of paper and the operating environment.
You cannot use this function in combination with the following functions or operations.
Booklet
Saddle Stitch
Transparency Interleaving
[Staple+Collate] or [Staple+Group] during Finishing
Punch
Creep Correction
Cover, Sheet Insertion, Job Separator, Tab Paper
You can select C-Fold for the following paper sizes and types.
Paper sizes: A4R, LTRR
Paper types: Thin, Plain, Recycled, Colour
Under normal conditions, the print surface when C-Folding is the front, however, by selecting [Face Up] in 'Face Up/Down', you can C-Fold with the print surface on the back (inside). When performing two-sided printing, the paper is C-Folded with both the front and back sides printed.
You can adjust the width to fold paper with [Adjust C-Fold Position]. You should specify a value for this setting to adjust the folding width of C-folded paper to match the size needed to fit in an envelope, or to adjust the positioning of an image on C-folded paper to be visible through a window envelope. For details on this setting, See "Adjusting the Paper Folding Position."
|
Face Up/Face Down
[Face Down]*, [Face Up]
This setting enables you to specify in which direction the printing surface is output onto the output tray.
[Face Down]
The printing surface (the front when 2-sided printing) is output downward.
[Face Up]
The printing surface (the front when 2-sided printing) is output upward.
 |
 |
 |
 |
|
Face Down
|
Face Up
|
When printing multiple page documents:
|
NOTE
|
|
You cannot use [Face Up] in combination with 'Punch', 'Z-Fold', 'Staple', 'Booklet', 'Saddle Stitch', and 'Transparency Interleaving'.
|