Printing Files Directly From the Remote UI
You can print PDF, PS/EPS, TIFF/JPEG, XPS, or image files directly from the Remote UI, without having to open the files.
|
IMPORTANT
|
|
If the imagePASS is installed, you cannot use the Direct Print function.
|
Direct Print
The Direct Print function enables you to send files directly to a printer without using a printer driver. The printer recognizes the file, and prints it. Thus, it is not necessary to open a file to print it.
To print using the Direct Print function, specify the file (PDF file or TIFF/JPEG image file) you want to print from the Remote UI. You can also specify a URL to print a PDF file directly from the Web.
The Direct Print function also supports command entry (LPR command) from the command prompt.
|
IMPORTANT
|
|
After registering the license for the Direct Print Kit, make sure you restart the machine and perform the procedure in "Reset Printer." The Direct Print function is only activated when the license has been registered, the machine has been restarted, and the printer settings have been initialized.
The touch panel display settings for use with Direct Print are 'Common Settings', 'Imaging Settings', 'PDF Settings', and 'XPS Settings'. For more information on the settings for 'Common Settings', 'Imaging Settings', 'PDF Settings', and 'XPS Settings', see "Function Settings: Printer."
Even in cases where you cannot print a file or if the print output is out of alignment using the Direct Print function, you may still be able to open the file in an application and print it using the printer driver.
|
Printing PDF Files Directly
To print PDF files directly from the Remote UI, perform the following procedure:
|
IMPORTANT
|
|
The PS Printer Kit, Direct Print Kit (for PDF), or Direct Print Kit (for PDF/XPS) is required to print a PDF file without opening it.
|
1.
Click [Direct Print] → [PDF Files].

2.
Specify the PDF file you want to print.
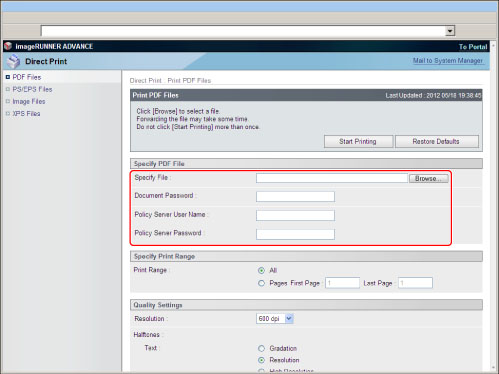
If you want to specify the file path, click [Browse] for <Specify File>→ click [Open].
If you want to specify URL, enter the URL for <Specify File>.
If a password is required to open the document or a password must be entered when printing, enter the password in <Document Password>.
If you want to print a PDF file linked to the policy server, enter <Policy Server User Name> and <Policy Server Password>.
|
IMPORTANT
|
|
If you attempt to print a file without entering the password, the message <PDL PDF Data Decode Err> is displayed, and printing is cancelled. To print PDF files that forbid printing, or to print PDF files that only allow low-resolution printing in high resolution, enter the master password.
|
|
NOTE
|
|
To print by specifying a URL, it is necessary to set [Use Reference Print] to 'On' in [Remote UI] in [Management Settings] (Settings/Registration).
If you specify to print a PDF file by entering its URL, the next print job cannot be processed until the download of the PDF file is complete or until the browser has disconnected from the Web server.
Only the HTTP protocol is supported for the printing of a PDF file by entering its URL.
|
3.
Set <Specify Print Range>.
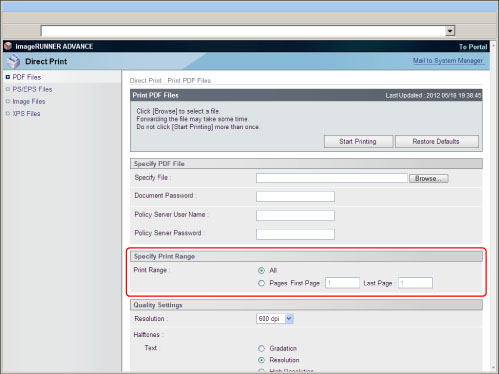
If you select [All], all pages are printed.
If you select [Pages], enter the range of pages → only the specified pages are printed.
4.
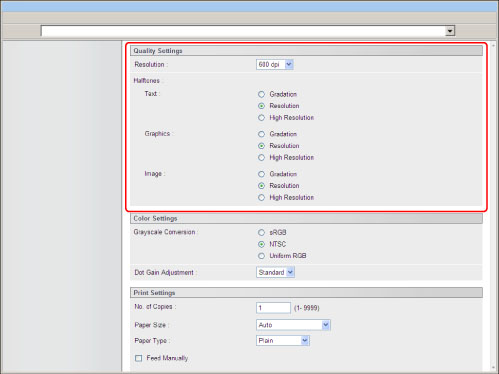
Set [Quality Settings].
|
[Resolution]
|
This setting specifies the resolution for printing.
Resolution is expressed in units of dpi (dots per inch), indicating the number of dots in one inch. The higher the value, the greater the resolution, allowing finer expression of detail. If [600 dpi] is selected, you can perform printing suited to general documents and tables.
If [1200 dpi] is selected, characters and lines can be finely printed.
|
|
[Halftones]
|
This setting specifies how to express halftones in black and white data.
Print data is expressed in dots. Fine gradations, edges, and shades are expressed by using dither patterns, which are groups of dots. This is called halftone processing. If [Resolution] is selected, you can print text with distinct outlines, which is best to print text and thin lines.
If [Gradation] is selected, you can print with both smooth gradation and outlines, which is best to print graphs and graphics that use gradation.
If [High Resolution] is selected, finer printing can be done than with [Resolution], although toner stability is somewhat weaker. This is suited to printing small characters and fine lines, and outlines (such as from CAD data) sharply.
|
5.
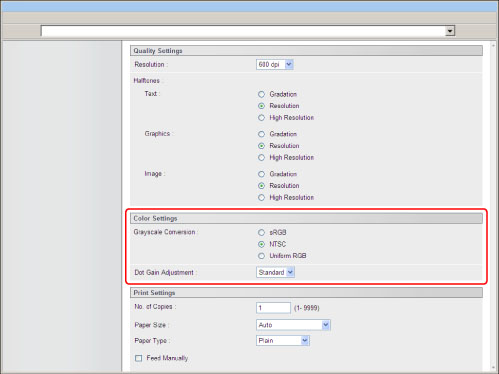
Set [Color Settings].
|
[Grayscale Conversion]
|
You can select ways to convert colour values to a grayscale value when you print colour print data.
[sRGB] lets you to calculate the grayscale value by the colour conversion method based on sRGB.
[NTSC] lets you to calculate the grayscale value by the colour conversion method based on NTSC.
[Uniform RGB] counts the average value of the Red, Green, and Blue values as the grayscale value.
This setting allows you to convert the colour data into grayscale data.
This setting is invalid for black-and-white data.
|
|
[Dot Gain Adjustment]
|
This setting can be used to adjust the area to fill and the density of halftone dots. The larger the value, the more dense the dots.
|
6.
Set [Print Settings].

|
[No. of Copies]
|
This setting enables you to specify the number of copies printed.
|
|
[Paper Size]
|
This setting specifies the output paper size.
If [Auto] is selected, the most appropriate paper source is selected according to the PDF file page size.
If a setting other than [Auto] is selected, the file is printed so that the orientation of the long edge of the PDF file page size and the long edge of the selected paper matches.
If the PDF file page size exceeds the largest or smallest size of the user defined paper, jobs are cancelled. (They are not included in the Prints count.)
|
|
[Paper Type]
|
This setting specifies the output paper type.
|
|
[Feed Manually]
|
This setting enables you to fix the paper feed source to manual feed.
|
|
[Enlarge/Reduce to Fit Paper Size]
|
If you select the checkbox, the selected page size is enlarged or reduced with the same ratio for both the length and width to print within the printable area. However this function is not available if [Auto] is selected in Paper Size.
|
|
[Enlarge Print Area]
|
This setting specifies whether to enlarge the printable area to the edge of the paper.
|
|
[Print 2-Sided]
|
This setting specifies whether to print on one-side or both sides of the paper.
|
|
[Binding Location]
|
This setting specifies whether to place the binding position along the long edge or the short edge of the paper. If the margin is specified on the touch panel display, the binding margin position is automatically adjusted on the front and back sides of the paper.
For more information, see "Gutter." |
|
[N on 1]
|
You can print several pages of PDF file data on 1 sheet of paper.
Multiple pages are printed from (top) left to right. |
|
[Page Order]
|
If you print multiple pages on one page in the Page Layout settings, you can specify the order that the pages are arranged onto the source paper.
|
|
[Finishing]*
|
This setting specifies whether to print in pages or copies.
If [Off] is selected, all copies of the same page are printed before the next page is printed.
If [Collate (Page Order)] is selected, all pages of each copy are printed before the next copy is printed.
If [Group (Same Pages)] is selected, all copies of the same page are printed before the next page is printed.
If [Staple] is selected, all pages of each copy (collating) are printed and stapled.
|
|
[Offset]*
|
If the checkbox and [Collate (Page Order)] are selected in [Finishing], all pages of each copy (collating) are printed, and every other complete copy is offset to indicate where each copy starts.
If the checkbox and [Group (Same Pages)] are selected in [Finishing], all copies of the same page are printed before printing the next page. Every other complete set of pages is offset to indicate where each new set starts.
|
|
[Rotate 90 Degrees]*
|
If the check box and [Collate (Page Order)] are selected in [Finishing], the specified number of print sets are output in page order, and each print set is output in alternating directions.
If the check box and [Group (Same Pages)] are selected in [Finishing], the specified number of print sets are output by page, and each page set is output in alternating directions.
|
|
[Punch]*
|
This setting allows you to punch holes in the printed-paper.
Select the checkbox and one of either [Left], [Right], [Top], or [Bottom] for <Punch Position>. If you select both the staple and punch settings, specify the punch and staple settings so the positions match. If the positions do not match (for example, the staple position is on the right and the punch position is on the left), both settings are void and the paper is printed without either stapling or punching.
The number of holes that can be punched varies depending on the type of puncher unit of the attached finisher. |
|
[Staple Position]*
|
This setting specifies the staple position if [Staple] is selected in [Finishing].
If [Corner] is selected, you can select one of either [Top Left], [Top Right], [Bottom Left], or [Bottom Right].
If [Double] is selected, you can select one of either [Left], [Right], [Top], or [Bottom].
|
|
[Booklet]*
|
This setting enables you to prepare the printout for binding as a booklet. Booklet printing is a process whereby two pages of data are printed on the front and back of one page and it is folded in half to create a book.
|
|
[Opening Direction]*
|
If you select [Booklet], select [Left Opening] or [Right Opening].
If you set [Left Opening], the pages are printed in a layout to create a booklet that opens to the left.
If you set [Right Opening], the pages are printed in a layout to create a booklet that opens to the right.
|
|
[Saddle Stitch]*
|
This setting enables you to bind a finished print job by stapling and folding the pages of a booklet in the centre when you select [Booklet].
|
|
[Print Comments]
|
This setting specifies whether to print annotations.
If [Off] is selected, no annotations are printed.
If [Auto] is selected, only the annotations specified for printing in the PDF file are printed.
|
|
[Store in Mail Box]
|
To store the data in a mail box, select [Store in Mail Box] and then select the destination mail box.
|
|
[File Name After Storing]
|
To store the data in a mail box, you can specify the file name.
The file name cannot exceed 24 characters. |
* The settings and values displayed on the Remote UI differ depending on the optional products available for use. For more information, see "Function Settings: Printer."
* If you select [Superfine (1200 dpi)] for [Resolution], you cannot set [Rotate 90 Degrees].
7.
Press [Start Printing].

|
NOTE
|
|
To restore the default settings, click [Restore Defaults].
Do not repeatedly click [Start Printing] when a file is being forwarded. It may take some time for a file to be forwarded. However, if you click repeatedly during forwarding, the file may malfunction and may not be forwarded.
|
When the print job has been sent, the screen changes and the following message appears.
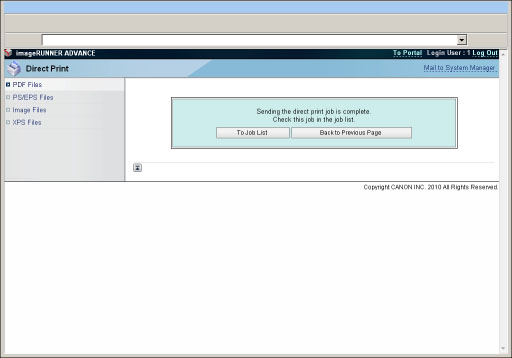
To check the sent print job, press [To Job List].
Printing PS/EPS Files Directly
To print PS/EPS files directly from the Remote UI, perform the following procedure:
|
IMPORTANT
|
|
To print PS/EPS files directly from the Remote UI, it is necessary to activate the PS Printer Kit.
|
1.
Select [PS/EPS Files] from the [Direct Print] menu.
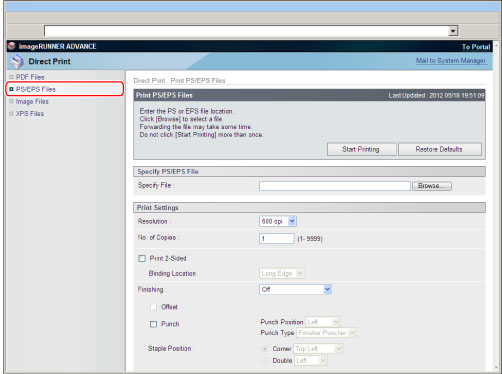
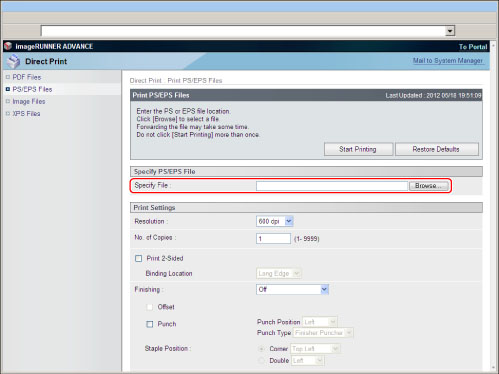
2.
Click [Browse] → select the file → click [Open].
Specify [Print Settings] as necessary.

|
[Resolution]
|
This setting specifies the resolution for printing.
Resolution is expressed in units of dpi (dots per inch), indicating the number of dots in one inch. The higher the value, the greater the resolution, allowing finer expression of detail. If [600 dpi] is selected, you can perform printing suited to general
documents and tables. If [1200 dpi] is selected, characters and lines can be finely printed.
|
|
[No. of Copies]
|
This setting enables you to specify the number of copies printed.
|
|
[Print 2-Sided]
|
This setting specifies whether to print on one-side or both sides of the paper.
|
|
[Binding Location]
|
This setting specifies whether to place the binding position along the long edge or the short edge of the paper. If the margin is specified on the touch panel display, the binding margin position is automatically adjusted on the front and back sides of the paper.
For more information, see "Gutter." |
|
[Finishing]*
|
This setting specifies whether to print in pages or copies.
If [Off] is selected, all copies of the same page are printed before the next page is printed.
If [Collate (Page Order)] is selected, all pages of each copy are printed before the next copy is printed.
If [Group (Same Pages)] s selected, all copies of the same page are printed before the next page is printed.
If [Staple] is selected, all pages of each copy (collating) are printed and stapled.
|
|
[Offset]*
|
If the checkbox and [Collate (Page Order)] are selected in [Finishing], all pages of each copy (collating) are printed, and every other complete copy is offset to indicate where each copy starts.
If the checkbox and [Group (Same Pages)] are selected in [Finishing], all copies of the same page are printed before printing the next page. Every other complete set of pages is offset to indicate where each new set starts.
|
|
[Rotate 90 Degrees]*
|
If the check box and [Collate (Page Order)] are selected in [Finishing], the specified number of print sets are output in page order, and each print set is output in alternating directions.
If the check box and [Group (Same Pages)] are selected in [Finishing], the specified number of print sets are output by page, and each page set is output in alternating directions.
|
|
[Punch]*
|
This setting allows you to punch holes in the printed-paper.
Select the checkbox and one of either [Left], [Right], [Top], or [Bottom] for <Punch Position>.
If you select both the staple and punch settings, specify the punch and staple settings so the positions match. If the positions do not match (for example, the staple position is on the right and the punch position is on the left), both settings are void and the paper is printed without either stapling or punching.
The number of holes that can be punched varies depending on the type of puncher unit of the attached finisher. |
|
[Staple Position]*
|
This setting specifies the staple position if [Staple] is selected in [Finishing].
If [Corner] is selected, you can select one of either [Top Left], [Top Right], [Bottom Left], or [Bottom Right].
If [Double] is selected, you can select one of either [Left], [Right], [Top], or [Bottom].
|
|
[Store in Mail Box]
|
To store the data in a mail box, select [Store in Mail Box] and then select the destination mail box.
|
|
[File Name After Storing]
|
To store the data in a mail box, you can specify the file name.
The file name cannot exceed 24 characters. |
* The settings and values displayed on the Remote UI differ depending on the optional products available for use. For more information, see "Function Settings: Printer."
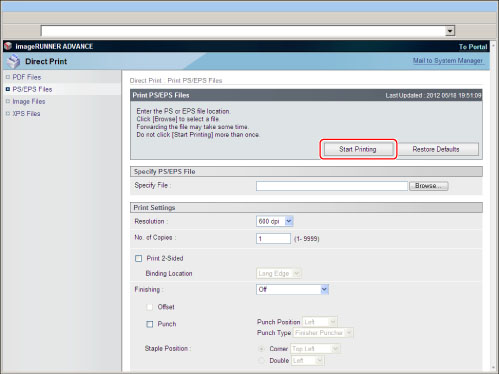
3.
Click [Start Printing].
|
NOTE
|
|
To restore the default settings, click [Restore Defaults].
Do not repeatedly click [Start Printing] when a file is being forwarded. It may take some time for a file to be forwarded. However, if you click repeatedly during forwarding, the file may malfunction and may not be forwarded.
|
When the print job has been sent, the screen changes and the following message appears.

To check the sent print job, press [To Job List].
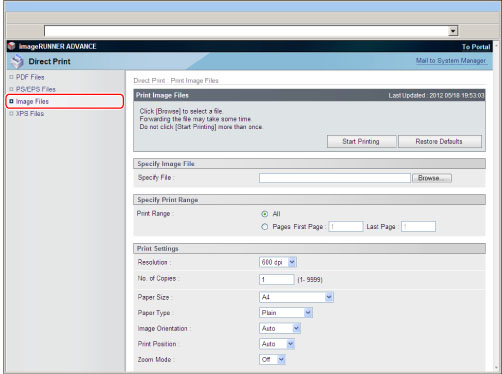
Printing Image Files Directly
To print TIFF/JPEG image files directly from the Remote UI, perform the following procedure:
Direct printing of image files supports ITU-T Rec. T.81 for JPEG data and Adobe TIFF Revision 6.0 for TIFF data.
1.
Click [Direct Print] → [Image Files].
2.
Click [Browse] → select the file → click [Open].
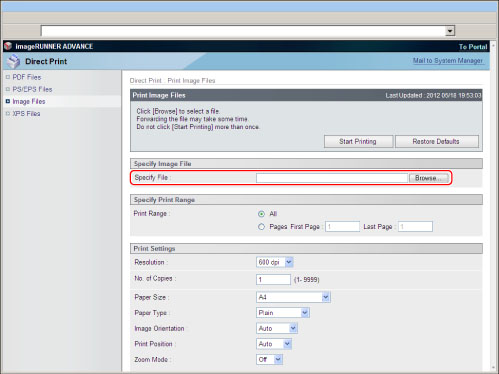
3.
Set <Specify Print Range>.

If you select [All], all pages are printed.
If you select [Pages], enter the range of pages → only the specified pages are printed.
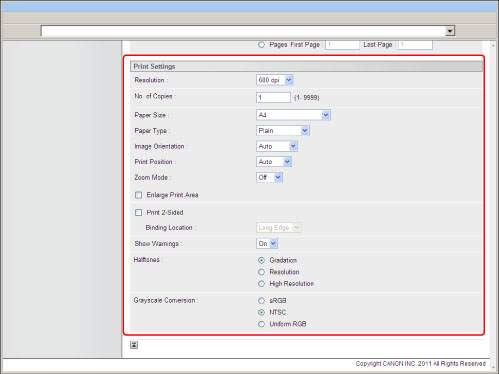
4.
Set [Print Settings].
|
[Resolution]
|
You can set the resolution for printing.
Resolution is expressed in units of dpi (dots per inch). The larger this value, the higher the resolution, and the finer the detail of the image. If you select [600 dpi], files are printed at 600 dpi resolution. This mode is optimal for normal documents and tables.
If you select [1200 dpi], files are printed at 1200 dpi resolution. This enables you to reproduce the contours of text and graphics in fine detail. This mode is optimal for printing data including fine and/or faint lines.
|
|
[No. of Copies]
|
This setting enables you to specify the number of copies printed.
|
|
[Paper Size]
|
This setting specifies the output paper size.
If [Auto] is selected, the most appropriate paper source is selected according to the PDF file page size.
If a setting other than [Auto] is selected, the file is printed so that the orientation of the long edge of the PDF file page size and the long edge of the selected paper matches.
If the PDF file page size exceeds the largest or smallest size of the user defined paper, jobs are cancelled. (They are not included in the Prints count.) |
|
[Paper Type]
|
This setting specifies the output paper type.
|
|
[Image Orientation]
|
This setting specifies whether to print an image vertically or horizontally.
If [Auto] is selected, orientation is automatically adjusted by comparing length and width of the image. If the width is greater, the image is printed horizontally. If the length is greater, the image is printed vertically.
If [Vertical] is selected, the image is printed vertically regardless of its dimensions.
If [Horizontal] is selected, the image is printed horizontally regardless of its dimensions.
|
|
[Print Position]
|
This setting specifies the print position for the image.
If [Auto] is selected, the image is printed in the specified position of the paper if the print position for the image is specified. If the print position is not specified, the image is printed in the centre of the paper.
If [Center] is selected, the image is printed in the centre of the paper regardless of whether the print position of the image is specified.
If [Top Left] is selected, the image is printed in the top left of the paper regardless of whether the print position of the image is specified.
|
|
[Zoom Mode]
|
This setting enlarges or reduces the size of an image to match the printable area of the paper size specified.
If [Auto] is selected, the size of the image is automatically enlarged or reduced to match the printable area of the specified paper size. If the size of the image is larger than the printable area, it is automatically reduced. If the size of the image is smaller than the printable area, it is automatically enlarged. |
|
[Enlarge Print Area]
|
This setting specifies whether to enlarge the printable area to the edge of the paper.
|
|
[Print 2-Sided]
|
This setting specifies whether to print on one-side or both sides of the paper.
|
|
[Binding Location]
|
This setting specifies whether to place the binding position along the long edge or the short edge of the paper. If the margin is specified on the touch panel display, the binding margin position is automatically adjusted on the front and back sides of the paper.
For more information, see "Gutter." |
|
[Show Warnings]
|
This setting specifies the action to be taken if an error associated with printing an image occurs on the machine.
If [On] is selected, an error message is displayed.
If [Off] is selected, an error message is not displayed.
|
|
[Halftones]
|
This setting specifies how to express halftones in black and white data.
Print data is expressed in dots. Fine gradations, edges, and shades are expressed by using dither patterns, which are groups of dots. This is called halftone processing.
[Resolution] is selected, you can print text with distinct outlines, which is best to print text and thin lines.
[Gradation] is selected, you can print with both smooth gradation and outlines, which is best to print graphs and graphics that use gradation.
If [High Resolution] is selected, finer printing can be done than with [Resolution], although toner stability is somewhat weaker. This is suited to printing small characters and fine lines, and outlines (such as from CAD data) sharply.
|
|
[Grayscale Conversion]
|
You can select ways to convert colour values to a grayscale value when you print colour print data.
[sRGB] lets you to calculate the grayscale value by the colour conversion method based on sRGB.
[NTSC] lets you to calculate the grayscale value by the colour conversion method based on NTSC.
[Uniform RGB] counts the average value of the Red, Green, and Blue values as the grayscale value.
This setting allows you to convert the colour data into grayscale data.
This setting is invalid for black-and-white data.
|
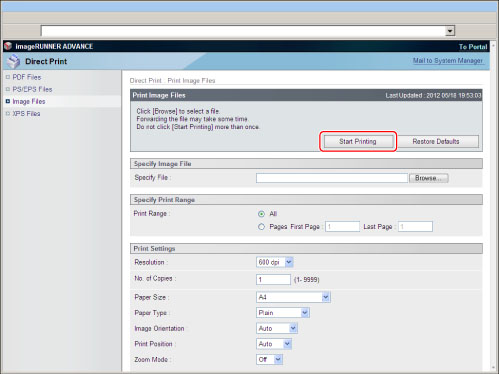
5.
Press [Start Printing].
|
NOTE
|
|
To restore the default settings, click [Restore Defaults].
Do not repeatedly click [Start Printing] when a file is being forwarded. It may take some time for a file to be forwarded. However, if you click repeatedly during forwarding, the file may malfunction and may not be forwarded.
|
When the print job has been sent, the screen changes and the following message appears.

To check the sent print job, press [To Job List].
|
IMPORTANT
|
|
You cannot print images files in the JPEG 2000 format.
The encoding methods for JPEG data that are supported/not supported by this machine are as follows:
Supported
Standard DCT method
Not Supported
Extended DCT method
Lossless method
Hierarchical method
The encoding methods for TIFF data that are supported/not supported by this machine are as follows:
Supported
Uncompressed
ITU-T Rec. T.4 One-dimensional encoding method
ITU-T Rec. T.4 Two-dimensional encoding method
ITU-T Rec. T.6 Basic facsimile encoding method
ITU-T Rec. T.81 JPEG (Standard DCT method only)
PackBits (Apple Macintosh PackBits method)
Not Supported
LZW
ITU-T Rec. T.82 JBIG (black-and-white)
ITU-T Rec. T.43 JBIG (colour)
ITU-T Rec. T.44 MRC
|
Printing XPS Files Directly
To print XPS files directly from the Remote UI, perform the following procedure:
|
IMPORTANT
|
|
The Direct Print Kit (for XPS) or Direct Print Kit (for PDF/XPS) is required to print an XPS file without opening it.
|
1.
Click [Direct Print] → [XPS Files].
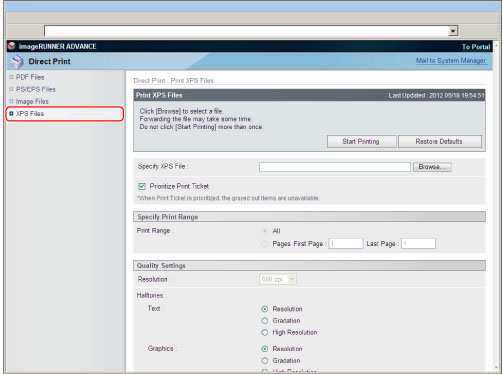
2.
Click [Browse] → select the file → click [Open].
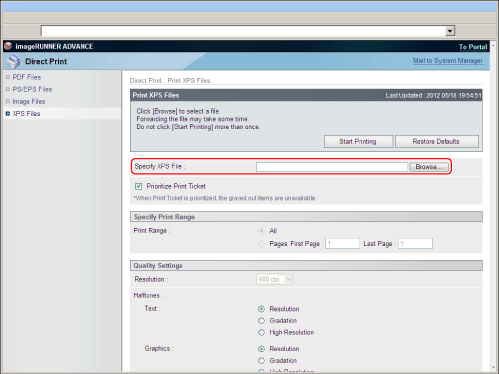
If you prioritize print ticket, select [Prioritize Print Ticket].
3.
Set [Specify Print Range].

If you select [All], all pages are printed.
If you select [Pages], enter the range of pages → only the specified pages are printed.
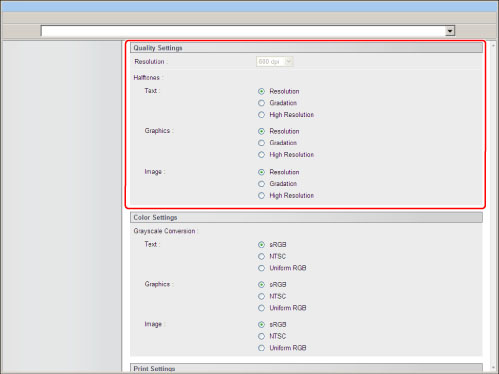
4.
Set [Quality Settings].
|
[Resolution]
|
This setting specifies the resolution for printing.
Resolution is expressed in units of dpi (dots per inch), indicating the number of dots in one inch. The higher the value, the greater the resolution, allowing finer expression of detail. If [600 dpi] is selected, you can perform printing suited to general
documents and tables. If [1200 dpi] is selected, characters and lines can be finely printed.
|
|
[Halftones]
|
This setting specifies how to express halftones in black and white data.
Print data is expressed in dots. Fine gradations, edges, and shades are expressed by using dither patterns, which are groups of dots. This is called halftone processing. If [Resolution] is selected, you can print text with distinct outlines, which is best to print text and thin lines.
If [Gradation] is selected, you can print with both smooth gradation and outlines, which is best to print graphs and graphics that use gradation.
If [High Resolution] is selected, finer printing can be done than with [Resolution], although toner stability is somewhat weaker. This is suited to printing small characters and fine lines, and outlines (such as from CAD data) sharply.
|
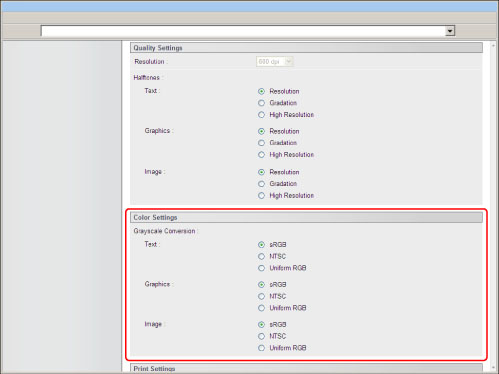
5.
Set [Color Settings].
|
[Grayscale Conversion]
|
You can select ways to convert colour values to a grayscale value when you print colour print data.
Settings can be applied separately for text, graphics, and image data.
[sRGB] lets you to calculate the grayscale value by the colour conversion method based on sRGB.
[NTSC] lets you to calculate the grayscale value by the colour conversion method based on NTSC.
[Uniform RGB] counts the average value of the Red, Green, and Blue values as the grayscale value.
This setting allows you to convert the colour data into grayscale data.
This setting is invalid for black-and-white data.
|
6.
Set [Print Settings].

|
[No. of Copies]
|
This setting enables you to specify the number of copies printed.
|
|
[Paper Size]
|
This setting specifies the output paper size.
If [Auto] is selected, the most appropriate paper source is selected according to the XPS file page size.
If a setting other than [Auto] is selected, the file is printed so that the orientation of the long edge of the XPS file page size and the long edge of the selected paper matches.
If the XPS file page size exceeds the largest or smallest size of the user defined paper, jobs are cancelled. (They are not included in the Prints count.) |
|
[Paper Type]
|
This setting specifies the output paper type.
|
|
[Feed Manually]
|
This setting enables you to fix the paper feed source to manual feed.
|
|
[Enlarge/Reduce to Fit Paper Size]
|
If you select the checkbox, the selected page size is enlarged or reduced with the same ratio for both the length and width to print within the printable area. However this function is not available if [Auto] is selected in[Paper Size].
|
|
[Enlarge Print Area]
|
This setting specifies whether to enlarge the printable area to the edge of the paper.
|
|
[Print 2-Sided]
|
This setting specifies whether to print on one-side or both sides of the paper.
|
|
[Binding Location]
|
This setting specifies whether to place the binding position along the long edge or the short edge of the paper. If the margin is specified on the touch panel display, the binding margin position is automatically adjusted on the front and back sides of the paper.
For more information, see "Gutter." |
|
[N on 1]
|
You can print several pages of XPS file data on 1 sheet of paper.
Multiple pages are printed from (top) left to right. |
|
[Page Order]
|
If you print multiple pages on one page in the Page Layout settings, you can specify the order that the pages are arranged onto the source paper.
|
|
[Finishing]*
|
This setting specifies whether to print in pages or copies.
If [Off] is selected, all copies of the same page are printed before the next page is printed.
If [Collate (Page Order)] is selected, all pages of each copy are printed before the next copy is printed.
If [Group (Same Pages)] is selected, all copies of the same page are printed before the next page is printed.
If [Staple] is selected, all pages of each copy (collating) are printed and stapled.
|
|
[Offset]*
|
If the checkbox and [Collate (Page Order)] are selected in [Finishing], all pages of each copy (collating) are printed, and every other complete copy is offset to indicate where each copy starts.
If the checkbox and [Group (Same Pages)] are selected in [Finishing], all copies of the same page are printed before printing the next page. Every other complete set of pages is offset to indicate where each new set starts.
|
|
[Rotate 90 Degrees]*
|
If the check box and [Collate (Page Order)] are selected in [Finishing], the specified number of print sets are output in page order, and each print set is output in alternating directions.
If the check box and [Group (Same Pages)] are selected in [Finishing], the specified number of print sets are output by page, and each page set is output in alternating directions.
|
|
[Punch]*
|
This setting allows you to punch holes in the printed-paper.
Select the checkbox and one of either [Left], [Right], [Top], or [Bottom] for <Punch Position>. If you select both the staple and punch settings, specify the punch and staple settings so the positions match. If the positions do not match (for example, the staple position is on the right and the punch position is on the left), both settings are void and the paper is printed without either stapling or punching.
The number of holes that can be punched varies depending on the type of puncher unit of the attached finisher. |
|
[Staple Position]*
|
This setting specifies the staple position if [Staple] is selected in [Finishing].
If [Corner] is selected, you can select one of either [Top Left], [Top Right], [Bottom Left], or [Bottom Right].
If [Double] is selected, you can select one of either [Left], [Right], [Top], or [Bottom].
|
|
[Booklet]*
|
This setting enables you to prepare the printout for binding as a booklet. Booklet printing is a process whereby two pages of data are printed on the front and back of one page and it is folded in half to create a book.
|
|
[Opening Direction]*
|
If you select [Booklet], select [Left Opening] or [Right Opening].
If you set [Left Opening], the pages are printed in a layout to create a booklet that opens to the left.
If you set [Right Opening], the pages are printed in a layout to create a booklet that opens to the right.
|
|
[Saddle Stitch]*
|
This setting enables you to bind a finished print job by stapling and folding the pages of a booklet in the centre when you select [Booklet].
|
|
[Store in Mail Box]
|
To store the data in a mail box, select [Store in Mail Box] and then select the destination mail box.
|
|
[File Name After Storing]
|
To store the data in a mail box, you can specify the file name.
The file name cannot exceed 24 characters. |
* The settings and values displayed on the Remote UI differ depending on the optional products available for use. For more information, see "Function Settings: Printer."
* If you select [Superfine (1200 dpi)] for [Resolution], you cannot set [Rotate 90 Degrees].
7.
Press [Start Printing].

|
NOTE
|
|
To restore the default settings, click [Restore Defaults].
Do not repeatedly click [Start Printing] when a file is being forwarded. It may take some time for a file to be forwarded. However, if you click repeatedly during forwarding, the file may malfunction and may not be forwarded.
|
When the print job has been sent, the screen changes and the following message appears.
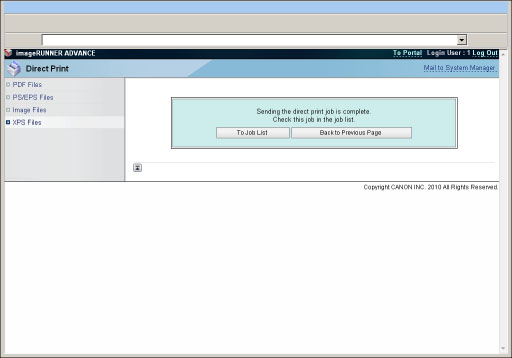
To check the sent print job, press [To Job List].