Changing the Zoom Ratio
You can set the machine to adjust the zoom ratio automatically, or you can specify the zoom ratio manually.
As an example, the procedure for selecting a mail box as the storage location is explained in this section.
|
IMPORTANT
|
|
If you want to use Preset Zoom to perform the following enlargements, place your originals horizontally. Placing an original horizontally means setting the original with the longer side sideways. (See "Orientation.")
LTR → 11" x 17", LGL
STMT → 11" x 17"
|
Preset Zoom
You can use preset copy (zoom) ratios to enlarge or reduce standard size originals to other standard sizes.
1.
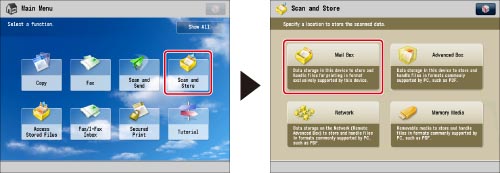
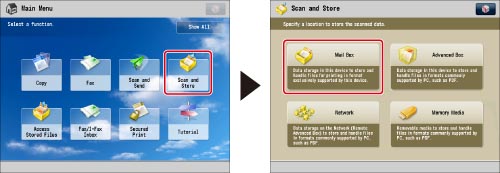
Press [Scan and Store] → [Mail Box].
2.
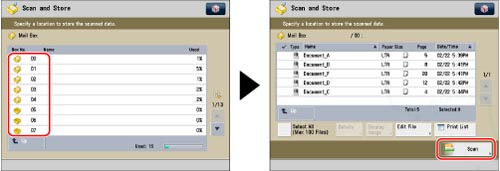
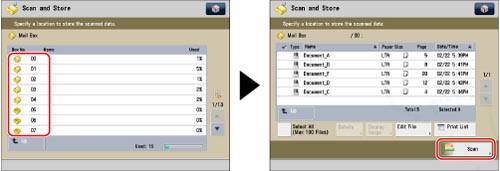
Select the desired Mail Box → press [Scan].
3.
Press [Copy Ratio] → select the desired zoom ratio → press [OK].

Zoom by Percentage
You can enlarge or reduce originals by any zoom ratio in 1% increments. The same zoom ratio is used for the horizontal and vertical axes.
1.
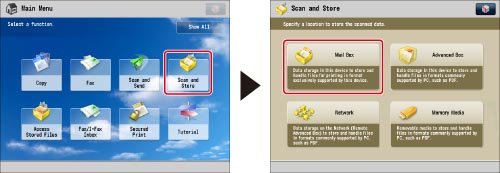
Press [Scan and Store] → [Mail Box].
2.
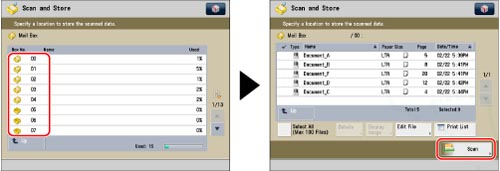
Select the desired Mail Box → press [Scan].
3.
Press [Copy Ratio] → adjust the zoom ratio using [-] and [+] → press [OK].

Auto Ratio
Select this mode to have the machine automatically select the zoom ratio based on the selected record size. The same zoom ratio is used for the horizontal and vertical axes.
1.
Press [Scan and Store] → [Mail Box].
2.
Select the desired Mail Box → press [Scan].
3.
Press [Copy Ratio] → [Auto].

4.
Select the desired data output size → press [OK].
Zoom by Length
This mode enables you to enlarge or reduce originals by individually entering the dimensions of the original and output paper. You can set a copy (zoom) ratio from 25% to 400% if you place the original on the platen glass, or from 25% to 200% if you place the original in the feeder.
|
IMPORTANT
|
|
This mode is only available for storing files in a mail box.
|
|
NOTE
|
|
The machine converts the specified sizes into a zoom ratio (%) using the following formula. The result is rounded to the closest integer.
Zoom ratio (%) = (data output size (mm)/original size (mm)) x 100
|
1.
Press [Scan and Store] → [Mail Box].

2.
Select the desired Mail Box → press [Scan].

3.
Press [Copy Ratio] → [Set by Length].

4.
Set the horizontal and vertical copy (zoom) ratio for the original size and record size.
If you do not want to change the horizontal and vertical copy ratio, select [XY Same Ratio]. To change the copy ratio, select [XY Independent].
If you select [XY Same Ratio]:
You can set the same copy (zoom) ratio for both the horizontal (X) and vertical (Y) axes.

Press [XY Same Ratio].
Press [Original Size] → enter a value.
Press [Data Output Size] → enter a value.
You can enter the width or length of the original size. If you enter the width for the original size, make sure to enter the width for the output size, and vice versa.
If you select [XY Independent]:
You can set different copy (zoom) ratios for the horizontal (X) and vertical (Y) axes.

Press [XY Independent].
Press [X] and [Y] for <Original Size> → enter each value.
Press [X] and [Y] for <Data Output Size> → enter each value.
You can enter the width or length of the original size. If you enter the width for the original size, make sure to enter the width for the output size, and vice versa.
5.
Press [OK].
The machine automatically calculates the correct copy (zoom) ratio based on the values you entered. However, the original image may be cut off slightly depending on the paper size.
Setting the X and Y Axes Independently
The XY Ratio mode enables you to specify different XY copy ratios in percentages to make enlarged or reduced copies. You can set a copy (zoom) ratio from 25% to 400% if you place the original on the platen glass, or from 25% to 200% if you place the original in the feeder.

|
IMPORTANT
|
|
This mode is only available for storing files in a mail box.
|
|
NOTE
|
|
If you set the zoom ratio in the XY Ratio mode, the image of the original may be rotated before being printed. The machine calculates whether or not to do this based on the original size and the specified zoom ratio.
|
1.
Press [Scan and Store] → [Mail Box].

2.
Select the desired Mail Box → press [Scan].

3.
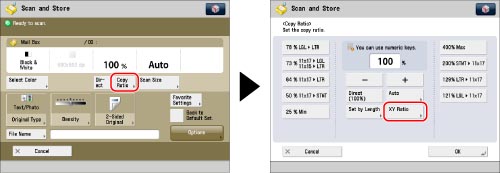
Press [Copy Ratio] → [XY Ratio].
4.
Press [X] and [Y] → press [-] or [+] to specify each copy ratio.
You can also use the numeric keys to enter values.
5.
Press [OK].
|
IMPORTANT
|
|
For information on the modes which cannot be set in combination with this mode, see "Combination of Functions Chart."
You cannot scan highly transparent originals, such as transparencies, using the Auto setting for Copy Ratio. Use the Preset Zoom or Zoom by Percentage mode instead.
To use [Auto], your originals must conform to one of the following standard paper sizes:
11" x 17", LGL, LTR, LTRR, STMT, or STMTR. (You can place STMTR originals only on the platen glass.) You can only select [Auto] for Copy Ratio when the resolution is set to 300 x 300 dpi or 600 x 600 dpi.
|
|
NOTE
|
|
If the actual data output size differs from the zoom ratio specified in [Auto], you can adjust it using [Fine Adjust Zoom]. (See "Fine Adjust Zoom.")
If the original is placed on the platen glass, the zoom ratio automatically appears when the feeder is closed, provided that the original size can be detected.
If you place the original in the feeder, the zoom ratio appears when you press
 (Start). (Start).To return the ratio to 100%, press [Direct (100%)].
|