Printer Connection Method (IPP/IPPS)
In the following procedures, items displayed on the screens for Windows Vista are used. Depending on your environment, the items you see on the screen may differ.
1.
The procedure for checking whether the IP address of the computer to install the driver in is allowed in the [Firewall Settings] of the machine is described in steps 12 and 13 of "TCP/IPv4 Settings," and steps 9 and 10 of "TCP/IPv6 Settings."
|
IMPORTANT
|
|
If communication via the relevant IP address is not permitted in [Firewall Settings], you cannot install the driver.
After you have installed the driver, if communication via the IP address of the computer you have installed it on is not permitted in [Firewall Settings], you cannot print or send a fax from that computer.
|
2.
Start the Add Printer Wizard.
If you are using Windows 2000:
From the [Start] menu, select [Settings] - [Printers].
Double-click the [Add Printer] icon → click [Next].
If you are using Windows XP Professional:
From the [Start] menu, select [Printers and Faxes].
Click [Add a printer] for [Printer Tasks] → [Next].
If you are using Windows XP Home Edition:
From the [Start] menu, select [Control Panel] - [Printers and Other Hardware] - [Printers and Faxes].
Click [Add a printer] for [Printer Tasks] → [Next].
If you are using Windows Server 2003:
From the [Start] menu, select [Printers and Faxes].
Double-click the [Add a printer] icon → click [Next].
If you are using Windows Vista:
From the [Start] menu, select [Control Panel].
Double-click the [Printers] icon → click [Add a printer].
If you are using Windows Server 2008:
From the [Start] menu, select [Control Panel].
Double-click [Printer] → [Add Printer].
If you are using Windows 7:
From the [Start] menu, select [Control Panel].
Click [Hardware and Sound] → [Add a printer].
3.
Specify the URL for the printer.
Select the type of printer → the printer connection method.
Windows 2000: Select [Network Printer] → click [Next]. Select [Connect to a printer on the Internet or on your intranet].
Windows XP/Server 2003: Select [A network printer, or a printer attached to another computer] → click [Next]. Select [Connect to a printer on the Internet or on a home or office network].
Windows Vista/Server 2008/7: Select [Add a network, wireless, or Bluetooth printer] → [The printer that I want isn't listed] → [Select a shared printer by name].
Enter the URL → click [Next].
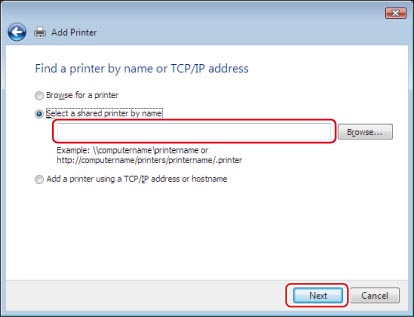
If you want to use regular IPP printing, enter the following URL.
http://<the IP address or host name of the machine>/ipp
If you want to use encrypted communication and perform IPPS printing, enter the following URL.
https://<the IP address or host name of the machine>/ipp
Click [Have Disk] on the screen for selecting the manufacturer and name of the printer → insert the CD-ROM that came with the machine into your computer.
4.
Specify the folder in which the printer driver is located → follow the instructions on the screen to complete the installation.
Mac OS X 10.3.9 or Later
If you are using the PS Printer Kit, and a PS printer driver provided by Apple Inc. with the Mac OS, you can use IPP as the print application. After installing the PPD file according to "Printing from a Computer (Mac)," specify the print settings according to the instructions in the documentation provided with your Macintosh.
|
IMPORTANT
|
|
When using IPPS printing with Windows Vista, it is necessary to obtain the public key of the machine and install it in Windows Vista. For instructions on obtaining the public key, see "Obtaining the Public Key of the Machine to Use SSL with Windows Vista/Server 2008."
|
|
NOTE
|
|
If you are using Windows Vista, a dialog box may appear while you are performing the procedure. In this case, enter a user name and password. For more information, see the manuals provided with the operating system.
|