Paper Selection
Select the size and type of the paper to copy. You can also feed the paper from the multi-purpose tray.
|
IMPORTANT
|
|
Be sure to correctly set the paper type. If the type of paper is not set correctly, it may adversely affect image quality. Moreover, the fixing unit may become dirty, or the paper could jam, and a service repair may be needed.
|
1.
Press [Copy].
2.
Press [Select Paper] → select the paper to copy to.
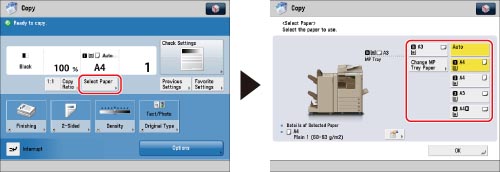
If paper is being fed from the multi-purpose tray for the current job, you can select the paper for the next job from [Change MP Tray Paper]. (See "Reserving a Job Using a Paper Type Different to the Current Paper in the Multi-Purpose Tray.")
Selecting a paper size that is loaded in a paper drawer:
Select the desired paper size.
You can select [Auto] to select the paper size automatically.
|
IMPORTANT
|
|
For nonstandard size originals, the same paper size as the original is not selected with automatic paper selection. Manually specify the paper to copy to.
If you copy the following types of originals with automatic paper selection, a screen for selecting the original size is displayed. Select an original size that closely matches the size of the original you have placed.
Highly transparent originals, such as transparencies
Originals with an extremely dark background
Originals smaller than B6
A5R original placed on the platen glass
|
|
NOTE
|
|
If [Paper Drawer Auto Selection On/Off] is set to 'Off' for a particular paper source, you cannot make copies on paper loaded in that paper source in the Automatic Paper Selection mode. (See "Enabling Paper Drawer Auto Selection.") Also, even if [Paper Drawer Auto Selection On/Off] is set to 'On' for a paper source, depending on the paper type, automatic paper selection may not be performed. To use paper loaded in a paper drawer for which automatic paper selection cannot be performed, manually specify the paper drawer and perform copying.
Icons indicating the type of paper loaded in each paper drawer can be displayed on paper selection screens, if you store that information into the machine beforehand. (See "Registering/Editing Custom Paper Types.")
 indicates that the paper is loaded vertically, and indicates that the paper is loaded vertically, and  indicates that the paper is loaded horizontally. The suffix <R> (such as in A5R) used in paper size designations indicates that the paper is loaded in a paper drawer or the multi-purpose tray horizontally. indicates that the paper is loaded horizontally. The suffix <R> (such as in A5R) used in paper size designations indicates that the paper is loaded in a paper drawer or the multi-purpose tray horizontally. |
Copying on standard size paper set in the multi-purpose tray:
Press [MP Tray] → select the paper size → press [Next].
Select the desired paper type → press [OK].
If the desired paper type does not appear in the list, press [Detailed Settings] → select the paper type → press [OK].
If you are copying onto the back side of a previously printed sheet, press [2nd Side of 2-Sided Page].
|
NOTE
|
|
[Transparency] can be selected only if you select [A4] as the paper size.
You can register paper types that are not displayed on the detailed settings list in <Change Multi-Purpose Tray Paper: Paper Type>. For more information on storing the paper type, see "Registering/Editing Custom Paper Types."
|
Copying on nonstandard size (Free Size) paper set in the multi-purpose tray:
Press [MP Tray] → [Free Size] → [Next].
Select the desired paper type → press [OK].
If the desired paper type does not appear in the list, press [Detailed Settings] → select the paper type → press [OK].
If you are copying onto the back side of a previously printed sheet, press [2nd Side of 2-Sided Page].
Selecting a custom size paper:
Press [MP Tray] → [Custom Size].
Press [X] and [Y] → enter each value → press [OK].
You can also select a size key ([S1] to [S5]) containing a stored paper size setting, instead of entering values.
|
NOTE
|
|
To recall paper sizes from size buttons ([S1] to [S5]), register the paper sizes in advance. (See "Registering/Editing/Deleting Custom Paper Sizes.")
|
Press [Next] → select the desired paper type → press [OK].
If the desired paper type does not appear in the list, press [Detailed Settings] → select the paper type → press [OK].
If you are copying onto the back side of a previously printed sheet, press [2nd Side of 2-Sided Page].
Copying on an envelope loaded in the multi-purpose tray:
Press [MP Tray] → [Envelope] → [Next].
If [Specify Multi-Purpose Tray Envelope Type] is set to 'On', select the desired envelope type → press [OK].
If it is set to 'Off', you cannot select the envelope type. If you press [Envelope], No. 10(COM10) is automatically selected as the envelope type.
|
IMPORTANT
|
|
If the envelope type is not set correctly, a paper jam will occur. Do not use envelopes that have glue attached to their flaps.
If you use envelopes that have glue attached to their flaps, the glue may melt due to the heat and pressure of the fixing unit.
|
Press [OK].
3.
Press [OK].
|
IMPORTANT
|
|
For information on the modes which cannot be set in combination with this mode, see "Combination of Functions Chart."
|
|
NOTE
|
|
Take care when copying an original with an image that extends all the way to the edges. If you copy onto the same size paper, the periphery of the original image may be cut off slightly on the copy. For more information on how much may be cut off, see "Before Using This Machine."
If you select [Fit to Page], the copied image is automatically reduced slightly based on the copy paper size and the image size. As a result, the entire original image is reproduced on the copy without being cut off.
If [Register Multi-Purpose Tray Defaults] is set to 'On' in [Preferences] (Settings/Registration), the stored default values appear. (See "Registering Multi-Purpose Tray Defaults.")
For instructions on loading paper into the multi-purpose tray, see "Printing Using the Multi-Purpose Tray."
For more information on paper types, see "Available Paper Stock."
|