Collating Prints
You can select Finishing modes to collate print output in various ways, by pages or print sets.
For information on the optional products required to use this function, see "Optional Products Required for Each Function."
As an example, the procedure for printing files that are stored in a Mail Box is explained in this section.
|
IMPORTANT
|
|
This mode can be used only for printing a file stored in a mail box or a PDF or XPS file.
The Saddle Stitch and Fold modes can be used only for printing a file stored in a mail box.
Be sure to correctly set the paper type. If the type of paper is not set correctly, it could adversely affect the quality of the image. Moreover, the fixing unit may become dirty, or the paper could jam, and a service repair may be needed.
The Finishing modes cannot be set if free size or custom size is selected.
|
Specifying the Finishing Mode
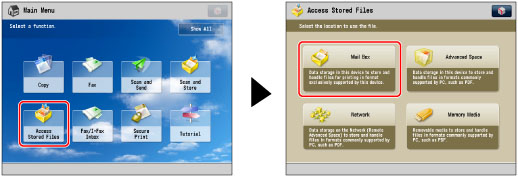
1.
Press [Access Stored Files] → [Mail Box].
2.
Select the desired Mail Box → select the desired file → press [Print].

3.
Press [Change Print Settings] → [Finishing].

To change the paper source, see "Paper Selection."
4.
Set the desired finishing mode.
Select [Collate (Page Order)], [Group (Same Pages)], or [Staple].
Page Order (Collate):
When printing multiple copies of a file, you can collate the output into separate prints.
Example: Three prints of each page collated in page order

Press [Collate (Page Order)] → [OK].
Same Page (Group):
When printing multiple copies of a file, you can group each page together.
Example: Three prints of each page grouped by page

Press [Group (Same Pages)] → [OK].
Page Order (Staple):
When printing multiple copies of a file, you can staple the output for separate prints.
If you select [Corner]:
Staples the output in one location.
If you select [Double]:
Staples the output in two locations, on the left or right side.
If you select [Saddle Stitch]:
Staples the output in two locations along the saddle stitch position.
Press [Staple] → [Next].
Select the stapling type → press [Next].
Select the stapling position → press [OK].
If you select [Saddle Stitch], you can add a cover.
To add a cover, press [Add Cover] → select whether to print on the cover → press [OK].
To change the paper for the main document or cover, press [Change] for <Select Paper> → select the paper to use → press [OK].
You can change the saddle stitch position according to the paper size.
If you want to adjust the saddle stitch position, press [Change Fold/Stitch Pos.] → select the paper size. Adjust the saddle stitch position using [-] or [+] → press [OK] → [OK].
|
IMPORTANT
|
|
You must select the same paper size for the cover page as that used for the main document.
Only 60 to 105 g/m2 paper can be used for the main document.
Only 60 to 220 g/m2 paper can be used for the cover paper.
The [Saddle Stitch] mode can be set only if 2-Sided Printing is set.
The accuracy of folds created in the Saddle Stitch mode may vary, depending on the paper type and the number of sheets.
|
Other Modes Compatible with Finishing
Hole Punch
The machine punches two or more holes in the output.

Saddle Fold
The machine folds A3 or A4R paper into A4 or A5 size, respectively.

|
IMPORTANT
|
|
The Saddle Fold mode can be set only if 2-Sided Printing is set.
The paper is saddle folded one sheet at a time, and then output.
|
Rotate 90 Degrees
If the copies are of the same size, the sheets are automatically collated into sets arranged in page order. These sets are output in alternating directions as follows:

|
IMPORTANT
|
|
You can only set [Rotate 90 Degrees] in the following cases:
If you select the available paper size manually
If the paper size compatible with Rotate 90 Degrees is loaded in both the horizontal and vertical directions
If [Paper Drawer Auto Selection On/Off] for the selected paper source is set to 'On' (See "Enabling Paper Drawer Auto Selection.")
If there is no paper which can be rotated, the output is collated.
|
Offset
If you set [Offset], you can specify the number of print sets to offset. The prints are slightly offset vertically in the output tray as shown below.

Finishing Features Available with Each Optional Unit
 : Available
-: Unavailable
|
Optional Unit
|
Collate (Page Order)
|
Group (Same Pages)
|
Offset
|
Rotate 90 Degrees
|
Staple
|
Hole Punch
|
Saddle Fold
|
||
|
Corner
|
Double
|
Saddle Stitch
|
|||||||
|
None
|
|
|
-
|
|
-
|
-
|
-
|
-
|
-
|
|
Inner Finisher-D1
|
|
|
|
-
|
|
|
-
|
-
|
-
|
|
Inner 2Way Tray-H1
|
|
|
-
|
|
-
|
-
|
-
|
-
|
-
|
|
Inner Finisher-D1 and Inner 2 Hole Puncher-A1/Inner 2/4 Hole Puncher-A1/Inner 4 Hole Puncher-A1
|
|
|
|
-
|
|
|
-
|
|
-
|
|
Inner Finisher-D1 and Inner Finisher Additional Tray-A1
|
|
|
|
-
|
|
|
-
|
-
|
-
|
|
Inner Finisher-D1, Inner 2 Hole Puncher-A1/Inner 2/4 Hole Puncher-A1/Inner 4 Hole Puncher-A1, and Inner Finisher Additional Tray-A1
|
|
|
|
-
|
|
|
-
|
|
-
|
|
Staple Finisher-G1
|
|
|
|
-
|
|
|
-
|
-
|
-
|
|
Booklet Finisher-G1
|
|
|
|
-
|
|
|
|
-
|
|
|
Staple Finisher-G1 and External 2 Hole Puncher-B2/External 2/4 Hole Puncher-B2/External 4 Hole Puncher-B2
|
|
|
|
-
|
|
|
-
|
|
-
|
|
Booklet Finisher-G1
and External 2 Hole Puncher-B2/External 2/4 Hole Puncher-B2/External 4 Hole Puncher-B2
|
|
|
|
-
|
|
|
|
|
|
Maximum Number of Sheets You Can Staple
When the Inner Finisher-D1 is attached
|
Paper Size
|
Corner
|
Double
|
|
A3
|
30 sheets
|
30 sheets
|
|
A4R
|
30 sheets
|
30 sheets
|
|
A4
|
50 sheets
|
50 sheets
|
|
A5R
|
-
|
-
|
|
A5
|
-
|
-
|
When the Staple Finisher-G1/Booklet Finisher-G1 is attached
|
Paper Size
|
Corner
|
Double
|
Saddle Stitch*1
|
|
A3
|
25 sheets
|
25 sheets
|
16 sheets
|
|
A4R
|
25 sheets
|
25 sheets
|
16 sheets
|
|
A4
|
50 sheets
|
50 sheets
|
-
|
|
A5R
|
-
|
-
|
-
|
|
A5
|
-
|
-
|
-
|
*1 Available only if the Booklet Finisher-G1 is attached
|
NOTE
|
|
For information on the original orientation and paper orientation when performing stapling, see "Relationship Between the Original Orientation and Paper Orientation."
|
|
IMPORTANT
|
|
For information on the modes which cannot be set in combination with this mode, see "Unavailable Combination of Functions."
|
|
NOTE
|
|
For information on optional products, see the following:
If [Finishing] is not set, the settings are the same as when [Group (Same Pages)] is set.
You can display the detailed information of the selected paper by pressing
 . . |