Setting the Network
You can register the Advanced Space (Network Place) of another imageRUNNER ADVANCE series machine which is opened with SMB or WebDAV as an external storage location and share the files in the Advanced Space.
|
IMPORTANT
|
|
If you want to connect to the Advanced Space of another imageRUNNER ADVANCE series machine on the network, you must set the Advanced Space of the destination to Open to Public. For instructions on setting the Advanced Space to Open to Public, see "Advanced Space Settings."
Do not register something other than the Advanced Space of another imageRUNNER ADVANCE series machine which is opened externally, as this may cause the machine to malfunction.
|
Setting/Managing the Advanced Space of an External Reference (Network Place)
1.
Press  (Settings/Registration).
 (Settings/Registration).
2.
Press [Function Settings] → [Store/Access Files] → [Network Settings].
3.
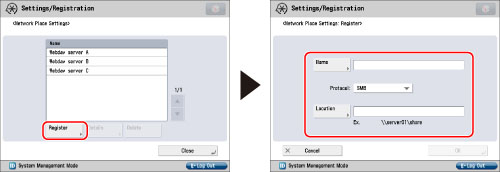
Press [Network Place Settings] → set the Network Place.
To register the Network Place:
Press [Register] → specify each setting.

[Name]:
Enter the name for external reference.
<Protocol:>:
Select [SMB] or [WebDAV] for the protocol.
For SMB: Set [Location] as follows.
Shared Space: \\host name or IP address\share
Personal Space: \\host name or IP address\users
For WebDAV: Set [Host Name] and [Folder Path] as follows.
Shared Space:
[Host Name]: http(s)://host name or IP address
[Folder Path]: /share
Personal Space:
[Host Name]: http(s)://host name or IP address
[Folder Path]: /users
|
NOTE
|
|
For instructions on entering characters, see "Entering Characters from the Touch Panel Display."
|
Press [OK].
To check the details of the Network Place:
Select the external network place to check → press [Details].
Press [OK].
To delete the Network Place:
Select the external network place to delete → press [Delete].
Press [Yes].
Press [Close].
Setting the Protocol for External Reference
You can select the protocol used when accessing the Advanced Space (Network Place) of another imageRUNNER ADVANCE series machine which is opened externally.
1.
Press  (Settings/Registration).
 (Settings/Registration).
2.
Press [Function Settings] → [Store/Access Files] → [Network Settings].
3.
Press [Protocol for External Reference].
4.
Select [On] for the protocol to use → press [OK].
Press [Off] for <SMB> if you do not want to use SMB.
Press [Off] for <WebDAV> if you do not want to use WebDAV.
Press [Off] for <WebDAV> if you do not want to use WebDAV.
Confirming the SSL Server Certificate when Accessing the Network Place
You can confirm whether the SSL server certificate is valid when accessing the Advanced Space (Network Place) of another imageRUNNER ADVANCE series machine.
You can verify the validity of the certificate and reliability of the certificate chain, as well as confirm the CN (Common Name).
1.
Press  (Settings/Registration).
 (Settings/Registration).
2.
Press [Function Settings] → [Store/Access Files] → [Network Settings].
3.
Press [Confirm SSL Certificate for Network Access].
4.
Press [On] → [OK].
Select [Off] if you do not want to confirm the SSL server certificate when accessing the Network Place.
To confirm the CN, press [CN] for <Add Items to Verify>.
|
IMPORTANT
|
|
If you do not verify the certificate, SSL communication is performed, even with an invalid certificate.
|
|
NOTE
|
|
If a certificate error occurs when you try to access the Network Place, you cannot access the Network Place.
If a certificate error occurs when you try to access a folder/file in the Network Place, you cannot access the folder/file.
|