Sending PC Faxes
 |
When <Allow Fax Driver TX> is set to <Off>, you cannot send faxes from computers. You need to enable Department ID Management on the fax driver you are using if Department ID Management is enabled on the machine. For more information, click [Help] on the fax driver screen. Setting the Department ID Management |
1
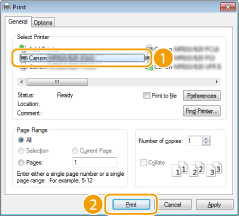
Open a document in an application and display the print dialog box.
How to display the print dialog box differs for each application. For more information, see the instruction manual for the application you are using.
2
Select your fax driver, and click [Print].


When Sending from the Windows Store app in Windows 8/8.1/Server 2012/Server 2012 R2
Follow the procedure below.
Windows 8/Server 2012
Display the charms at the right of the screen, and tap or click [Devices] the fax you are using
  [Print]. When you print in this way, you can only specify settings for some of the print functions.
Windows 8.1/Server 2012 R2
Display the charms at the right of the screen, and tap or click [Devices] [Print]
  the fax you are using
  [Print]. When you print in this way, you can only specify settings for some of the print functions.
Windows 8/Server 2012
Display the charms at the right of the screen, and tap or click [Devices]
 the fax you are using
  [Print]. When you print in this way, you can only specify settings for some of the print functions.
Windows 8.1/Server 2012 R2
Display the charms at the right of the screen, and tap or click [Devices]
 [Print]
  the fax you are using
  [Print]. When you print in this way, you can only specify settings for some of the print functions.
If the message [The printer requires your attention. Go to the desktop to take care of it.] is displayed, move to the desktop and proceed to step 3. This message appears when the machine is set to display the user name during printing and similar instances.
3
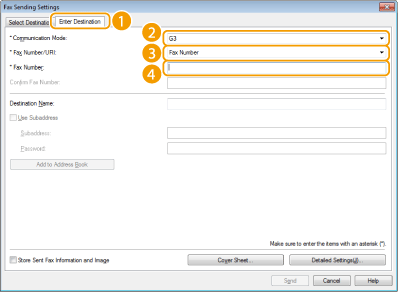
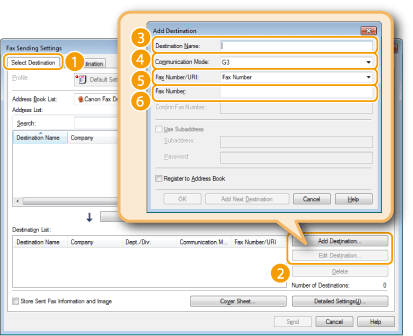
Specify the destination.
 Specifying one destination

 Specifying several destinations

If you need to specify a number to dial an outside line, select [Detailed Settings]  [Add Outside Dialing Prefix to G3/IP Fax Number] and enter the number in [Outside Dialing Prefix]. The specified number is added to the beginning of the fax number when the machine dials.
 [Add Outside Dialing Prefix to G3/IP Fax Number] and enter the number in [Outside Dialing Prefix]. The specified number is added to the beginning of the fax number when the machine dials.
To make it easier to specify destinations using the Address Book, see Using Registered Destinations.
Selecting [Store Sent Fax Information and Image] enables you to store the logs for sending documents and check detailed information of a sent document along with its image, including destinations and number of pages. For more information, click [Help] on the fax driver screen.

If you have selected [Confirm Fax Number/URI when Setting Destination] in the dialog box that is displayed when [Security Settings] of the [Special] tab is clicked, Enter [Confirm Fax Number]/[Confirm URI]. For more information, click [Help] on the fax driver screen.
4
Attach a cover sheet to the document as necessary. Attaching Cover Sheets to PC Faxes
5
Click [Send] to send the document.