Attaching Cover Sheets to PC Faxes
You can attach a cover sheet to the document you are sending. Select a cover sheet from three preset cover sheets in the fax driver, or create your own custom cover sheets. For more information, click [Help] on the fax driver screen.
1
Open a document in an application and display the print dialog box.
How to display the print dialog box differs for each application. For more information, see the instruction manual for the application you are using.
2
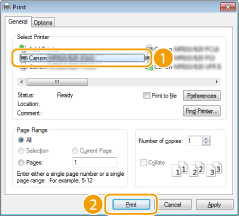
Select your fax driver, and click [Print].
3
Click the [Cover Sheet] and specify each setting.
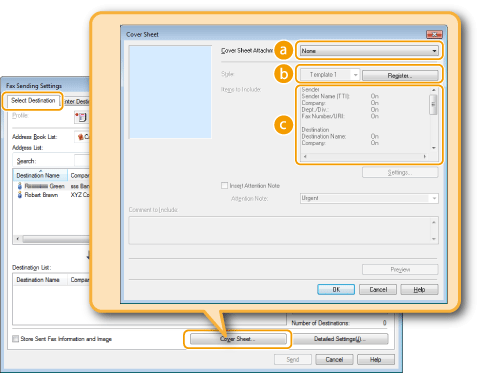
 [Cover Sheet Attachment]
Select [Different Sheet to Each Destination] or [Same Sheet to All Destinations].
 [Style]
Select a cover sheet from the three preset cover sheets (Template 1 to 3). The layout of the selected cover sheet is displayed in the image on the left.
 [Items to Include]
Displays items that are to be included on a cover sheet. To change the items to be included, click [Settings].

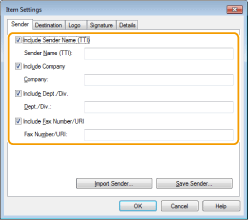
 [Sender] tab
Select the sender items you want to include and enter the information.
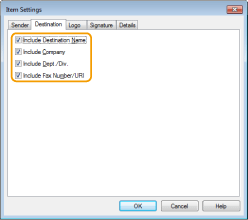
 [Destination] tab
Select the destination items you want to include and enter the information. Destination names, company names, department names, and fax numbers specified in the [Select Destination]/[Enter Destination] tab (Sending PC Faxes) are included on the cover sheet.
 [Logo] tab/[Signature] tab
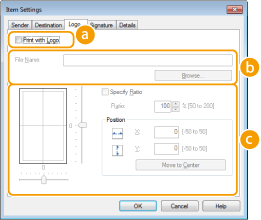
Specify each setting. The following screen shows an example for when the [Logo] tab is selected.
 With/without logos or signatures
Select [Print with Logo] or [Print with Signature] if you want to include logos or signatures on the cover sheet. Have the bitmap files for logos or signatures ready beforehand.
 Location of logos or signature files
Specify the location where logos or signatures files are saved. Click [Browse] to locate the file you are using for logos or signatures.
 Size and position of the specified logos or signatures
Adjust the size and position of the specified logos or signatures while checking the image displayed on the left.
 [Details] tab
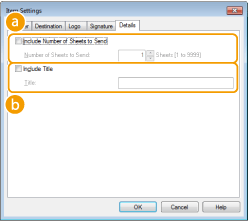
 [Include Number of Sheets to Send]
Select this check box if you want to include the number of sheets that you are going to send in the cover sheet and specify the number of sheets in [Number of Sheets to Send]. The number of sheets to send is not counted automatically. The value specified here is included in the cover sheet.
 [Include Title]
Select this check box if you want to add a title to the cover sheet and enter the title in [Title].
4
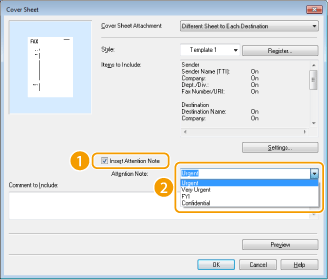
If you want to insert an attention note, select [Insert Attention Note] and select a note from the [Attention Note] drop-down list.
Attention notes such as "Urgent" and "Confidential" are available. You can also enter characters directly in [Attention Note] instead of selecting a note from the list.
You can also add comments in [Comment to Include].
5
Click [Preview] to check the contents of the cover sheet, and if everything is correct, click [OK].
To modify the contents, perform the steps from 3 again.
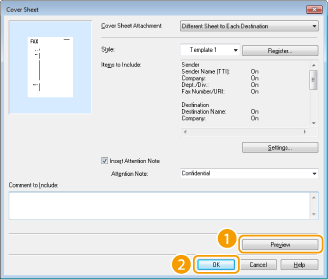
The specified cover sheet is attached to the fax when the fax is sent.