Scanning Using the WIA Driver (Windows XP/Vista/7/8 Only)
|
Before scanning with the WIA driver, see "Attention (WIA Driver)."
|
This section describes how to scan documents with the WIA driver.
You can specify detailed settings for each scan.
Scanning from the [Scanner and Camera Wizard] dialog box (Windows XP only)
1
Place documents.
|
NOTE
|
When scanning from the platen glassScanning multiple pages is not available when scanning from the platen glass.
|
2
Press [ ].
].
 ].
].
3
Select <Remote Scanner> using [ ] or [
 ] and press [OK].
 ] or [
 ] and press [OK].
The machine is now waiting to be scanned.


4
Open the [Scanners and Cameras] folder.
5
Double-click the WIA driver icon.
6
Click [Next].
7
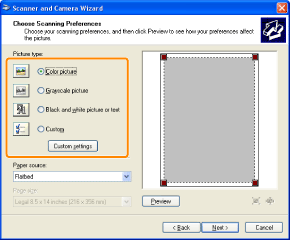
Select a picture type.
[Color picture]
[Grayscale picture]
[Black and white picture or text]
[Custom]
Click [Custom settings] to make detailed settings in the [Properties] dialog box.
Click [Custom settings] to make detailed settings in the [Properties] dialog box.
8
Select a feeding method.
[Flatbed] (platen glass)
[Document Feeder] (feeder)
9
Specify the scanning area.
If you selected [Flatbed] as the paper source
Click [Preview] and drag [ ] to specify the scanning area.
 ] to specify the scanning area.
When [Document Feeder] is selected
Select a document size from the drop-down menu.
10
Click [Next].
11
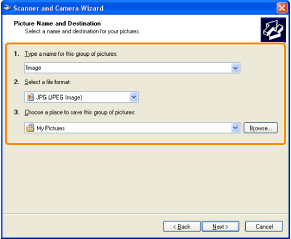
Specify a name, file format, and location for saving the group of pictures.
Select one of the following file formats.
[BMP (Bitmap Image)]
[JPG (JPEG Image)]
[TIF (TIF Image)]
[PNG (PNG Image)]
12
Click [Next].
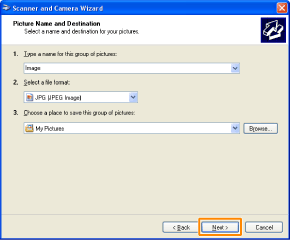
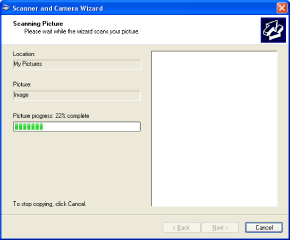
Scanning starts.
13
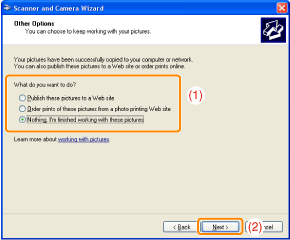
Select an item and click [Next].
14
Click [Finish].
Scanning from the [Windows Fax and Scan] dialog box (Windows Vista/7/8 only)
You may not be able to use the function depending on the edition of Windows Vista/7/8 you are using.
1
Place documents.
|
NOTE
|
When scanning from the platen glassScanning multiple pages is not available when scanning from the platen glass.
|
2
Press [ ].
].
 ].
].
3
Select <Remote Scanner> using [ ] or [
 ] and press [OK].
 ] or [
 ] and press [OK].
The machine is now waiting to be scanned.


4
Open the [Windows Fax and Scan] dialog box.
5
Click [New Scan] on the toolbar.
6
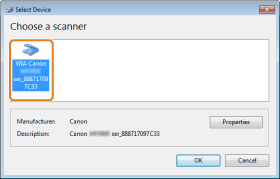
When the following screen appears, double-click the scanner icon.
7
Specify the settings for scanning.
For details, see "[New Scan] Dialog Box."
8
Click [Scan].
Scanning from Windows Live Photo Gallery (Windows Photo Gallery)
1
Place documents.
|
NOTE
|
When scanning from the platen glassScanning multiple pages is not available when scanning from the platen glass.
|
2
Press [ ].
].
 ].
].
3
Select <Remote Scanner> using [ ] or [
 ] and press [OK].
 ] or [
 ] and press [OK].
The machine is now waiting to be scanned.


4
Start [Windows Live Photo Gallery] (or [Windows Photo Gallery]).
For [Windows Live Photo Gallery]
From the [Start] menu, select [All Programs] -> [Windows Live] -> [Windows Live Photo Gallery].
For [Windows Photo Gallery]
From the [Start] menu, select [All Programs] -> [Windows Photo Gallery].
5
Open the [Import Pictures and Videos] dialog box.
From the [File] menu, select [Import from camera or scanner].
6
Double-click the scanner driver icon.
The next step to take differs depending on the operating system of your computer. Refer below and proceed to the step appropriate for your operating system.
For Windows XP
For details, see the step 6 to step 14 in "Scanning from the [Scanner and Camera Wizard] dialog box (Windows XP only)."
For Windows Vista/7/8
Proceed to the step 7.
Specify the settings for scanning.
For details, see "[New Scan] Dialog Box."
8
Click [Scan].
9
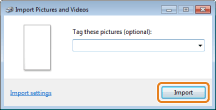
Click [Import].
[Tag these pictures (optional)]
You can classify the scanned image by entering in a tag.
You can classify the scanned image by entering in a tag.
Scanning from an application
Follow the procedures below when the WIA driver is displayed. For details on displaying the WIA driver, see the following.
1
Place documents.
|
NOTE
|
When scanning from the platen glassScanning multiple pages is not available when scanning from the platen glass.
|
2
Press [ ].
].
 ].
].
3
Select <Remote Scanner> using [ ] or [
 ] and press [OK].
 ] or [
 ] and press [OK].
The machine is now waiting to be scanned.


4
Select a feeding method.
[Flatbed] (platen glass)
[Document Feeder] (feeder)
5
Select a picture type.
Select the type from the following settings.
[Color picture]
[Grayscale picture]
[Black and white picture or text]
[Custom settings]
6
Click [Adjust the quality of the scanned picture] if necessary.
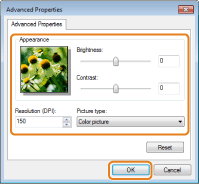
The [Advanced Properties] dialog box appears.
7
Adjust the quality of the image and click [OK].
|
[Appearance]
|
A sample image is displayed.
|
|||||||||
|
[Brightness]
|
Specify the brightness (-127 to 127).
|
|||||||||
|
[Contrast]
|
Specify the contrast (-127 to 127) (for color and grayscale scanning only).
|
|||||||||
|
[Resolution (DPI)]
|
|
|||||||||
|
[Picture type]
|
Specify a color format ([Color picture], [Grayscale picture], or [Black and white picture or text]).
|
|||||||||
|
[Reset]
|
Reset all the current settings to their default values.
|
|||||||||
|
NOTE
|
The setting items and their default values in the [Advanced Properties] tabThey will vary depending on the selected image type.
|
8
Specify the scanning area.
If you selected [Flatbed] as the paper source
Click [Preview] and drag [ ] to specify the scanning area.
 ] to specify the scanning area.
When [Document Feeder] is selected
Select the original document size from the drop-down menu.
9
Click [Scan].