Scanning Fundamentals (File Server)
Sending scanned documents to a file server.
This section describes the basic procedure.
1
Place documents.
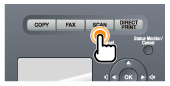
2
Press [ ].
].
].
3
Select <Windows (SMB)> using [ ] or [
 ] and press [OK].
] or [] and press [OK].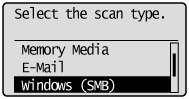
4
Specify the destination.
Specify destinations in the following ways.
by selecting a one-touch key
by selecting a coded dial code
from the Address book
5
Specify the scan settings based on your purpose of the scan.
The following settings can be changed.
Scan size
Color Mode
File Format
Density
Original orientation
Original Type
2-Sided Original
Sharpness
Data Size
The settings specified here are effective only for the current task. To make the settings effective for all send operations, see "Changing the Default Settings for Sending to a File Server."
6
Press [ ] (Start).
] (Start).Scanning starts.
When scanning from the feeder, or set the <File Format> to <JPEG>After scanning the document, the scanned data is sent to the USB memory.
When scanning from the platen glass, or set the <File Format> to other than <JPEG>Proceed to Step 7.
|
To continuously scan the document, press [] (Start).
] (Start).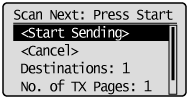
To Cancel the scan
|
(1)
|
Select <Cancel> with [
] or [], and then press [OK]. |
|
(2)
|
Select <Yes> with [
] or [], and then press [OK]. |
To confirm the destination
|
(1)
|
Select <Destinations: > with [
] or [], and then press [OK]. |
To confirm the number of transferred pages
|
(1)
|
Select <No. of TX Pages> with [
] or [], and then press [OK]. |
8
Select <Start Sending> with [] or [], and then press [OK].
] or [], and then press [OK].The scanned file is sent.