How to Save to a File Server (A Shared File Server)
Specify how to save documents to a file server using the Send Setup Utility. The settings are registered in one-touch keys.
|
IMPORTANT
|
If a Shared Folder Has Not Been SetIn order to send data to shared folders on the network from the machine, it is necessary to set up shared folders on the computer (file server) side where the data will be sent, not just using settings on the machine side. See the Send Setting Guide for shared folder settings.
|
|
NOTE
|
Note that the settings are registered in one-touch keys.The settings are registered in one-touch keys. Check that there is an unregistered one-touch key before specifying the settings.
Check the following information.The name of the computer with shared folders and the paths and folder names of shared folders are required.
If access restrictions are set, the user name and password that were used are also required.
|
1
Activate the Send Setup Utility.
2
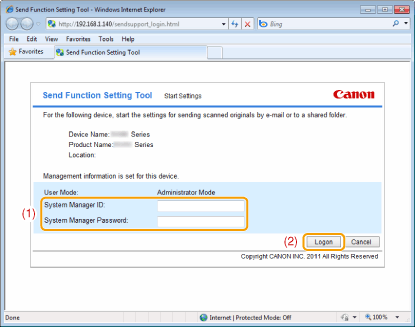
Log on to the Send Setup Utility.
|
(1)
|
Enter [System Manager ID] and [System Manager Password].
|
|
(2)
|
Click [Logon].
 |
3
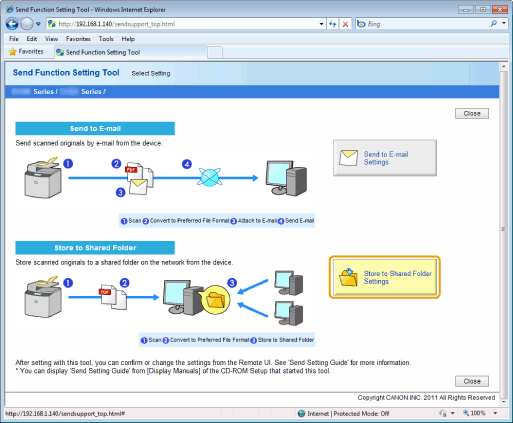
Click [Store to Shared Folder Settings].
4
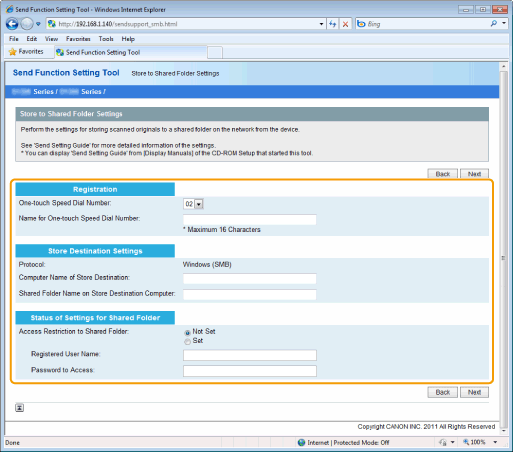
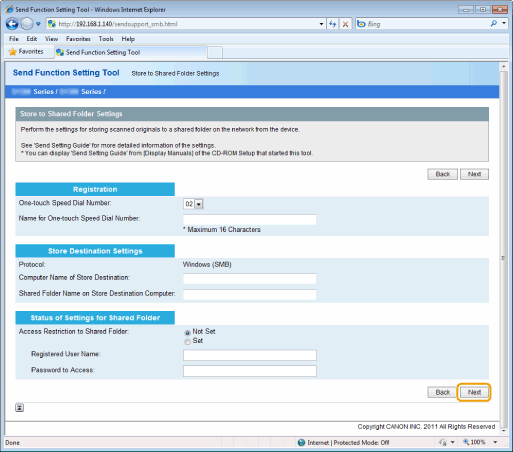
Register the file server that you use.
|
[One-touch Speed Dial Number]
|
From the drop-down list, select the One-touch Speed Dial number you want to register.
|
||
|
[Name for One-touch Speed Dial Number]
|
Enter the registered name of the one-touch key.
|
||
|
[Computer Name of Store Destination]
|
Enter the name or the IP address of the computer where the shared folder is located.
|
||
|
[Shared Folder Name on Store Destination Computer]
|
Enter the shared name.
|
||
|
[Access Restriction to Shared Folder]
|
Select the [Set] or [Not Set] check box based on the access restrictions of the shared folder.
|
||
|
[Registered User Name]
|
When [Set] is selected for [Access Restriction to Shared Folder], enter the user name.
|
||
|
[Password to Access]
|
When [Set] is selected for [Access Restriction to Shared Folder], enter the password.
|
5
Click [Next].
6
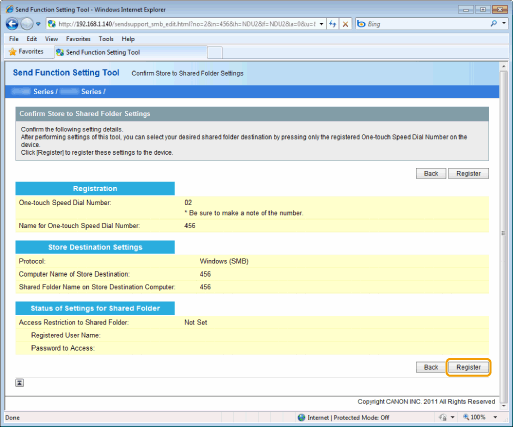
Make sure the settings and click [Register].
