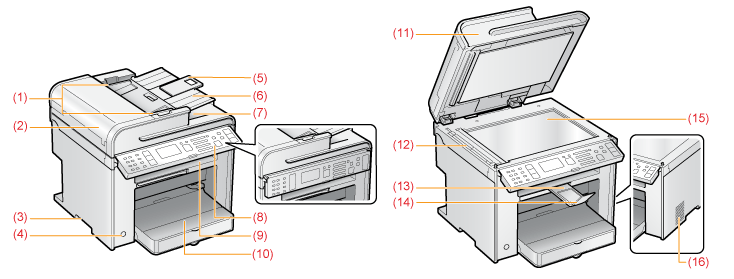
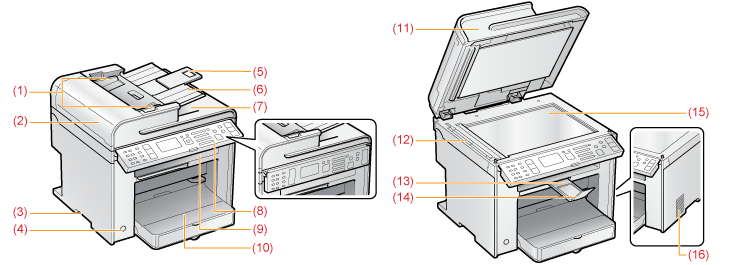
Front Side
MF4890dw

MF4880dw/MF4770n

|
(1)
|
Document guides
Adjust these guides to fit the document.
|
|
(2)
|
Feeder cover
Open the cover to clear paper jams.
|
|
(3)
|
Lift handles
Hold the handle to lift or transport the machine.
|
|
(4)
|
Power button
Turns the power ON or OFF.
|
|
(5)
|
Tray extension
Pull out to load large size documents.
|
|
(6)
|
Document feeder tray
Place your documents in this tray to scan documents.
|
|
(7)
|
Document return tray
Documents are sent after they are scanned by the feeder.
|
|
(8)
|
Operation panel
Control the machine using this panel. You can adjust the position of the operation panel.
|
|
(9)
|
Output tray
Copies, printed documents, and faxes are output here.
|
|
(10)
|
Paper cassette
Load paper here.
|
|
(11)
|
Feeder
Use the feeder to scan documents automatically.
|
|
(12)
|
Scanning area
Scans documents from the feeder.
|
|
(13)
|
Output tray extension
Extend the tray for large size paper.
|
|
(14)
|
Paper stopper
Pull out the paper stopper to prevent the paper from falling out of the output tray.
|
|
(15)
|
Platen glass
Place a document here.
|
|
(16)
|
Ventilation slots (MF4890dw/MF4880dw only)
Allows inside of the machine to cool down.
Leave enough space around the machine to allow heat to escape sufficiently.
|