Using the Simple Mode

Scanning using the simple mode
1
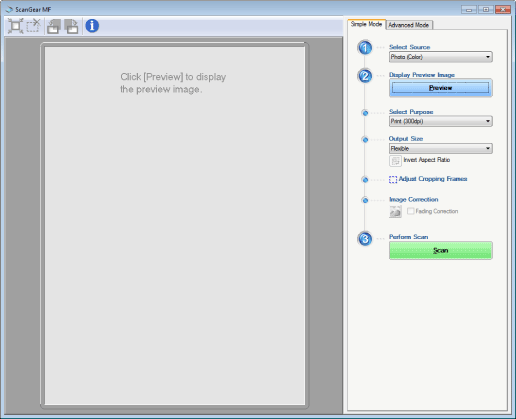
Display the ScanGear MF.
Start the ScanGear MF using one of the following methods.
Selecting [Display the Scanner Driver] in the MF Toolbox
Starting from an application
2
Select a document type in [Select Source].
If you select [Document (Color) ADF] or [Document (Grayscale) ADF], proceed to step 4.
When selecting a document type other than [Newspaper (B&W)], the automatic color correction function is activated. For details on how to cancel the function, see "Using the Advanced Mode."
|
[Photo (Color)]
|
Select when scanning color photos.
|
|
[Magazine (Color)]
|
Select when scanning color magazines. (with the Descreen function)
|
|
[Newspaper (B&W)]
|
Select when scanning text and line drawings.
|
|
[Document (Grayscale)]
|
Select when scanning color photos or text in monochrome. It is appropriate for scanning high-resolution monochrome images.
|
|
[Document (Color) ADF]
|
Select when scanning color documents on the feeder.
|
|
[Document (Grayscale) ADF]
|
Select when scanning grayscale documents on the feeder.
|
3
Click [Preview].
The preview image is displayed.
 |
The document loaded in the feeder cannot be previewed.
|
Select a purpose for the scanned image in [Select Purpose].
[Print (300dpi)]
[Image Display (150dpi)]
[OCR (300dpi)]
5
Select an output size of the scanned image.
The options you can select vary depending on what you selected in step 4.
Click [ ] to change the layout orientation (landscape or portrait).
 ] to change the layout orientation (landscape or portrait).
6
Adjust the cropping frames as needed.
7
Select [Fading Correction] as needed.
[Fading Correction] can be selected only when color documents are scanned.
[Fading Correction] cannot be specified when the preview image is not displayed.
8
Click [Scan].
Simple mode toolbar

|
[
 ] (Auto Crop) ] (Auto Crop) |
Specifies the cropping area of the image automatically. For details, see the following.
|
|
[
 ] (Remove Cropping Frame) ] (Remove Cropping Frame) |
Deletes the selected cropping frames.
|
|
[
 ] (Left Rotate) ] (Left Rotate) |
Rotates the image 90 degrees in the left.
|
|
[
 ] (Right Rotate) ] (Right Rotate) |
Rotates the image 90 degrees in the right.
|
|
[
 ] (Information) ] (Information) |
Displays the information of the scanned image.
|
Adding/Deleting the output size
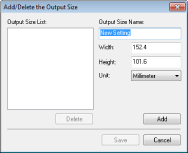
Selecting [Add/Delete] in [Output Size] displays the [Add/Delete the Output Size] dialog box. This dialog box enables you to add and delete the custom output size.

|
[Output Size List]
|
Displays the registered output size name.
|
|
[Output Size Name]
|
Enter the output size name you want to register.
|
|
[Width]
|
Specifies the width of the output size.
|
|
[Height]
|
Specifies the height of the output size.
|
|
[Unit]
|
Selects the unit of measurement for the output size.
|
|
[Add]
|
Adds the specified output size to [Output Size List].
|
|
[Delete]
|
Deletes the selected output size from [Output Size List].
|
|
[Save]
|
Saves the registered settings.
|