Replacing the Toner Cartridge
|
See "Attention (Replacing the Toner Cartridge)" in advance.
|
|
NOTE
|
Checking the toner level:You can check the level of remain toner on the operation panel.
|
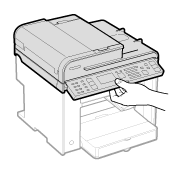
1
Hold the operation panel.
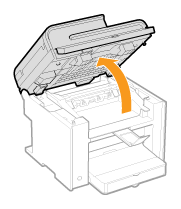
2
Lift the scanning platform.
|
|
||
|
Ensure that the feeder is completely closed.
Do not try to forcefully lift the scanning platform, as this may damage the machine.
|

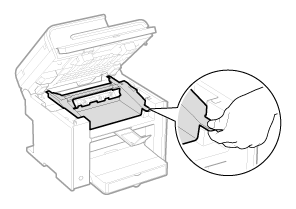
3
Hold the grip on the right front side of the toner cover.
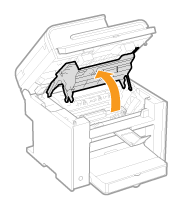
4
Open the toner cover.
5
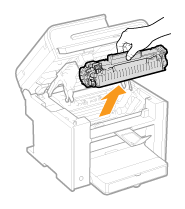
Remove the toner cartridge.
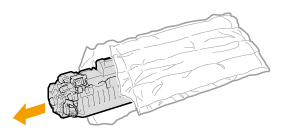
6
Take out the new toner cartridge from the protective bag.
You can open the protective bag with your hands from the notch.
|
※
|
Store the protective bag. It is required when you remove the toner cartridge for the machine maintenance or other purposes.
|
7
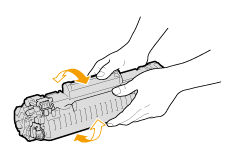
Gently shake the toner cartridge five or six times to evenly distribute the toner.
8
Place the toner cartridge on a flat surface.
9
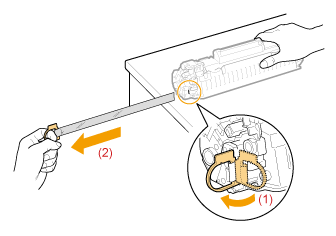
Lift the tab, and then pull the sealing tape completely out (approximately 20" (50 cm)).
|
IMPORTANT
|
When pulling out the sealing tape:Do not pull the sealing tape at an angle or up and down. If the tape breaks, it may not be pulled out completely.
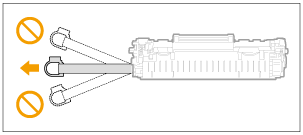 Even if the sealing tape stops at midpoint, pull it out of the toner cartridge completely.
If any tape remains in the toner cartridge, this may result in poor print quality. If you are using the Fax, please note that you can only print the received data once, because the received data is deleted once it is printed.
|
Disposing of the removed sealing tape:Dispose of the sealing tape according to local regulations.
|
10
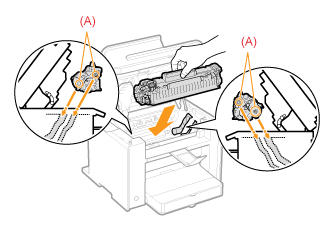
Insert the toner cartridge.
Fit the protrusions (A) on each side of the toner cartridge into the guides located on each side of the machine. Slide the toner cartridge into the machine, until the toner cartridge meets the back of the machine.
11
Close the toner cover.
 If you cannot close the toner cover: If you cannot close the toner cover:Make sure that the toner cartridge is properly installed in the machine.
Do not try to forcefully close the toner cover, as this may damage the machine.
|
12
Lower the scanning platform.