Basic Procedures for Sending Faxes
1
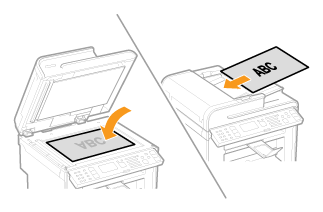
Place your fax.

MF4890dw
Up to 50 documents can be loaded into the feeder.
MF4870dn/MF4750
Up to 35 documents can be loaded into the feeder.
2
Press [ ] (FAX).
 ] (FAX).
3
Specify the scanning settings as needed.

The settings specified here are effective only for the current sending operation. To make the settings effective for all the fax operations, see "Changing the Default Fax Settings."
4
Specify the destination.
Specify destinations in the following ways:
by entering the fax number
by selecting a one-touch key
by selecting a coded dialing code
by selecting a group address
from the Address book
under sequential broadcasting
When the destination confirmation screen is displayed:
After confirming details of the destination, press [OK] to proceed to the next step.
 |
 |
 |
 |
If <One-Touch/Coded Dial TX Confirmation> is set to <On> and the destination is specified by One-Touch keys or Coded dialing codes, the screen is displayed.
|
5
Press [ ] (Start).
 ] (Start).
When your fax is placed in the feeder:
The scan starts. Your fax is sent to the destination when the scan is complete.
When your fax is placed on the platen glass:
Perform the following procedure.
|
(1)
|
Press [
 ] or [ ] or [ ] to highlight the size of the original document, and then press [OK]. ] to highlight the size of the original document, and then press [OK]. |
|
(2)
|
Place the next page on the platen glass, and then press [
 ] (Start). ] (Start).Press [
 ] (Start) for each page. ] (Start) for each page. |
|
(3)
|
When all documents are scanned completely, press [
 ] or [ ] or [ ] to highlight <Start Sending>, and then press [OK]. ] to highlight <Start Sending>, and then press [OK].Your fax is sent to the destination.
|