Starting the Remote UI
There are the following two ways to start the Remote UI.
|
Before starting the Remote UI, see "Attention (Remote UI)."
|
Starting the Remote UI from the Printer Status Window
1
Click [  ] in the Windows taskbar, and then select the printer name.
 ] in the Windows taskbar, and then select the printer name.
2
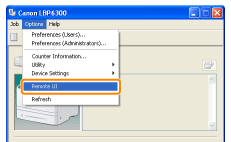
Select [Remote UI] from the [Options] menu.

 If you cannot select [Remote UI] If you cannot select [Remote UI]
|
3
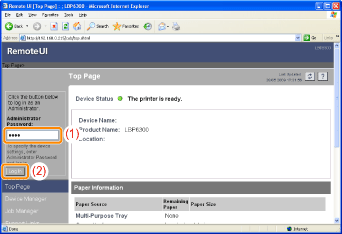
Log in as Administrator as needed.
By logging in as Administrator, you can perform all the operations and settings of the Remote UI.
|
(1)
|
Enter a password in [Administrator Password].
|
||
|
(2)
|
Click [Log In].
|

Starting the Remote UI Directly from a Web Browser
1
Start the Web browser.
2
Enter "http://<the IP address of the printer>/" in the address field, and then press the [ENTER] key on your keyboard.
Input Example: "http://192.168.0.215/"
 |
If the host name of the printer is registered in the DNS server, you can enter ["host name"."domain name"] instead of the IP address.
Input Example: "http://my_printer.xy_dept.company.com/"
|

 If the Remote UI does not start If the Remote UI does not start
|
3
Log in as Administrator as needed.
By logging in as Administrator, you can perform all the operations and settings of the Remote UI.
|
(1)
|
Enter a password in [Administrator Password].
|
||
|
(2)
|
Click [Log In].
|


 "
"