Registering the Paper Size and Type
This printer's paper drawer cannot automatically detect the paper size and type. Therefore, you need to register the size and type of the loaded paper.
Register the paper size and type using the following procedure.
|
NOTE
|
When registering a paper size and typeAs you cannot register a paper size and type while printing is in progress, make sure that the printer is idle before registering the paper size and type.
You can register paper size and type only while one of the following messages is displayed.
<Specified Paper Different from Set Paper>
<Out of Paper>
|
1
Click [  ] in the Windows task tray, and then select the printer name.
 ] in the Windows task tray, and then select the printer name.
2
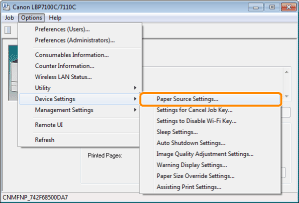
From the [Options] menu, select [Device Settings] → [Paper Source Settings].

3
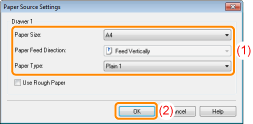
Register the paper size and type.
|
(1)
|
Specify the size and type of the paper loaded in the paper drawer.
|
|
(2)
|
Click [OK].
|

|
[Paper Size]
|
Select the size of the paper loaded in the paper drawer.
|
||
|
[Paper Feed Direction]
|
Select the feed direction (orientation) of paper loaded in the paper drawer when using A5, Statement, or custom size paper.
|
||
|
[Paper Type]
|
Select the type of the paper loaded in the paper drawer.
|
|
For details on the basic printing procedure, see "Basic Printing Procedure."
|

