Registering a Custom Paper Size
1
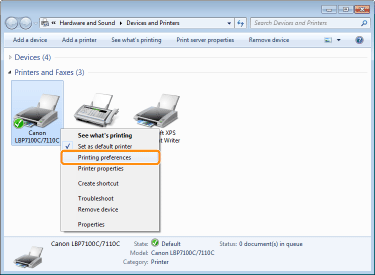
Open the printer folder.
2
Right-click the icon for this printer, then select [Printing Preferences] from the pop-up menu.

3
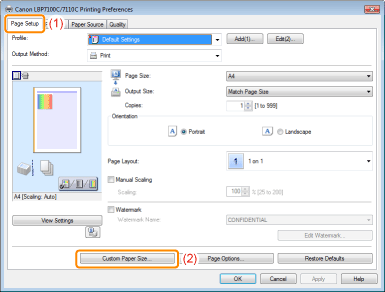
Display the [Custom Paper Size Settings] dialog box.
|
(1)
|
Display the [Page Setup] sheet.
|
|
(2)
|
Click [Custom Paper Size].
|

4
Specify the custom paper size.

|
[Name of Custom Paper Size]
|
Enter the name of the custom paper size to be added. You can enter up to 31 characters.
|
|
[Unit]
|
Select the unit to be used when setting the custom paper size.
|
|
[Paper Size]
|
Specify the height and width of the custom paper size ([Height]
 [Width]). [Width]). Specify the custom paper size in portrait orientation ([Height]  [Width]) within user-definable sizes. [Width]) within user-definable sizes. |
5
Register the custom paper size.
|
(1)
|
Click [Register].
|
||
|
(2)
|
Confirm that the registered custom paper size is added to [Paper List].
|
||
|
(3)
|
Click [OK].
|

|
For details on the basic printing procedure, see "Basic Printing Procedure."
|
