Restricting the Users Who Can Print and Specify Settings
You can restrict the users who can print and specify settings (the users who can send/receive data) based on their IP addresses and MAC addresses.
|
NOTE
|
If restricted users try to printThe message <Network Communication Error> appears in the Printer Status Window.
|
Restricting Based on IP Addresses
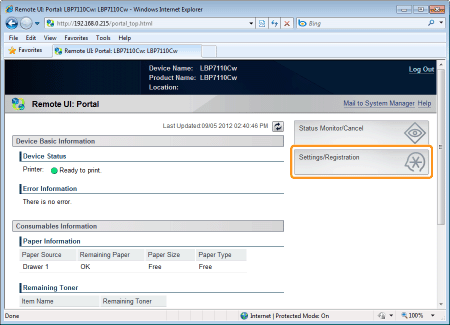
1
Start the Remote UI, and then log in as Management Mode.
2
Click [Settings/Registration].
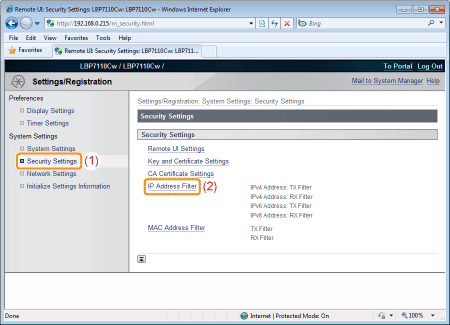
3
Display the [IP Address Filter] page.
|
(1)
|
Select [Security Settings].
|
|
(2)
|
Click [IP Address Filter].
|
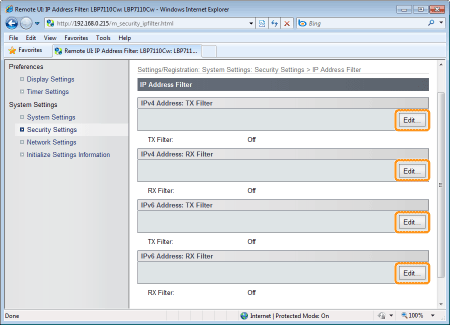
4
Click [Edit] in the filter which you want to specify.
|
[IPv4 Address: TX Filter]
|
Restricts data transmission from the printer based on the specified IPv4 addresses.
|
|
[IPv4 Address: RX Filter]
|
Restricts data reception to the printer based on the specified IPv4 addresses.
|
|
[IPv6 Address: TX Filter]
|
Restricts data transmission from the printer based on the specified IPv6 addresses.
|
|
[IPv6 Address: RX Filter]
|
Restricts data reception to the printer based on the specified IPv6 addresses.
|
(The following describes the procedure for the [IPv4 Address: TX Filter] screen as an example.)
5
Select the [Use Filter] check box.
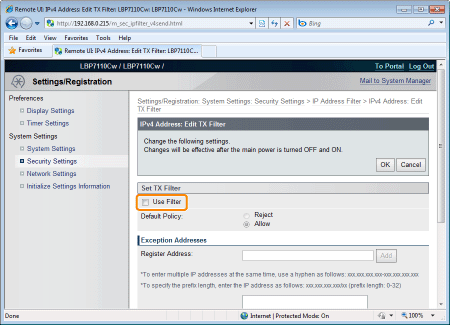
6
Select [Default Policy].
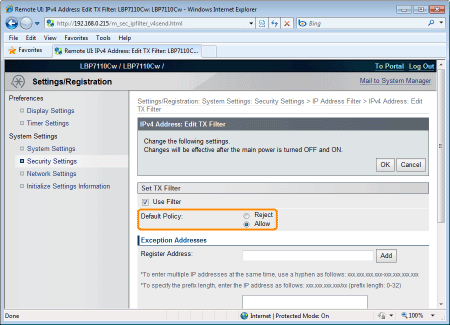
|
[Reject]
|
Restricts data transmission to or data reception from IP addresses other than those specified in [Exception Addresses].
(Only the IP addresses specified in [Exception Addresses] are available for transmission or reception.)
|
|
[Allow]
|
Allows data transmission to or data reception from IP addresses other than those specified in [Exception Addresses].
(Only the IP addresses specified in [Exception Addresses] are restricted.)
|
7
Specify the exception IP address for [Default Policy].
|
(1)
|
Enter the exception IP address for the policy selected in [Default Policy] at Step 6.
|
|
(2)
|
Click [Add].
|

<Method for entering IPv4 addresses>
|
Specification Method
|
Input Method
|
Input Example
|
|
Single Address
|
Enter the IP address, with the numbers separated by periods (.).
|
192.168.0.10
|
|
Multiple Addresses
|
To enter the IP addresses of consecutive numbers, place a hyphen (-) between the address of the smallest number and that of the largest number.
This setting specifies the range of IP addresses to be excepted.
This setting is useful when you want to specify a series of addresses at a time.
|
192.168.0.10-192.168.0.20
|
|
Prefix Address
|
To specify with a prefix (0 to 32), place a slash (/) between the prefix address and the prefix length.
This setting specifies the prefix to be excepted.
This setting is useful when you want to specify addresses having the same prefix at a time.
|
192.168.0.10/24
|
 |
Up to 16 addresses (or 16 ranges of addresses) can be specified for the single address, multiple addresses, and prefix address combined.
|
|
|
An address consisting of only zeros cannot be specified.
|
<Method for entering IPv6 addresses>
|
Specification Method
|
Input Method
|
Input Example
|
|
Single Address
|
Enter the IP address, with the alphanumeric characters separated by a colon (:).
|
fe80::10
|
|
Multiple Addresses
|
To enter the IP addresses of consecutive numbers, place a hyphen (-) between the address of the smallest number and that of the largest number.
This setting specifies the range of IP addresses to be excepted.
This setting is useful when you want to specify a series of addresses at a time.
|
fe80::10-fe80::20
|
|
Prefix Address
|
To specify with a prefix (0 to 128), place a slash (/) between the prefix address and the prefix length.
This setting specifies the prefix to be excepted.
This setting is useful when you want to specify addresses having the same prefix at a time.
|
fe80::10/64
|
|
|
Up to 16 addresses (or 16 ranges of addresses) can be specified for the single address, multiple addresses, and prefix address combined.
|
|
|
An address consisting of only zeros cannot be specified.
|
|
NOTE
|
||||
When deleting a set IP address
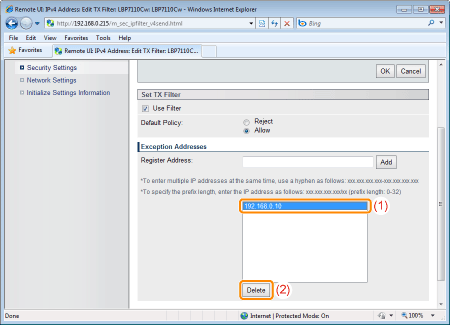 |
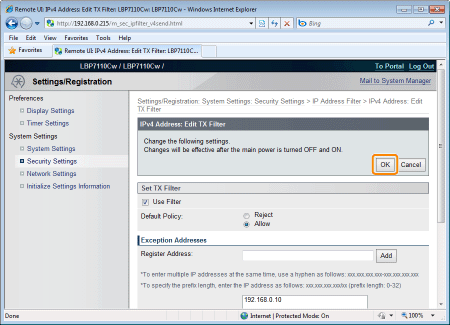
8
Click [OK].
9
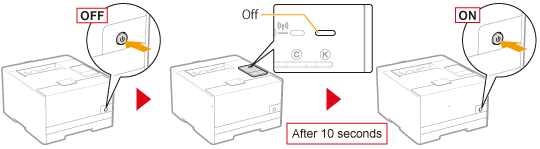
Restart the printer.
Turn the printer OFF, make sure that the Main Power indicator is off, wait for 10 seconds or longer, and then turn it ON again.
|
→
|
After the printer is restarted, the settings become effective.
|
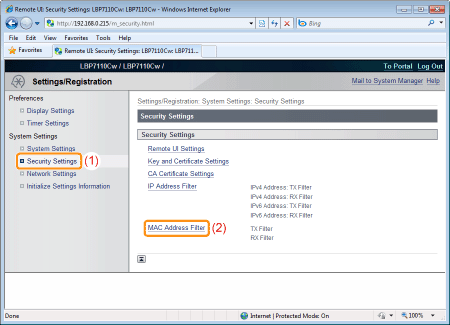
Restricting Based on MAC Addresses
1
Start the Remote UI, and then log in as Management Mode.
2
Click [Settings/Registration].
3
Display the [MAC Address Filter] page.
|
(1)
|
Select [Security Settings].
|
|
(2)
|
Click [MAC Address Filter].
|
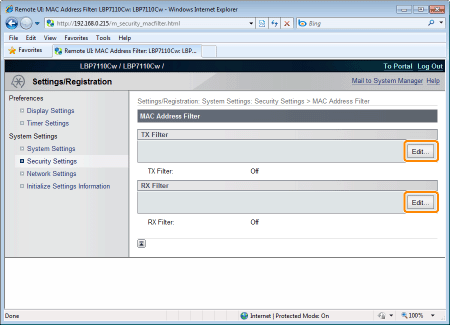
4
Click [Edit] in the filter which you want to specify.
|
[TX Filter]
|
Restricts data transmission from the printer.
|
|
[RX Filter]
|
Restricts data reception to the printer.
|
(The following describes the procedure for the [TX Filter] screen as an example.)
5
Select the [Use Filter] check box.
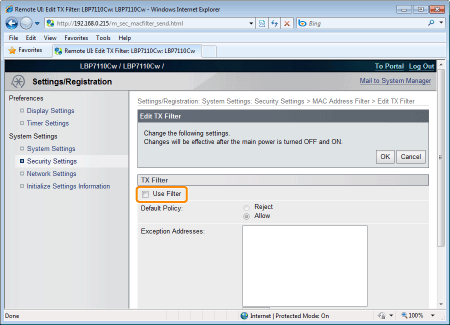
6
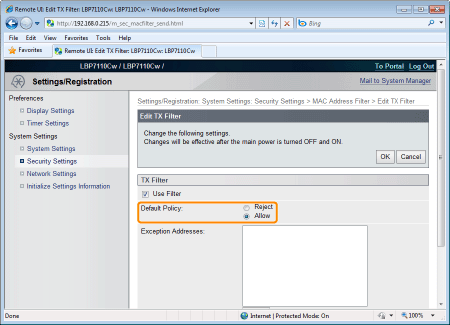
Select [Default Policy].
|
[Reject]
|
Restricts data transmission to or data reception from MAC addresses other than those specified in [Exception Addresses].
(Only the MAC addresses specified in [Exception Addresses] are available for transmission or reception.)
|
|
[Allow]
|
Allows data transmission to or data reception from MAC addresses other than those specified in [Exception Addresses].
(Only the MAC addresses specified in [Exception Addresses] are restricted.)
|
|
IMPORTANT
|
||
When selecting [Reject]You cannot access from a MAC address not set in [Exception Addresses]. Therefore, confirm the MAC address when entering it.
|
7
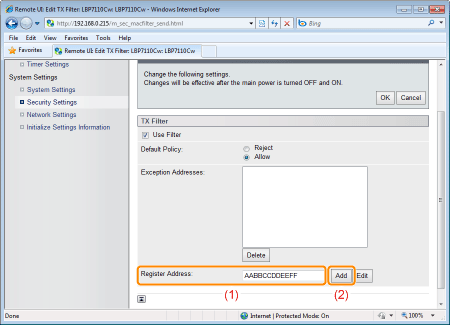
Specify the exception MAC address for [Default Policy].
|
(1)
|
Enter the exception MAC address for the policy selected in [Default Policy] at Step 6.
|
||
|
(2)
|
Click [Add].
|
|
NOTE
|
||||
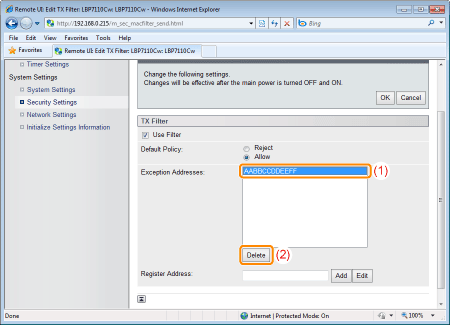
When deleting a set MAC address
 |
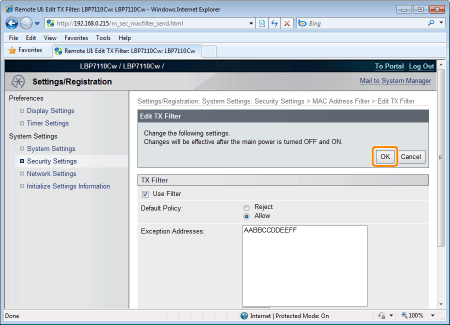
8
Click [OK].
9
Restart the printer.
Turn the printer OFF, make sure that the Main Power indicator is off, wait for 10 seconds or longer, and then turn it ON again.
|
→
|
After the printer is restarted, the settings become effective.
|