Uninstalling the USB Class Driver
Uninstall the USB class driver under the following circumstances.
If the printer driver installed using a USB connection cannot be uninstalled properly
If you cannot install the printer driver properly even after reinstalling it

When uninstalling the USB class driver, be sure to perform the following procedure.
 |
If the printer driver could not be installed properly, be sure to uninstall the printer driver before deleting the USB class driver.
|
|
|
If you delete the USB class driver, it is automatically installed again by USB connection.
|
|
|
Deleting the USB class driver is not supported for Macintosh.
|
1
Check the following.
The printer and computer are connected using a USB cable.
The printer is turned ON.
2
Display [Device Manager].

|
1.
|
From the [Start] menu, select [Control Panel].
|
|
2.
|
Click [Performance and Maintenance] → [System].
|
|
3.
|
Click the [Hardware] tab → [Device Manager].
|


|
1.
|
From the [Start] menu, select [Control Panel].
|
|
2.
|
Click [Hardware and Sound] or [Hardware] → [Device Manager].
|

|
1.
|
From the [Start] menu, select [Control Panel] → [System].
|
|
2.
|
Click the [Hardware] tab → [Device Manager].
|

|
1.
|
From the [Start] menu, select [Control Panel].
|
|
2.
|
Double-click [Device Manager].
|
 If the [User Account Control] dialog box appears If the [User Account Control] dialog box appearsClick [Yes] or [Continue].
|
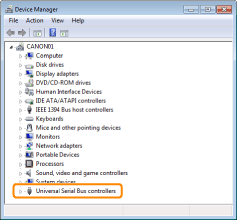
3
Double-click [Universal Serial Bus controllers].
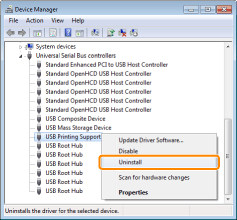
4
Right-click [USB Printing Support], then select [Uninstall] from the pop-up menu.
|
|
Do not uninstall any drivers for other devices. If you uninstall them by mistake, Windows may not operate properly.
|
|
|
If the USB class driver is not installed properly, [USB Printing Support] is not displayed. Then, click [
 ] to close the [Device Manager] dialog box. ] to close the [Device Manager] dialog box. |
|
If the USB class driver is under [Other Devices] Select the USB class driver which is displayed as [Unknown device], and then uninstall it.
|
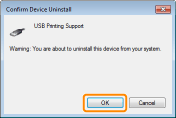
5
Click [OK].
6
Click [ ] to close the [Device Manager] dialog box.
] to close the [Device Manager] dialog box.7
Disconnect the USB cable from the computer, then restart Windows.