Setting IPv6 Addresses
 |
Use the Remote UI to set IPv6 addresses. Before setting IPv6 addresses, make sure that the IPv4 address has been set correctly (Viewing Network Settings). You can register up to nine of the following IPv6 addresses.
|
|
Type
|
Maximum number available
|
Description
|
|
Link-local address
|
1
|
An address that is valid only within a subnet or link and cannot be used to communicate with devices beyond a router. A link-local address is set automatically when the IPv6 function of the machine is enabled.
|
|
Manual address
|
1
|
An address that is entered manually. Specify the prefix length and default router address.
|
|
Stateless address
|
6
|
An address that is generated automatically using the MAC address of the machine and a network prefix that is advertised by the router. Stateless addresses are discarded when the machine is restarted (or turned ON).
|
|
Stateful address
|
1
|
An address obtained from a DHCP server using DHCPv6.
|
1
Start the Remote UI and log on in System Manager Mode. Starting the Remote UI
2
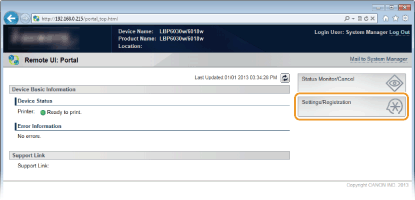
Click [Settings/Registration].
3
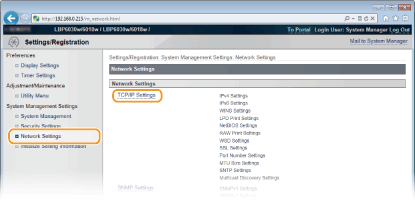
Click [Network Settings]  [TCP/IP Settings].
 [TCP/IP Settings].
4
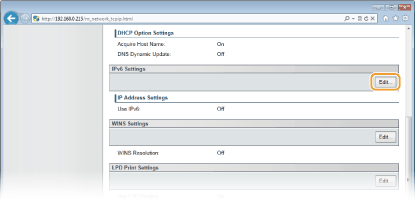
Click [Edit] in [IPv6 Settings].
5
Select the [Use IPv6] check box and configure the required settings.
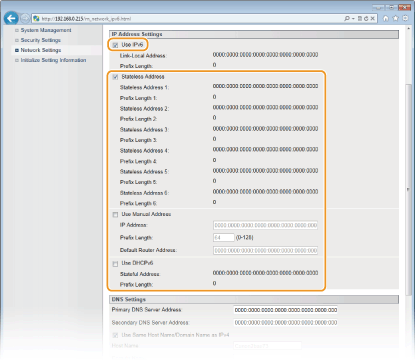
[Use IPv6]
Select the check box to use IPv6 on the machine. Clear the check box if you do not want to use IPv6.
Select the check box to use IPv6 on the machine. Clear the check box if you do not want to use IPv6.
[Stateless Address]
Check to use stateless addresses. Clear the check box if you do not want to use stateless addresses.
Check to use stateless addresses. Clear the check box if you do not want to use stateless addresses.
[Use Manual Address]
When you want to enter an IPv6 address manually, select the check box and enter values in the [IP Address], [Prefix Length], and [Default Router Address] text boxes. Clear the check box if you do not want to enter a manual address.
When you want to enter an IPv6 address manually, select the check box and enter values in the [IP Address], [Prefix Length], and [Default Router Address] text boxes. Clear the check box if you do not want to enter a manual address.
[IP Address]
Enter an IPv6 address. Addresses that start with "ff" (multicast addresses) and the loopback address (::1) cannot be entered.
Enter an IPv6 address. Addresses that start with "ff" (multicast addresses) and the loopback address (::1) cannot be entered.
[Prefix Length]
Enter the length (number of bits) of the network portion of the address.
Enter the length (number of bits) of the network portion of the address.
[Default Router Address]
Specify the default router address, as necessary. Addresses that start with "ff" (multicast addresses) and the loopback address (::1) cannot be entered.
Specify the default router address, as necessary. Addresses that start with "ff" (multicast addresses) and the loopback address (::1) cannot be entered.
[Use DHCPv6]
Select the check box to use the stateful address. Clear the check box if you do not want to use the stateful address.
Select the check box to use the stateful address. Clear the check box if you do not want to use the stateful address.
6
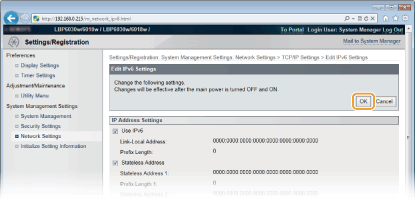
Click [OK].
7
Restart the machine.
Turn OFF the machine, wait for at least 10 seconds, and turn it back ON.
 |
Checking whether the settings are correctMake sure that the Remote UI screen can be displayed with your computer by using the IPv6 address of the machine. Starting the Remote UI
If you change IP addresses after installing the printer driverYou need to add a new port. Configuring Printer Ports
|