Flow of Secure Print Operations
To print from the Secure Print screen, follow the steps below.
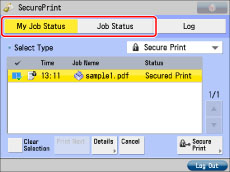
You can press either [My Job Status] or [Job Status] on the Secure Print screen to check the print job status.
[My Job Status] is displayed when you are using the SSO-H login service, and only jobs for the user currently logged in to the machine can be checked on the My Job Status screen. For instructions on using the SSO-H login service, see "Overview of Login Services."
If you press [Job Status], you can check the jobs for all users.
|
IMPORTANT
|
|
Only the currently logged-in user can print secured documents and encrypted secured documents.
You can set secured documents and encrypted secured documents to be automatically erased, even if not printed. You can change the time until auto erase in [Function Settings](Settings/Registration) → [Printer] → [Printer Settings] → [Settings] → [Secure Print Delete Time]. (See "Secure Print Delete Time.")
To display [My Job Status] when you are using the SSO-H login service, the user name entered when you assign a PIN/password at the computer and the user name entered when you log in must match.
|
|
NOTE
|
|
If you are managing users by login service, such as SSO-H, you can specify the following settings. (See "Simple Authentication Settings for Secure Print.")
Printing secured documents without PIN
Excluding domain name to determine my job
|
1.
Press [Secure Print].
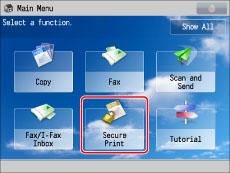
If the desired function is not displayed on the Main Menu screen, press [Show All].
2.
Press [My Job Status] or [Job Status].
3.
Select the document that you want to print → press [Secure Print].
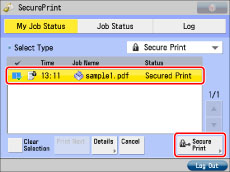
To display only secured documents in the [Job Status] list, select [Secure Print] in the type selection drop-down list.
To select all of the jobs, press [Select All]. (If a destination is already selected, this key changes to [Clear Selection].)
|
IMPORTANT
|
|
If print job is not displayed, press [Restrict Printer Jobs] in [Function Settings] (Settings/Registration) and check the setting. (See "Restricting Printer Jobs.")
|
|
NOTE
|
|
You can cancel a selection by selecting the job again.
To cancel all selections, press [Clear Selection]. ([Clear Selection] changes to [Select All].)
|
4.
Select and print the document (print data).
To print a secured document:
Enter the PIN using  -
-  (numeric keys).
- (numeric keys).Press [OK].
Printing starts when you press [OK].
Select [Cancel] if you do not want to print it.
|
IMPORTANT
|
|
Assigning a PIN/password at the computer is performed using the printer driver. (See "Printing Documents from a Computer.")
Secured documents and encrypted secured documents are erased after they are printed.
You cannot change the print settings of secured documents or encrypted secured documents (set using the printer driver).
|
|
NOTE
|
|
If you are logged on as the SSO-H administrator, jobs sent by all users are displayed, and you can view the details of or cancel the jobs. However, secured documents and encrypted secured documents can only be printed by the user that sent them.
When printing a secured document/encrypted secured document, enter the same PIN/password that you originally assigned to the document using the printer driver. If there is a current or reserved job, it will be queued for printing.
If multiple or all secured documents/encrypted secured documents have the same PIN/password, you can select them and clear their PINs/passwords simultaneously.
For instructions on entering characters to set a password, see "Basic Operations."
If there are jobs currently being printed or waiting to be printed, the secured documents/encrypted secured documents will be printed after those jobs are completed.
You cannot simultaneously select secured documents and encrypted secured documents from the job list to clear their PINs/passwords.
|