Setting a Shared Folder as a Save Location
The feature of scanning to shared folders is also called "Scan to SMB" because the feature uses Server Message Block (SMB), a Windows-specific technology. SMB is a protocol for sharing resources, such as files and printers, with more than one device in a network (Configuring SMB). To configure the machine for saving your scanned documents into a shared folder in the network via SMB, specify the location of the shared folder from a computer by using the Send Function Setting Tool.
|
NOTE
|
|
You can also use the Remote UI to specify the location of the shared folder by registering the folder to the Address Book. The Send Function Setting Tool is helpful for users who want to complete the setup easily.
|
1
Start the Send Function Setting Tool.
 Using a Web browser
Enter "http://(the IP address of the machine)/sendsupport_login.html" in the address field of a Web browser, and press the [ENTER] key.

 Using the User Software CD-ROM
|
1
|
Insert the User Software CD-ROM into the drive on the computer.
Select a language and click [OK] if you are prompted to do so.
|
|
2
|
Click [Start Software Programs].
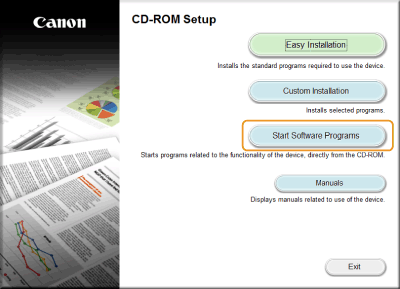 NOTE:
If the above screen is not displayed Displaying the [CD-ROM Setup] or [Select language] Screen
|
|
3
|
Click [Start] for [Send Function Setting Tool].
|
|
4
|
Click [Next].
If you want to view Send Setting Guide, click [How to Set].
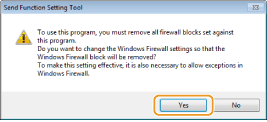
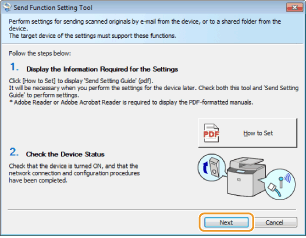 NOTE:
If the screen below appears Click [Yes].
 |
|
5
|
Select the machine from [Device List] and click [Next].
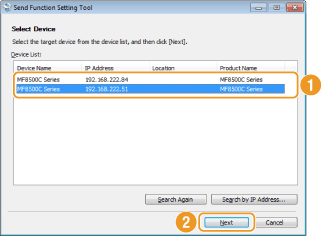 NOTE:
If the machine is not displayed in [Device List] Click [Search Again]. If the problem persists, click [Search by IP Address], enter the IP address of the machine, and then click [OK].
|
|
6
|
Confirm the settings and click [OK].
|
2
Click [Start].
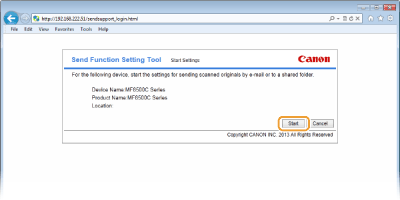
If the logon screen is displayed, enter the appropriate ID and PIN in the corresponding text boxes, and then click [Logon].
3
Click [Store to Shared Folder Settings].
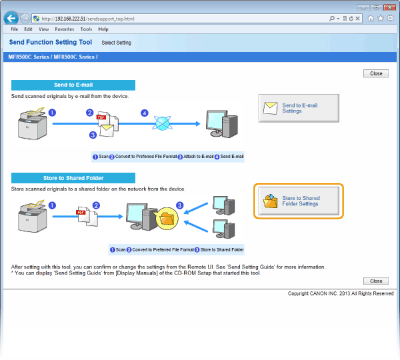
If the screen prompting you to enter the Address Book PIN is displayed, enter the PIN for the Address Book, and click [OK]. Setting a PIN for Address Book
4
Specify the required settings.
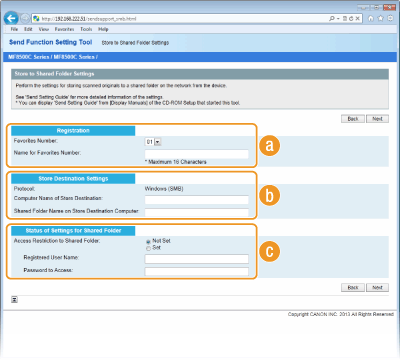
 [Registration]
[Favorites Number]
With the Send Function Setting Tool, you can register a shared folder for saving scanned documents into <Favorites> in the Address Book. Select a number from the drop-down list.
With the Send Function Setting Tool, you can register a shared folder for saving scanned documents into <Favorites> in the Address Book. Select a number from the drop-down list.
[Name for Favorites Number]
Enter the name for identifying the destination to be registered. Set a name that will be easy for you to find later in the Address Book.
Enter the name for identifying the destination to be registered. Set a name that will be easy for you to find later in the Address Book.
 [Store Destination Settings]
[Protocol]
The protocol that is used for sending scanned documents to a shared folder is displayed.
The protocol that is used for sending scanned documents to a shared folder is displayed.
[Computer Name of Store Destination]
Enter the name or the IP address of the computer where the shared folder is located.
Enter the name or the IP address of the computer where the shared folder is located.
[Shared Folder Name on Store Destination Computer]
Enter the name of (or path to) the shared folder. For example, if the shared folder is a subfolder named "share" and is contained in the [Public] folder in drive C (path: C:\users\public\share), enter "users\public\share."
Enter the name of (or path to) the shared folder. For example, if the shared folder is a subfolder named "share" and is contained in the [Public] folder in drive C (path: C:\users\public\share), enter "users\public\share."

 [Status of Settings for Shared Folder]
[Access Restriction to Shared Folder]
Click the [Not Set] or [Set] radio button to match the access restrictions set to the shared folder. When [Set] is selected, enter the user name in the [Registered User Name] text box and password in the [Password to Access] text box.
Click the [Not Set] or [Set] radio button to match the access restrictions set to the shared folder. When [Set] is selected, enter the user name in the [Registered User Name] text box and password in the [Password to Access] text box.
5
Click [Next].
6
Confirm the settings and click [Register].
7
Restart the machine.
Turn OFF the machine, wait for at least 10 seconds, and turn it back ON.