Sending Faxes
|
NOTE
|
|
You need to complete some procedures before using fax functions. Configuring Initial Settings for Fax Functions (MF8580Cdw / MF8280Cw Only)
|
1
Place the document(s). Placing Documents
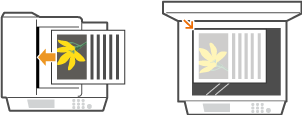
2
Press  .
.
.3
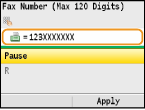
Enter the destination using the numeric keys, and press <Apply>.
If your machine is connected to a PBX (Private Branch Exchange), use  /
/ to select <R> and press
  before entering the destination. If <R> is not available, you need to register the R-key settings. R-Key Setting
/ to select <R> and press before entering the destination. If <R> is not available, you need to register the R-key settings. R-Key SettingIf you enter the wrong characters, press  . (Press to delete each character one by one; press and hold to delete all the input characters at once.)
To make it easier to specify destinations by using other methods, such as the Address Book, see Specifying Destinations for Faxes.
NOTE:
When <Confirm Entered Fax Number> is set to <On>, a screen appears that prompts you to enter the destination again (Checking Destinations before Sending Documents). Enter the same destination again for confirmation.
 To send overseas
Enter the international access code, the country code, the area code, and the fax number to specify the destination.
|
1
|
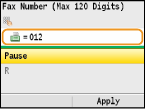
Enter the international access code.
 |
|
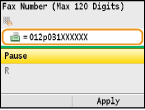
2
|
Use
/ to select <Pause>, and press .<p> (pause) is inserted between numbers. In this case, 012 will be dialed first, then two seconds later, the next number will be dialed.
NOTE:
Inputting pauses is optional; however, consecutive numbers that are input without pauses may not be recognized correctly.
Pauses can be inserted continuously.
One pause inserts 2 seconds of waiting time. This time can be changed as necessary. Set Pause Time
 |
|
3
|
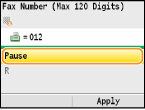
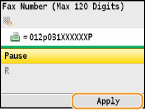
Enter the country code, the area code, and the fax number.
 |
|
4
|
Select <Pause> to insert a pause at the end of the fax number as necessary, and press
.The waiting time inserted here is fixed to 10 seconds. This time cannot be changed.
 |
|
5
|
Press <Apply>.
 |
4
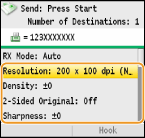
Specify the scanning settings as necessary.
5
Press  (B&W) to start sending.
(B&W) to start sending.Scanning starts.
If you want to cancel sending, press 
 <Yes> .
.When placing documents in the feeder in step 1
When scanning is complete, the faxes are sent.
When placing documents on the platen glass in step 1
Follow the procedures below.
|
1
|
Use
/ to select the document size, and press .When there is only one page to be scanned, proceed to step 3.
|
|
2
|
Place the next document on the platen glass, and press
(B&W).Repeat this step until you finish scanning all of the pages.
|
|
3
|
Press <Start Sending>.
The faxes are sent.
|
|
TIPS
|
|
If you always want to send faxes with the same settings:
If you want to sound an alarm when the handset is off the hook:
If you want to check the dial tone before sending to avoid sending to wrong destinations:
|