Loading Envelopes into the Multi-Purpose Tray
If you want to load the envelopes into the multi-purpose tray, follow the procedure described below to prevent the envelopes from becoming creased.
For information on how to use the multi-purpose tray, see "Loading Paper into the Multi-Purpose Tray."
|
NOTE
|
|
Make sure that the height of the paper stack does not exceed the loading limit mark (
 ). ).If there are instructions on the paper package about which side of the paper to load, follow those instructions.
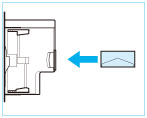
When the paper is loaded into the multi-purpose tray, the side facing down is the one printed on.
For more information on the print direction of preprinted paper (paper which has logos or patterns already printed on it), see "Relationship Between the Original Orientation and Paper Orientation."
When you use the multi-purpose tray to make copies, straighten out curled paper prior to use, as shown below. Curled paper may cause a paper jam.
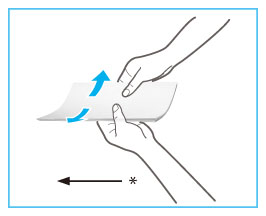 * Feeding Direction
To copy or print on the backside of preprinted paper by using the multi-purpose tray, fix the curling and then load the preprinted paper with the printed side face up. If you want to perform 2-Sided printing, set paper as shown in the illustration below in order to print with the same orientation of the preprinted side.
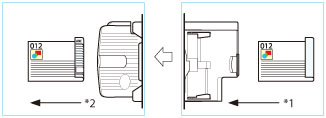 *1 Feeding Direction
*2 Output Direction
For instructions on loading envelopes into the paper drawer, see "Loading Envelopes."
|
Loading Envelopes
1.
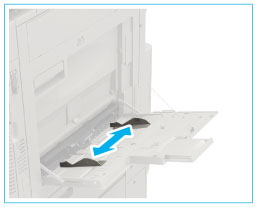
Open the multi-purpose tray.
If you are loading large size envelopes, pull out the auxiliary tray.

* Auxiliary Tray
|
NOTE
|
|
If a paper size other than envelopes is registered in [Multi-Purpose Tray Defaults] in [Preferences] (Settings/Registration), select [Standard] for [Always Specify].
|
2.
Prepare envelopes.
|
IMPORTANT
|
|
If the envelopes become filled with air, flatten them by hand before loading them into the multi-purpose tray.
If envelopes are not neatly aligned before being loaded, a problem with the paper supply or a paper jam may occur. Fix any curling or warping of the envelopes, and load them while ensuring that no envelopes are stuck together.
Multiple envelopes may pass through the machine at a time, depending on the type of envelope. In this case, load only one envelope at a time.
Do not use envelopes that have glue attached to their flaps, as the glue may melt due to the heat and pressure of the fixing unit.
Do not print on the flap.
|
Take five envelopes, loosen them as shown, and then stack them together.
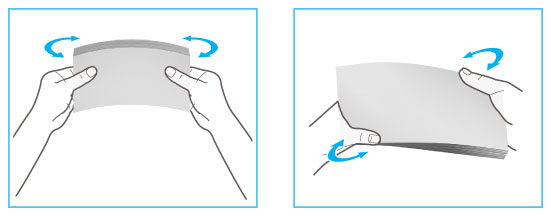
Repeat this step five times for each set of five envelopes.
Place the envelopes on a clean, level surface, and press all the way around the envelopes by hand, in the direction of the arrows, to remove any curls.
Repeat this step five times for each set of five envelopes.
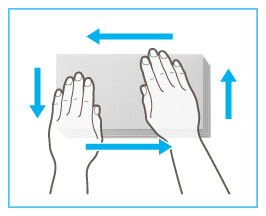
Hold down the four corners of the envelopes firmly, so that they and the sealed or glued portion stay flat.
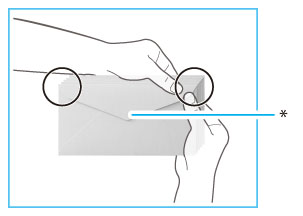
* Flap
Press the envelope in the direction of the arrows.
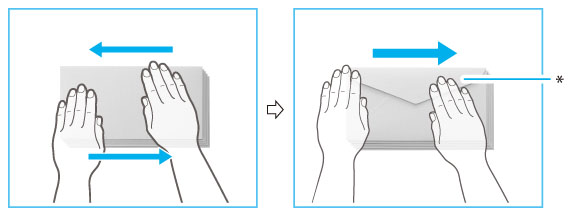
* Flap
|
IMPORTANT
|
|
Take special care to spread the envelopes out in the direction that they will be fed.
|
3.
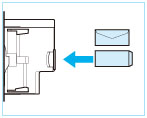
Load the envelopes into the multi-purpose tray.
Load them as shown in the figures below (recommended).
 |
 |
|
Nagagata 3
Yougatanaga 3
Kakugata 2
|
COM10 No.10
Monarch
DL
ISO-C5
|
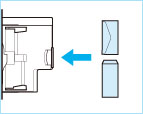
To change the orientation of the envelopes, load them as shown in the figures below.
 |
 |
|
Nagagata 3
Yougatanaga 3
|
COM10 No.10
Monarch
DL
ISO-C5
|
|
IMPORTANT
|
|
ISO-B5 is not supported.
When using Kakugata 2, place it horizontally.
If the envelopes do not pass through the machine properly even if the procedures up to this point have been followed, repeat the procedures by feeding once for each envelope.
If envelopes become wrinkled, load the envelopes with the long edge of the envelopes facing the machine.
|
4.
Adjust the slide guides.
Selecting the Paper Size
1.
Select the desired paper size.
|
IMPORTANT
|
|
Set the envelope size to the same size as the envelopes loaded in the multi-purpose tray. Selecting paper or envelopes of a different size may cause a paper jam.
|
|
NOTE
|
|
If a screen prompting you to adjust the slide guides is displayed, adjust the width of the slide guides → specify the paper size → press [OK].
If a screen prompting you to adjust the slide guides or check [Multi-Purpose Tray Defaults] in Settings/Registration is displayed, adjust the width of the slide guides to match the paper size stored in Register Multi-Purpose Tray Defaults, or select [Standard] for [Always Specify]. (See "Setting the Method for Selecting Multi-Purpose Tray Paper.")
|
Press [Envelope].

Select the placement and type of envelope.
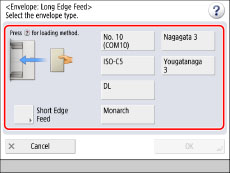
If you placed the envelopes horizontally, press [Short Edge Feed] → select the envelope type.
If you selected vertical placement for Nagagata 3, press [Next] → specify the flap length.
|
IMPORTANT
|
|
If the envelope type is not set correctly, a paper jam will occur.
When using Kakugata 2, place it horizontally.
|
2.
Press [OK].
If you make a mistake when specifying settings for paper loaded in the multi-purpose tray, remove the paper from the tray, place the paper back in the tray, and then specify the settings again.
|
IMPORTANT
|
|
Depending on the type of heavy paper you want to load, if you load multiple sheets of heavy paper into the multi-purpose tray, a paper jam may occur. In this case, load only one sheet of heavy paper at a time.
If you are making two-sided prints, select the 2-Sided mode. The printed paper may crease depending on the moisture absorption condition of the paper.
If you are printing on envelopes, do not allow more than 10 envelopes to accumulate in the output tray. Always empty the output tray once 10 envelopes have accumulated.
|
|
NOTE
|
|
Envelopes may be creased in the printing process.
|