TCP/IPv6 Settings
This section describes the procedure for setting TCP/IPv6 using the control panel. After specifying the settings for TCP/IPv6, follow the procedure in "Settings Common to TCP/IPv4 and TCP/IPv6" to specify the required settings, and the procedure in "Confirming TCP/IPv6 Settings (PING Command)" to check whether the network settings are correct. If the settings for TCP/IPv4 are already specified and you have finished specifying the settings common to TCP/IPv4 and TCP/IPv6, only check the network settings after completing this procedure.
If you want to use IPv4 communications at the same time, follow the procedure in "TCP/IPv4 Settings" to specify the required settings, and the procedure in "Confirming TCP/IPv4 Settings (PING Command)" to confirm the settings.
The machine can use up to seven of the following IPv6 addresses. With IPv6 communication, multiple IPv6 addresses can be used at the same time.
Link Local Address (1)
An address that is only valid within the same link. A link local address is automatically set using a specific prefix (fe80::) and an interface identifier generated from the MAC address of the machine. When the machine is using the functions of IPv6, one link local address is always registered.
Manual Address (0 or 1)
A fixed address that is set from the control panel.
Stateless Address (0 to 4)
A stateless address is automatically set using the machine's MAC address and the prefix (information indicating the network belonged to) included in the RA (Router Advertisement) notified by the router when the machine is started.
Stateful Address (0 or 1)
A stateful address can be obtained from a DHCP server using DHCPv6.
1.
Press  (Settings/Registration).
 (Settings/Registration).
2.
Press [Preferences] → [Network].
3.
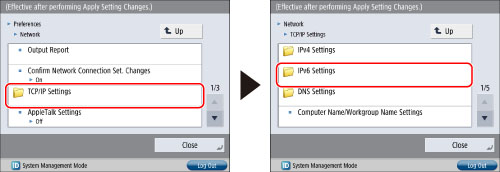
Press [TCP/IP Settings] → [IPv6 Settings].
4.
Press [Use IPv6] for [IPv6 Settings] → [On] → [OK].
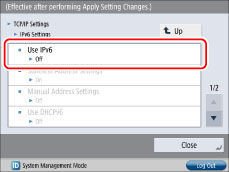
Press [Off] for <Use IPv6> if you do not want to use IPv6 communications.
If you set <Use IPv6> to 'On', you can use an IPv6 network. A link local address is automatically set.
5.
Press [Stateless Address Settings] for [IPv6 Settings] → specify the required settings → press [OK].
If you want to use a stateless address, press [On] for <Use Stateless Address>. A stateless address is automatically set when the machine is started.
|
NOTE
|
|
The stateless address is discarded when the machine is restarted (with the machine's main power switch On).
|
6.
Press [Manual Address Settings] for [IPv6 Settings] → specify the following items → press [OK].
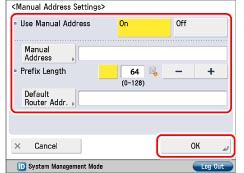
If you want to use a manual address, press [On] for <Use Manual Address>.
Press [Manual Address] → enter the IPv6 address → press [OK]. Enter the prefix length for the IPv6 address in [Prefix Length].
Press [Default Router Addr.] → enter the default router address → press [OK]. If you do not want to specify a default router address, leave [Default Router Addr.] blank.
|
IMPORTANT
|
|
You cannot use a manual address if you leave [Manual Address] blank. Also, you cannot set any of the following types of address for [Manual Address]:
Multicast address
Address composed entirely of zeros
IPv4 compatible address (an IPv6 address with the top 96 bits set to '0' and an IPv4 address in the lower 32 bits)
IPv4 mapped address (an IPv6 address with the top 96 bits set to '0:0:0:0:0:ffff:' and an IPv4 address in the lower 32 bits)
You cannot enter a multicast address or an address composed entirely of zeros in [Default Router Addr.].
|
7.
Press [Use DHCPv6] for [IPv6 Settings] → specify the required settings → press [OK].
Press [On] for <Use DHCPv6> to use DHCPv6 to obtain a stateful address from a DHCP server using DHCPv6.
If you are using Windows, or if you are not using Bonjour on the Macintosh, proceed to step 12.
8.
Press [Only Retrieve Stateful Address Prefix] for [IPv6 Settings] → [On] → [OK].
Press [On] for <Only Retrieve Stateful Address Prefix> to only retrieve the first half of the stateful address from the DHCP server using DHCPv6.
|
NOTE
|
|
This setting is grayed out and cannot be selected if [Off] is selected for DHCPv6.
The second half of the address is automatically generated from the MAC address. It is the same value as the second half (64 bits) of the link local address.
|
9.
Press [Up].
10.
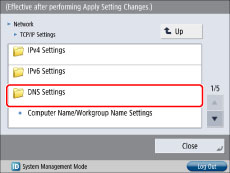
Press [DNS Settings] for [TCP/IP Settings].
11.
Press [mDNS Settings] for [DNS Settings] → specify the following items → press [OK].
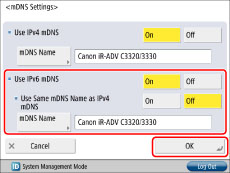
To use the DNS function on a system that does not have a DNS server, press [On] for <Use IPv6 mDNS>.
If you are using the same mDNS name you used for Ipv4, press [On] for [Use Same mDNS Name as IPv4].
To change the mDNS name, press [mDNS Name] → enter the new mDNS name → press [OK].
|
IMPORTANT
|
|
If you set <Use IPv6 mDNS> to 'On', the machine will not enter a complete Sleep mode.
|
|
NOTE
|
|
"Canon <product name>" is automatically set, if you do not change the mDNS name. If the same mDNS name already exists on the network, the name will become "Canon <product name>****** ("******" represents the last six digits of a MAC address.)"
e.g.) Canon iR-ADV C3320/3330 (7e:ec:75)
|
12.
Press [Up] → [Up].
13.
Press [Firewall Settings] for [Network] → [IPv6 Address Filter].
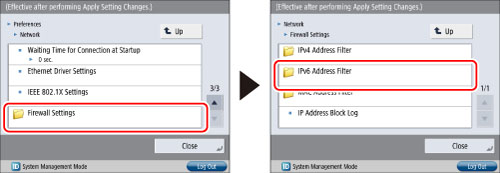
14.
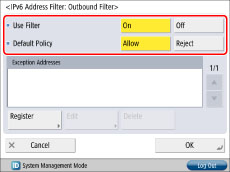
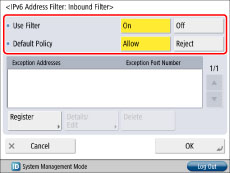
Press [Outbound Filter] or [Inbound Filter] → specify the following settings.
 |
 |
|
[Outbound Filter]
|
[Inbound Filter]
|
By specifying the settings described below, you can filter received packets and transmitted packets using IPv6 addresses and improve security when sending and receiving data between your computer and the machine. The possibility of a third person gaining unauthorized access can be reduced by configuring the settings for [IPv6 Address Filter] in accordance with the environment you are using.
When filtering received packets and transmitted packets, you can set to allow or reject data transmission/reception between your computer and the machine. You can specify with whom you allow data transmission/reception by registering IPv6 address of a computer as an exception address.
In case of [Inbound Filter], you can register exception port number as well as the IPv6 address so that you can set which computers are allowed to use specific functions and which are rejected. For example, you can allow general users to print via print server and reject them to access to the Remote UI while administrators are allowed to use all functions.
Details of settings are shown below:
|
<Use Filter>
|
<Default Policy>
|
Settings Required after Pressing [Register]
|
|
|
Allow data transmission with all computers, but not with specified computers.
|
[On]
|
[Allow]
|
Register IPv6 address or IPv6 address prefix you want to reject.
|
|
Reject data transmission with all computers, but not with specified computers.
|
[On]
|
[Reject]
|
Register IPv6 address or IPv6 address prefix you want to allow.
|
|
Allow data reception from all computers, but not from specified computers.
|
[On]
|
[Allow]
|
Register IPv6 address or IPv6 address prefix you want to reject.
Register port number for functions you want to reject.
|
|
Reject data reception from all computers, but not from specified computers.
|
[On]
|
[Reject]
|
Register IPv6 address or IPv6 address prefix you want to allow.
Register port number for functions you want to allow.
|
|
Allow data transmission/reception with all computers.
|
[Off]
|
-
|
-
|
|
NOTE
|
|
If data transmission/reception is attempted between the device, which has the IPv6 address/port number set to be rejected, and the machine, a block log will be generated. To display the block log, see "Checking the Block Log."
Information for the rejected port number is recorded in the block log only when using TCP/UDP. Port number is not recorded when using protocols which have no port number such as ICMP.
|
If you want to allow/reject data transmission/reception with all computers but not with specified computers
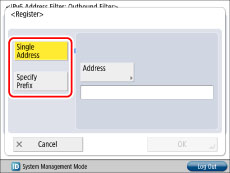
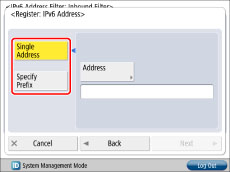
Press [Register] → set the exception IPv6 address or IPv6 address prefix.
 |
 |
|
[Outbound Filter]
|
[Inbound Filter]
|
To specify a single IPv6 address: Press [Single Address] → [Address] → enter an IPv6 address → press [OK].
To set the IPv6 address prefix: Press [Specify Prefix] → press [IPv6 Prefix] → enter the IPv6 address prefix → press [Prefix Length] → enter the prefix length.
|
IMPORTANT
|
|
You cannot specify a multicast address for an IPv6 address.
If the usage of a protocol or print application is not permitted on your device, it cannot be used even after settings in [Firewall Settings] have been changed on your device. Configure the settings to permit the protocol or print application.
If you enter '255' in [Prefix Length], no IPv6 addresses will be set.
If you enter '0' in [Prefix Length], all IPv6 addresses will be set.
|
Press [OK] or [Next].
For [Outbound Filter], press [OK] → [OK] → proceed to step 16.
For [Inbound Filter], press [Next] → proceed to step 15.
If you want to allow/reject data transmission/reception with all computers
Confirm that [Off] is set for <Use Filter> → press [OK] → proceed to step 16.
15.
Set exception port number → press [OK] → [OK].
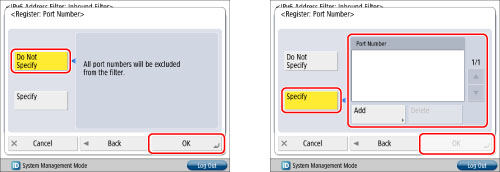
To specify all port numbers as exception: Press [Do Not Specify].
To specify port number individually: Press [Specify] → press [Add] and enter port number → press [OK].
|
IMPORTANT
|
|
You can register up to 16 port numbers for IPv6 addresses or IPv6 address prefixes.
You can register 50 port numbers for one port number setting.
|
16.
Press [Up] → [Up].
17.
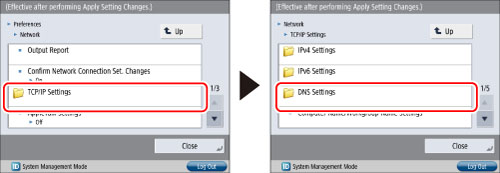
Press [TCP/IP Settings] → [DNS Settings].
18.
Press [DNS Server Address Settings] for [DNS Settings] → specify the following items in <IPv6> → press [OK].
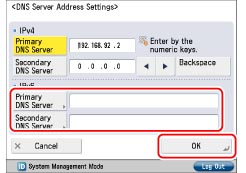
If you want to use dynamic DNS updating, press [Primary DNS Server] → enter the IPv6 address of the DNS server → press [OK].
If you do not want to specify a secondary DNS server, leave [Secondary DNS Server] blank.
|
IMPORTANT
|
|
You cannot set any of the following types of address for [Primary DNS Server] or [Secondary DNS Server]:
Multicast address
Address composed entirely of zeros
Link local address
If you set <Use DHCPv6> to 'On' in step 7, and the DNS server IP address obtained from the DHCPv6 server is different from the IP address set manually, the set IP address is overwritten.
If you enabled <Use IPv6 mDNS> in step 11, make sure that there are no devices on the network whose host name and mDNS name in the DNS Host/Domain Name Settings are the same. Any non-unique values set manually are automatically changed so that they are unique.
|
19.
Press [DNS Host/Domain Name Settings] for [DNS Settings] → specify the following items in <IPv6> → press [OK].
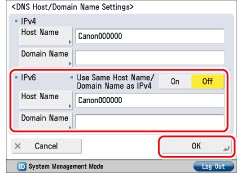
If you set <Use Same Host Name/Domain Name as IPv4> to 'On', the same host name and domain name for IPv4 communication is used for IPv6 communication.
If you set <Use Same Host Name/Domain Name as IPv4> to 'Off', press [Host Name] → enter the name of the machine → press [OK]. Press [Domain Name] → enter the name of the network domain the machine belongs to → press [OK].
It is necessary to set a host name and domain name if you want to use dynamic DNS updating.
|
IMPORTANT
|
|
If you set <Use DHCPv6> to 'On' in step 7, the domain name you set manually will be overwritten. Even if you set <Use Same Host Name/Domain Name as IPv4> to 'On', the domain name obtained from the DHCPv6 server is used.
|
20.
Press [DNS Dynamic Update Settings] for [DNS Settings] → specify the following items in <IPv6> → press [OK].
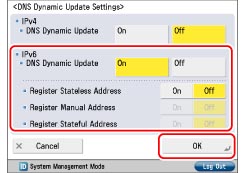
If you press [On] for <DNS Dynamic Update>, you can automatically register the IPv6 address, host name, and domain name set for the machine in the DNS server using dynamic DNS updating. A dynamic DNS server is required for using dynamic DNS updating.
Select the address to automatically register in the DNS server using dynamic DNS updating.
If you want to register a stateless address in the DNS server, press [On] for <Register Stateless Address>.
If you want to register a manual address in the DNS server, press [On] for <Register Manual Address>.
If you want to register a stateful address in the DNS server, press [On] for <Register Stateful Address>.
|
IMPORTANT
|
|
Windows Server 2003 does not support DHCPv6 servers.
If you have a DHCPv6 server running Windows Server 2008 that uses the DHCPv6 service and want to register the machine's DNS record, configure the following settings in the DHCPv6 server:
In the DHCPv6 server, right-click the [Scope] icon → click [Properties]. In the [DNS] sheet of the displayed dialog box, select [Enable DNS dynamic updates according to the settings below] → [Dynamically update DNS A and PTR records only if requested by the DHCP clients].
In the Active Directory environment, right-click the icon of the DHCPv6 server you are using → select [Properties]. In the [Advanced] sheet of the displayed dialog box, click [Credentials]. In the [DNS dynamic update credentials] dialog box, enter the user name, domain, and password for the Active Directory.
|
|
IMPORTANT
|
|
If the IPv6 address assigned to the machine is the same as another node, you may not be able to perform IPv6 communication, even though an IPv6 address is displayed on the screen.
|