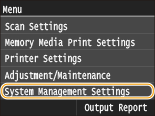
System Management Settings
 |
|
All the settings about System Management Settings are listed with short descriptions. Default settings are marked with a dagger (
 ). ). |
 |
Asterisks (*)Settings marked with "*1" cannot be imported or exported.
Settings marked with "*2" are only available for the MF729Cx.
Settings marked with "*3" are only available for the MF729Cx / MF728Cdw / MF724Cdw.
Settings marked with "*4" are only available for the MF729Cx / MF728Cdw / MF628Cw.
|
Network Settings
See Network Settings.
Enable NFC *1*2
Select whether to allow printing by touching an NFC-capable mobile device to the NFC mark on the machine's operation panel.
|
Off
On
 |
<Menu>  <System Management Settings>
  <Enable NFC>
  Select <Off> or <On>
  Restart the machine
 <System Management Settings>
  <Enable NFC>
  Select <Off> or <On>
  Restart the machine
System Manager Information Settings
Specify the ID or PIN exclusively for Administrators who have access privileges to <Network Settings> and <System Management Settings>. ID is <System Manager ID> and PIN is <System Manager PIN>. You can also register the name of an Administrator. Setting the System Manager ID
System Manager ID and PIN
Enter a number of up to seven digits for the System Manager ID and PIN.
|
System Manager ID
System Manager PIN
|
System Manager Name
Enter up to 32 alphanumeric characters for the name of an Administrator.
Device Information Settings 
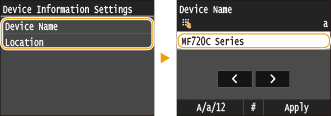
Enter up to 32 alphanumeric characters for the name and the installation location to identify the machine.
|
Device Name
Location
|
<Menu>  <System Management Settings>
  <Device Information Settings>
  Select <Device Name> or <Location>
  Enter <Device Name> or <Location> (Entering Text)
  <Apply>

 <System Management Settings>
  <Device Information Settings>
  Select <Device Name> or <Location>
  Enter <Device Name> or <Location> (Entering Text)
  <Apply>


Department ID Management On/Off 
Select whether to use the Department ID Management, a feature that uses IDs as user accounts to specify access privileges and maintain information on how the machine is used. Setting the Department ID Management
|
Off
 On
|
<Menu>  <System Management Settings>
  <Department ID Management On/Off>
  Select <Off> or <On>

 <System Management Settings>
  <Department ID Management On/Off>
  Select <Off> or <On>

Security Settings
Enable or disable settings for encrypted communication via SSL or IPSec, as well as settings for IP address or MAC address packet filtering.
Use SSL 
Select whether to use SSL encrypted communication. Enabling SSL Encrypted Communication for the Remote UI
|
Off
 On
|
<Menu>  <System Management Settings>
  <Security Settings>
  <Use SSL>
  Select <Off> or <On>
  Restart the machine
 <System Management Settings>
  <Security Settings>
  <Use SSL>
  Select <Off> or <On>
  Restart the machine
Use IPSec *1
Select whether to perform encrypted communication by establishing a virtual private network (VPN) via IPSec. Configuring IPSec Settings
|
Off
 On
|
<Menu>  <System Management Settings>
  <Security Settings>
  <Use IPSec>
  Select <Off> or <On>
  Restart the machine
 <System Management Settings>
  <Security Settings>
  <Use IPSec>
  Select <Off> or <On>
  Restart the machine
IPv4 Address Filter 
Enable or disable settings for filtering packets sent to or received from devices with specified IPv4 addresses. Specifying IP Addresses for Firewall Rules
|
Outbound Filter
Off
 On
Inbound Filter
Off
 On
|
<Menu>  <System Management Settings>
  <Security Settings>
  <IPv4 Address Filter>
  Select <Outbound Filter> or <Inbound Filter>
  Select <Off> or <On>
  Restart the machine
 <System Management Settings>
  <Security Settings>
  <IPv4 Address Filter>
  Select <Outbound Filter> or <Inbound Filter>
  Select <Off> or <On>
  Restart the machine
IPv6 Address Filter 
Enable or disable settings for filtering packets sent to or received from devices with specified IPv6 addresses. Specifying IP Addresses for Firewall Rules
|
Outbound Filter
Off
 On
Inbound Filter
Off
 On
|
<Menu>  <System Management Settings>
  <Security Settings>
  <IPv6 Address Filter>
  Select <Outbound Filter> or <Inbound Filter>
  Select <Off> or <On>
  Restart the machine
 <System Management Settings>
  <Security Settings>
  <IPv6 Address Filter>
  Select <Outbound Filter> or <Inbound Filter>
  Select <Off> or <On>
  Restart the machine
MAC Address Filter 
Enable or disable settings for filtering packets sent to or received from devices with specified MAC addresses. Specifying MAC Addresses for Firewall Rules
|
Outbound Filter
Off
 On
Inbound Filter
Off
 On
|
<Menu>  <System Management Settings>
  <Security Settings>
  <MAC Address Filter>
  Select <Outbound Filter> or <Inbound Filter>
  Select <Off> or <On>
  Restart the machine
 <System Management Settings>
  <Security Settings>
  <MAC Address Filter>
  Select <Outbound Filter> or <Inbound Filter>
  Select <Off> or <On>
  Restart the machine
Select Country/Region *1
Specify the country or region where the machine is used. The default setting may vary depending on the setting selected at initial power-on.
|
<Menu>  <System Management Settings>
  <Select Country/Region>
  Select a country or region

 <System Management Settings>
  <Select Country/Region>
  Select a country or region

Remote UI Settings *1
Configure settings for using the Remote UI. Using the Remote UI allows you to configure machine settings from a Web browser.
Use Remote UI
Select whether to use the Remote UI. Using the Remote UI allows you to configure machine settings from a Web browser. Disabling Remote UI
|
Off
On
 |
Remote UI Access Security Settings 
Set whether a PIN is required for accessing the Remote UI. Set a PIN of up to 7 digits. All users use a common PIN. Setting a Remote UI PIN
|
Off
 On
Remote UI Access PIN
|
<Menu>  <System Management Settings>
  <Remote UI Settings>
  <Remote UI Access Security Settings>
  <On>
<On>  Enter PIN
  PIN (Confirm)
  <Apply>
 <System Management Settings>
  <Remote UI Settings>
  <Remote UI Access Security Settings>
  <On>
<On>  Enter PIN
  PIN (Confirm)
  <Apply>
Auto Online for Remote Scan *1
When scanning from the computer, use this to specify whether to automatically go online for remote scanning (scan standby mode) without using the operation panel.
|
Off
On
 |
<Menu>  <System Management Settings>
  <Auto Online for Remote Scan>
  Select <Off> or <On>

 <System Management Settings>
  <Auto Online for Remote Scan>
  Select <Off> or <On>

Restrict TX Function
Configure restrictions on various methods for assigning destinations when sending E-mail, I-Faxes, etc.
Address Book PIN
Specify a PIN and require entering it to add new entries to or edit existing entries in the Address Book. Setting a PIN for Address Book
Restrict New Destinations
Select whether to limit the fax numbers and e-mail/I-Fax addresses that can be specified as destinations to those already registered in the Address Book. Limiting Available Destinations
|
Off
 On
|
Restrict Resending from Log
Select whether to prevent a destination from being selected from the sent job logs. Disabling Use of Previously Used Destinations
|
Off
 On
|
Coded Dial TX Confirmation
Select whether to display the details of an entered coded dial number when it is selected as a destination. Displaying Destinations in Address Book
|
Off
 On
|
Display Job Log 
Select whether to display the copying, printing, faxing, and scanning logs on the display of the machine and in the Communication Management Report.
|
Off
On
 |
<Menu>  <System Management Settings>
  <Display Job Log>
  Select <Off> or <On>
  Restart the machine
 <System Management Settings>
  <Display Job Log>
  Select <Off> or <On>
  Restart the machine
Use as USB Device
Enable or disable the USB port that is used for connecting the machine to a computer. Restricting the USB Connection with a Computer
|
Off
On
 |
Store to USB Memory
Select whether to permit storing scanned documents into a USB memory device. Restricting the Scan to USB Function
MF729Cx
|
Off
 On
|
MF728Cdw / MF724Cdw / MF628Cw / MF623Cn
|
Off
On
 |
Memory Media Print On/Off
Select whether to permit printing data from a USB memory device when it is attached to the machine. Restricting the USB Print Function
MF729Cx
|
Off
 On
|
MF728Cdw / MF724Cdw / MF628Cw / MF623Cn
|
Off
On
 |
Enable Product Extended Survey Program 
Enable or disable the Product Extended Survey Program (a program for the machine usage survey).
|
Off
On
 |
<Menu>  <System Management Settings>
  <Enable Product Extended Survey Program>
  Select <Off> or <On>
  Restart the machine
 <System Management Settings>
  <Enable Product Extended Survey Program>
  Select <Off> or <On>
  Restart the machine
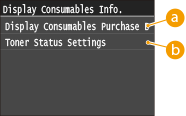
Display Consumables Information (RUI/Toner Status) 
Set whether to display a button in the Remote UI or Toner Status for accessing the Web site for purchasing toner cartridges. Also set whether to use Toner Status.
|
Display Consumables Purchase Button (RUI)
Off
On
 Toner Status Settings
Off
On
 Displ. Consmbls. Purchase Btn.
Off
On
 |
<Menu>  <System Management Settings>
  <Display Consumables Information (RUI/Toner Status)>
  Specify the settings

 <System Management Settings>
  <Display Consumables Information (RUI/Toner Status)>
  Specify the settings


 <Display Consumables Purchase Button (RUI)>
Select <Off> to prevent a button that accesses sites for purchasing toner cartridges from being displayed in the Remote UI.
 <Toner Status Settings>
If you do not want to use Toner Status, select <Off>. To prevent a button that accesses sites for purchasing toner cartridges from being displayed in Toner Status, select <On> and then <Off>.
Enable Canon Mobile Scanning 
Select whether to allow scanning from a mobile device using the Canon Mobile Scanning application.
|
Off
On
 |
<Menu>  <System Management Settings>
  <Enable Canon Mobile Scanning>
  Select <Off> or <On>
  Restart the machine
 <System Management Settings>
  <Enable Canon Mobile Scanning>
  Select <Off> or <On>
  Restart the machine
Google Cloud Print Settings *1
Enable or disable Google Cloud Print. Printing with Google Cloud Print
|
Enable Google Cloud Print
Off
On
 Google Cloud Print Registration Status
|
Notify to Check Paper Settings 
Specify whether to display a message prompting you to check paper settings when loading the paper drawer into the machine.
|
Off
On
 |
<Menu>  <System Management Settings>
  <Notify to Check Paper Settings>
  Select <Off> or <On>
  Restart the machine
 <System Management Settings>
  <Notify to Check Paper Settings>
  Select <Off> or <On>
  Restart the machine
Import/Export of Settings *1
You can use a USB memory device to import and export Address Book destinations and other types of settings data. Using a USB Memory Device to Export/Import Registered Data
|
Import
Export |
Secure Print Settings *3
Enable or disable Secure Print. Printing via Secure Print
|
Off
On
 Secure Print Deletion Time
10 to 30
 to 240 (min.) to 240 (min.) |
Select OS for USB Connected PC 
Select the OS of the PC connecting to the machine via USB.
|
Mac OS
 Windows Other |
 |
|
Be sure to match the machine settings to the OS of the PC. If not matched, the PC will not correctly recognize the machine.
|
<Menu>  <System Management Settings>
  <Select OS for USB Connected PC>
  Select the OS
  Restart the machine
 <System Management Settings>
  <Select OS for USB Connected PC>
  Select the OS
  Restart the machine
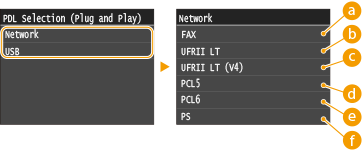
PDL Selection (Plug and Play) 
Select a page description language so that the machine is detected as a printer that is compatible with that language when it is connected to a computer by using Plug and Play. See the MF Driver Installation Guide for details.
Network*1
Select a page description language so that the machine is detected as a printer that is compatible with that language when it is detected over the network.
|
FAX*4
UFRII LT
 UFRII LT (V4)
PCL5*3
PCL6*3
PS*3
|
USB
Select a page description language so that the machine is detected as a printer that is compatible with that language when it is connected to a computer via USB.
|
FAX*4
UFRII LT
 UFRII LT (V4)
PCL5*3
PCL6*3
PS*3
|

<FAX> is displayed if <Select OS for USB Connected PC> is set to <Mac OS>.
<Menu>  <System Management Settings>
  <PDL Selection (Plug and Play)>
  Select <Network> or <USB>
  Select a page description language
  Restart the machine
 <System Management Settings>
  <PDL Selection (Plug and Play)>
  Select <Network> or <USB>
  Select a page description language
  Restart the machine
 <FAX>
<FAX>
Detects and connects the machine as a fax device.
 <UFRII LT>
Detects and connects the machine as a UFRII LT printer.
 <UFRII LT (V4)>
Detects and connects the machine as a UFRII LT printer that is compatible with XML Paper Specification (XPS).
 <PCL5>
Detects and connects the machine as a PCL5 printer.
 <PCL6>
Detects and connects the machine as a PCL6 printer.
 <PS>
<PS>
Detects and connects the machine as a PS printer.
Update Firmware *1
Select how to install the firmware update according to the environment of the machine.
<Via PC>
Select to manually install the firmware update available on the Canon Web site yourself. For instructions on how to install the update, see the instruction manual available on the Web site. When the machine uses a wireless LAN, update with <Via PC> below or use a USB cable to connect.
<Via Internet>
Select to automatically install the firmware update without using a computer. Follow the on-screen instructions to perform the update. The machine must be connected to the Internet.
<Version Information>
Select to check details for the current firmware.
|
Via PC
Via Internet
Version Information
|
Register License *1*2
Enter a license key for enabling option functions. License Registration (MF729Cx)
<Menu>  <System Management Settings>
  <Register License>
  <OK>
<OK>  Enter Register License Code
  <Register>
  <Close>
  Restart the machine
 <System Management Settings>
  <Register License>
  <OK>
<OK>  Enter Register License Code
  <Register>
  <Close>
  Restart the machine
Initialize Key and Certificate *1
Select to restore [Key and Certificate Settings] and [CA Certificate Settings] to the factory defaults. Initializing Key and Certificate
Initialize Address Book *1
Select to restore the Address Book settings to the factory defaults. Initializing Address Book
Initialize Menu *1
Select to restore the settings listed below to the factory defaults. You can restore all the settings listed below at once, or you can restore individual settings separately.Initializing Menu
|
Preferences
Timer Settings Common Settings Copy Settings Fax Settings*4 Scan Settings Memory Media Print Settings Printer Settings System Management Settings Initialize All |
System Management Settings
Select to restore the System Management Settings to the factory defaults. You can restore all the System Management Settings at once. Initializing Menu
|