
Configuring E-mail/I-Fax Communication Settings
Use the Remote UI to configure the detailed send and receive settings, such as the settings for using the machine to send and receive I-Faxes and the settings for POP authentication and encryption before you send e-mail or I-Faxes. Contact your provider or network administrator for the required settings.
1
Start the Remote UI and log on in System Manager Mode. Starting Remote UI
2
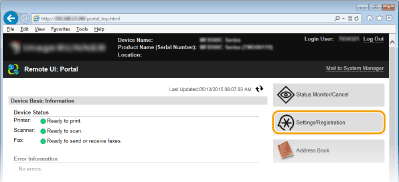
Click [Settings/Registration].
3
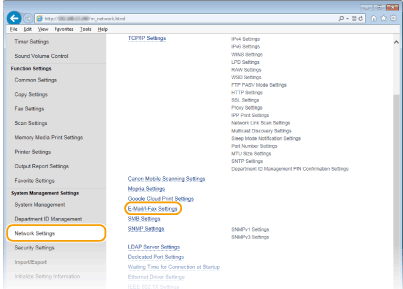
Click [Network Settings]  [E-Mail/I-Fax Settings].
 [E-Mail/I-Fax Settings].
4
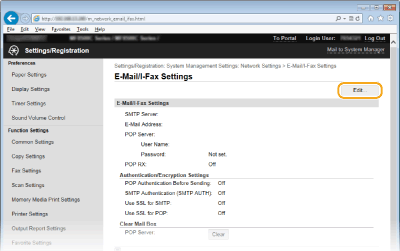
Click [Edit].
5
Specify the required settings.
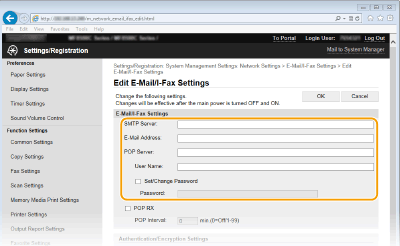
[SMTP Server]
Enter up to 48 alphanumeric characters as the SMTP server name (or IP address) for sending e-mail and I-Faxes.
Enter up to 48 alphanumeric characters as the SMTP server name (or IP address) for sending e-mail and I-Faxes.
[E-Mail Address]
Enter up to 120 characters for the e-mail address that you want to use for the machine.
Enter up to 120 characters for the e-mail address that you want to use for the machine.
[POP Server]
Enter up to 48 alphanumeric characters as the SMTP server name or IP address for sending e-mail and I-Faxes.
Enter up to 48 alphanumeric characters as the SMTP server name or IP address for sending e-mail and I-Faxes.
[User Name]
Enter up to 64 alphanumeric characters as the user name for the specified e-mail account when a POP3 server is used.
Enter up to 64 alphanumeric characters as the user name for the specified e-mail account when a POP3 server is used.
[Set/Change Password]
To set or change the password when a POP3 server is used, select this check box and enter up to 32 alphanumeric characters in [Password].
To set or change the password when a POP3 server is used, select this check box and enter up to 32 alphanumeric characters in [Password].
 Specify the settings required for I-Fax reception
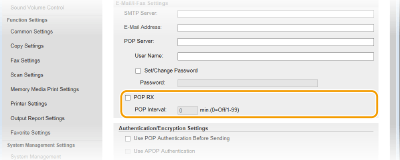
[POP RX]
Select the check box to receive I-Faxes.
Select the check box to receive I-Faxes.
[POP Interval]
This sets the interval (in minutes) used for automatically connecting to the POP3 server. If there are any I-Fax documents on the server, they are automatically received and printed.
This sets the interval (in minutes) used for automatically connecting to the POP3 server. If there are any I-Fax documents on the server, they are automatically received and printed.

To disable automatic reception
Set [POP Interval] to [0]. When [0] is set, you receive I-Faxes manually. Receiving I-Faxes Manually
 Setting up authentication before sending and encrypted communication with the server
Configuring authentication for sending prevents unauthorized users from sending e-mail and I-Faxes. Communication with the server can be encrypted.
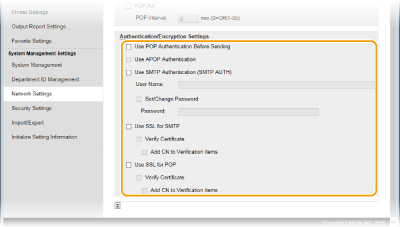
[Use POP Authentication Before Sending]
To use the POP3 server for authentication, select the check box.
To use the POP3 server for authentication, select the check box.
[Use APOP Authentication]
Select the check box to use APOP to encrypt the password during the authentication process.
Select the check box to use APOP to encrypt the password during the authentication process.
[Use SMTP Authentication (SMTP AUTH)]
To enable authentication on the SMTP server, select the check box and enter up to 64 characters in the [User Name] text box.
To enable authentication on the SMTP server, select the check box and enter up to 64 characters in the [User Name] text box.
[Set/Change Password]
To specify or change the password, enter up to 32 characters in the [Password] text box.
To specify or change the password, enter up to 32 characters in the [Password] text box.
[Use SSL for SMTP]
Select the check box to use SSL for encrypting communication with the SMTP server. Select the check box for [Verify Certificate] or [Add CN to Verification Items] depending on your needs.
Select the check box to use SSL for encrypting communication with the SMTP server. Select the check box for [Verify Certificate] or [Add CN to Verification Items] depending on your needs.
[Use SSL for POP]
Select this check box to encrypt communication with the POP server using SSL. Select the [Verify Certificate] and [Add CN to Verification Items] check boxes as required.
Select this check box to encrypt communication with the POP server using SSL. Select the [Verify Certificate] and [Add CN to Verification Items] check boxes as required.
6
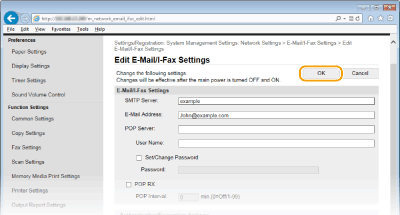
Click [OK].
7
Restart the machine.
Turn OFF the machine, wait for at least 10 seconds, and turn it back ON.
 |
|
Depending on the network you are using, you may need to change the SMTP or POP3 port setting (Changing Port Numbers). For more information, contact your Internet service provider or Network Administrator.
|