Setting/Confirming a Key Pair and Device Certificate
Setting a Key Pair and Device Certificate
The following procedures describe how to generate and update the key pair and device certificate necessary for adding a device signature to a PDF or XPS file.
For information on the optional products required to use this function, see "Optional Products Required for Each Function."
1.
Press  (Settings/Registration).
 (Settings/Registration).
2.
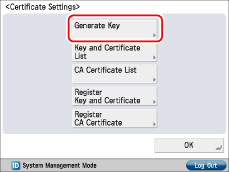
Press [Management Settings] → [Device Management] → [Certificate Settings].
3.
Press [Generate Key].

4.
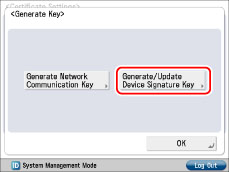
Press [Generate/Update Device Signature Key].

5.
Press [Yes].
|
IMPORTANT
|
|
You can register only one key pair.
|
|
NOTE
|
|
The name of the generated/updated key pair is set to 'Device Signature Key'.
|
6.
Press [OK].
Confirming a Key Pair and Device Certificate
The following procedure describes how to confirm a key pair and device certificate generated/updated in "Setting a Key Pair and Device Certificate."
1.
Press  (Settings/Registration).
 (Settings/Registration).
2.
Press [Management Settings] → [Device Management] → [Certificate Settings].
3.
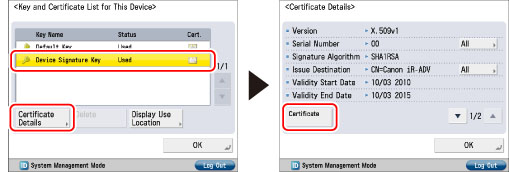
Press [Key and Certificate List] → [Key and Certificate List for This Device].
If  is displayed to the left of a key pair, it is corrupted or invalid. Follow the procedure in "Setting a Key Pair and Device Certificate." to generate/update a key pair.
 is displayed to the left of a key pair, it is corrupted or invalid. Follow the procedure in "Setting a Key Pair and Device Certificate." to generate/update a key pair.
|
NOTE
|
|
You cannot delete or edit a key pair necessary for a device signature on the Key and Certificate List for this Machine screen.
|
4.
Select [Device Signature Key] → press [Certificate Details] → [Certificate].

If [Certificate] is grayed out or <The key is corrupted or invalid.> is displayed, you cannot use the key pair. Follow the procedure in "Setting a Key Pair and Device Certificate" to generate/update a key pair.
|
NOTE
|
|
<Cert. Thumbprint> contains sender information used to validate the reliability of a PDF or XPS file with a device signature, by matching it with the MD5 or SHA-1 message digest number.
|
|
The expiration date for the device signature is set to 5 years after its key pair was generated/updated.
|
5.
Press [OK] → [OK] → [OK].
6.
Press [OK].
|
IMPORTANT
|
|
For information on how a general user can check the device certificate, see "Checking a Device Signature/User Signature Certificate."
|