Checking and Cancelling Jobs from the Job Status Screen
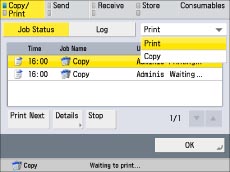
This section describes the operations that can be performed from the Job Status screen.
|
NOTE
|
|
You can select a job type from the drop-down list to display only jobs of a specific type in the list.
|
Checking and Cancelling Copy/Print Jobs
1.
Press  (Status Monitor/Cancel).
 (Status Monitor/Cancel).
2.
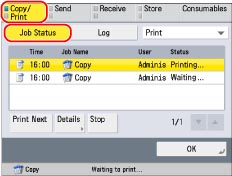
Press [Copy/Print] → [Job Status].
3.
Select the desired job →select the operation to perform.
You can select the following operations.
|
[Print Next]:
|
You can change the printing priority of the selected job, so that it is printed right after the current job is complete. [Print Next] is displayed when a print job is selected.
|
|
[Details]:
|
Displays detailed information for the selected job. Check the detailed information → press[OK] to return to the Copy/Print screen.
|
|
[Stop]:
|
Cancels the selected job. Press [Stop] → [Yes] to cancel the job.
|
If you select a print job → press [Details], you can perform the following operations.
Press [Pause] to temporarily stop the job.
Press [Paper Feed] to forcibly print the print data remaining in the memory.
Press [Skip Error] to temporarily disable errors and continue printing.
|
IMPORTANT
|
|
You cannot select multiple jobs and cancel them all at once. Select and cancel one job at a time.
|
|
NOTE
|
|
[Pause] changes to [Resume] when you pause a print job. Press [Resume] to resume printing.
For information on the errors that can be temporarily disabled by pressing [Skip Error] after you select a job, see "When a Message Appears."
The cancelled job is displayed as <NG> (No Good) on the Log screen.
|
Checking and Cancelling Send Jobs
1.
Press  (Status Monitor/Cancel).
 (Status Monitor/Cancel).
2.
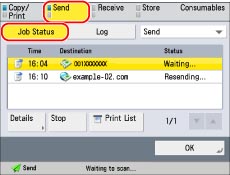
Press [Send] → [Job Status].
3.
Select the desired job →select the operation to perform.
You can select the following operations.
|
[Details]:
|
Displays detailed information for the selected job. Check the detailed information → press [OK] to return to the Send screen.
|
|
[Stop]:
|
Cancels the selected job. Press [Stop] → [Yes] to cancel the job.
|
|
[Print List]:
|
Prints the job status list. [Print List] is displayed when a job is selected. Press [Print List] → [Yes] to print the list.
|
If you select a send job → press [Details], you can perform the following operations.
Press[Resend] to resend the job. If you select a job with multiple destinations, press [Broadcast List] → [Resend].
Press [Change Destination] to change the destination. If you select a job with multiple destinations, press [Broadcast List] → [Resend].
|
IMPORTANT
|
|
You cannot select multiple jobs and cancel them all at once. Select and cancel one job at a time.
|
|
NOTE
|
|
The canceled job is displayed as <NG> (No Good) on the Log screen.
The list can be printed only if 11"×17", LGL, LTR, or LTRR (plain, recycled, thin, or color paper) is loaded in one of the paper sources that is set to 'On' when you press [Other] to select a paper source in [Paper Drawer Auto Selection On/Off]. (See "Enabling Paper Drawer Auto Selection.")
However, if [Consider Paper Type] for Copy is set to 'On' in [Paper Drawer Auto Selection On/Off] in [Function Settings] (Settings/Registration), you cannot print from a paper source with color paper specified.
|
Checking and Cancelling Receive Jobs
1.
Press  (Status Monitor/Cancel).
 (Status Monitor/Cancel).
2.
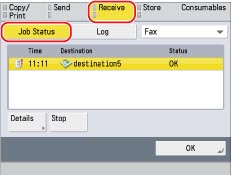
Press [Receive] → [Job Status].
3.
Select the desired job →select the operation to perform.
You can select the following operations.
|
[Details]:
|
Displays detailed information for the selected job. Check the detailed information → press [OK] to return to the Receive screen.
|
|
[Stop]:
|
Cancels the selected job. [Stop] is displayed when a job is selected. Press [Stop] → [Yes] to cancel the job.
|
|
[Check I-Fax RX]:
|
Displays the I-fax reception status. [Check I-Fax RX] is displayed when a job is selected.
|
|
NOTE
|
|
To use [Check I-Fax RX], set <Use POP RX> to 'On' in [Communication Settings] to enable the machine to receive POP. (See "Common Communication Settings for E-Mail/I-Fax.")
|
Checking and Cancelling Store Jobs
1.
Press  (Status Monitor/Cancel).
 (Status Monitor/Cancel).
2.
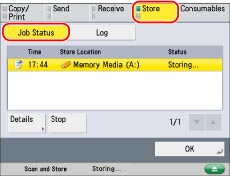
Press [Store] → [Job Status].
3.
Select the desired job →select the operation to perform.
You can select the following operations.
|
[Details]:
|
Displays detailed information for the selected job. Check the detailed information → press [OK] to return to the Store screen.
|
|
[Stop]:
|
Cancels the selected job. Press [Stop] → [Yes] to cancel the job.
|
|
IMPORTANT
|
|
You cannot select multiple jobs and cancel them all at once. Select and cancel one job at a time.
|
|
NOTE
|
|
The cancelled job is displayed as <NG> (No Good) on the Log screen.
|
|
NOTE
|
|
If [Suspended Job Timeout] in [Function Settings] (Settings/Registration) is set to 'On', the job which is suspended because paper was not available for printing is received is displayed as a suspended job after the specified time has elapsed. To resume printing, load the paper, and select the job → press [Details] → [Resume].
|