Specifying the Fax/I-Fax Inbox Settings
This section describes various settings, including the Memory Lock mode, for the Confidential Fax Inbox/Memory RX Inbox in the Fax/I-Fax Inbox.
If you are using the imageRUNNER ADVANCE C2020, depending on the region, the optional product is required to use this function. For information on the optional product, see "Optional Products Required for Each Function."
Set/Register Confidential Fax Inboxes
You can set and register a name and password for any Confidential Fax Inbox. You can also initialize the registered name and password.
Memory RX Inbox PIN
You can set a seven digit PIN for the Memory RX (Receive) Inbox, and restrict its use to only those users who enter the PIN.
Fax Memory Lock
If you set [Use Fax Memory Lock] to 'On' , the machine stores received fax documents in memory without printing them. This is referred to as the Fax Memory Lock.
You can later check the received documents in the Memory RX Inbox, and print or send them as necessary.
I-Fax Memory Lock
If you set [Use I-Fax Memory Lock] to 'On' , the machine stores received I-fax documents in memory without printing them. This is referred to as the I-Fax Memory Lock.
You can later check the received documents in the Memory RX Inbox, and print or send them as necessary.
Memory Lock Start Time
You can set the Memory Lock mode to start automatically at a specified time.
Memory Lock End Time
You can set the Memory Lock mode to end automatically at a specified time.
Divided Data RX Timeout
If it takes longer than the set Divided Data RX Timeout time to receive all the parts of a divided I-fax document, only the data which has been received is combined to form the document.
Data which can be combined to form complete pages is printed, and any remaining data is deleted.
1.
Press  (Settings/Registration).
(Settings/Registration).2.
Press [Function Settings] → [Receive/Forward] → [Common Settings].
3.
Press [Set Fax/I-Fax Inbox].
To set/store a Confidential Fax Inbox:
Press [Set/Register Confidential Fax Inboxes].
Press the desired Confidential Fax Inbox number.
If you want to initialize the settings, press the Confidential Fax Inbox number that you want to initialize.
If you enter Confidential Fax Inbox number using  -
-  (numeric keys), make sure to enter a two digit number → press [OK].
- (numeric keys), make sure to enter a two digit number → press [OK].Specify each setting → press [OK] → [Close].

[Register Box Name]:
Press [Register Box Name] → enter a name → press [OK].
Press [Register Box Name] → enter a name → press [OK].
<PIN>:
If you want to set a PIN for the Confidential Fax Inbox, enter the password using - (numeric keys). Press [Confirm] → re-enter the PIN for confirmation → press [OK]. You can leave the PIN blank. You cannot store a password with only zeros as the number, such as <0000000>.
If you want to set a PIN for the Confidential Fax Inbox, enter the password using
- (numeric keys). Press [Confirm] → re-enter the PIN for confirmation → press [OK]. You can leave the PIN blank. You cannot store a password with only zeros as the number, such as <0000000>.[URL Send Settings]:
If you set the machine to send a link via e-mail to the Confidential Fax Inbox in which the document is stored, you can check or perform operations on the document in the Confidential Fax Inbox, using the Remote UI (User Interface) of the machine. If you want to send a link to a Confidential Fax Inbox via e-mail, press [URL Send Settings] → specify the destination → press [OK].
If you set the machine to send a link via e-mail to the Confidential Fax Inbox in which the document is stored, you can check or perform operations on the document in the Confidential Fax Inbox, using the Remote UI (User Interface) of the machine. If you want to send a link to a Confidential Fax Inbox via e-mail, press [URL Send Settings] → specify the destination → press [OK].
[Initialize]:
To initialize settings, select the Confidential Fax Inbox that you want to initialize → press [Initialize] → [Yes].
To initialize settings, select the Confidential Fax Inbox that you want to initialize → press [Initialize] → [Yes].
|
IMPORTANT
|
|
Since there is no way to check a stored password, make sure that you write down the password that you enter, and keep it in a safe place.
|
To set a Memory RX Inbox PIN:
Press [Memory RX Inbox PIN].
Press [Set].
|
NOTE
|
|
If you do not specify a file name, the first 24 characters of the condition name are used as the file name. However, you can change the name of the file at any time.
|
Press [PIN] → enter the PIN.
Press [Confirm] → enter the same PIN → press [OK].
Press [OK].
If you do not want to set a PIN for the Memory RX Inbox, press [OK] without entering any numbers.
You cannot store a PIN with only zeros as the number, such as <0000000>. If you enter a number that begins in zeros, such as <02> or <002>, the zeros are ignored and the number is registered as <0000002>, the same as if you had simply entered <2>.
|
IMPORTANT
|
|
Since there is no way to check a stored password, make sure that you write down the password that you enter, and keep it in a safe place.
|
To store received Fax Documents in memory:
Press [Use Fax Memory Lock].
Press [On] → [OK].
Select [Off] if you do not want to use the Fax Memory Lock.
|
IMPORTANT
|
|
If the message <Fax Memory RX is on.> does not appear, set the Fax Memory Lock setting to 'On' on the Memory RX Inbox screen from the Inbox Selection screen of the Memory RX Inbox function.
|
To store received I-Fax Documents in memory:
Press [Use I-Fax Memory Lock].
Press [On] → [OK].
Select [Off] if you do not want to use the I-Fax Memory Lock.
|
IMPORTANT
|
|
If the message <I-Fax Memory RX is on.> does not appear, set the I-Fax Memory Lock setting to 'On' on the Memory RX Inbox screen from the Inbox Selection screen of the Memory RX Inbox function.
|
To specify the Memory Lock Start Time settings:
Press [Memory Lock Start Time].
Select the conditions.
If you select [Everyday], select a number ([1] to [5]) → enter the start time using - (numeric keys) → press [OK].
- (numeric keys) → press [OK].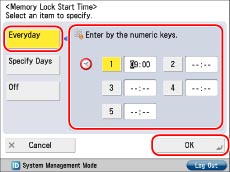
You can store up to five different start times.
The time is displayed in 24-hour notation. Enter the time as a four digit number including zeros.
|
Example:
|
7:05 a.m. → 0705
|
|
11:18 p.m. → 2318
|
If you make a mistake when entering the time, enter another four digit number.
If you select [Specify Days], select a day of the week ([Sun] to [Sat]) → select a number ([1] to [5]).

Enter the start time using - (numeric keys) → press [OK].
- (numeric keys) → press [OK].You can store up to five different start times for each day of the week.
The time is displayed in 24-hour notation. Enter the time as a four digit number including zeros.
|
Example:
|
7:05 a.m. → 0705
|
|
11:18 p.m. → 2318
|
If you make a mistake when entering the time, enter another four digit number.
If you select [Off], press [OK].
If you select [Off], Memory Lock will not automatically turn on at the specified time. You can manually turn Memory Lock On or Off by pressing [On] or [Off] under <Fax Memory Lock> or <I-Fax Memory Lock> on the Memory RX Inbox screen, from the Inbox Selection screen of the Memory RX Inbox function.
|
NOTE
|
|
You can select [Everyday] for Memory Lock Start Time and [Specify Days] for Memory Lock End Time, and vice versa.
|
To specify the Memory Lock End Time settings:
Press [Memory Lock End Time].
Select the conditions.
If you select [Everyday], select a number ([1] to [5]) → enter the end time using - (numeric keys) → press [OK].
- (numeric keys) → press [OK].
You can store up to five different end times.
The time is displayed in 24-hour notation. Enter the time as a four digit number including zeros.
|
Example:
|
7:05 a.m. → 0705
|
|
11:18 p.m. → 2318
|
If you make a mistake when entering the time, enter another four digit number.
If you select [Specify Days], select a day of the week ([Sun] to [Sat]) → select a number ([1] to [5]).
Enter the end time using - (numeric keys) → press [OK].
- (numeric keys) → press [OK].
You can store up to five different start times for each day of the week.
The time is displayed in 24-hour notation. Enter the time as a four digit number including zeros.
|
Example:
|
7:05 a.m. → 0705
|
|
11:18 p.m. → 2318
|
If you make a mistake when entering the time, enter another four digit number.
If you select [Off], press [OK].
The Memory Lock mode will not be turned off automatically. You can manually turn Memory Lock On or Off by pressing [On] or [Off] under <Fax Memory Lock> or <I-Fax Memory Lock> on the Memory RX Inbox screen, from the Inbox Selection screen of the Memory RX Inbox function.
|
NOTE
|
|
You can select [Everyday] for Memory Lock Start Time and [Specify Days] for Memory Lock End Time, and vice versa.
|
To specify the Divided Data RX Timeout settings:
Press [Divided Data RX Timeout].
Press [-] or [+] to adjust the timeout setting → [OK].
|
NOTE
|
|
If you set the divided data RX timeout time to '0', no divided data RX timeout time is set.
|
|
IMPORTANT
|
|||||||||
|
If the capacity of the Fax/I-Fax Inbox is reached, you cannot use the Memory Lock mode. These numbers may vary depending on the remaining capacity of the memory. The capacities are indicated below.
Maximum number of stored documents/pages:
If you are using the imageRUNNER ADVANCE C2020, depending on the region, the 2.5inch/80GB HDD is an optional product.
If you delete received divided data, you cannot then combine it to form a complete document, even if the remaining divided data is received later.
Divided data cannot be printed as a regular image unless it has been combined.
If you select [Print When Erased] on the Divided Data RX Inbox screen to print the data which is deleted, the data will not be forwarded or stored in memory. It will only be printed.
|
|
NOTE
|
|
You can create up to 50 Confidential Fax Inboxes.
The numbers for Confidential Fax Inboxes are 00 to 49.
Setting a name for a Confidential Fax Inbox is optional.
Setting a password for a Confidential Fax Inbox, Memory RX Inbox is optional.
You can enter up to seven digits for the password. If you enter fewer than seven digits, the machine stores the number with leading zeros.
Example: If <321> is entered, <0000321> is stored.
If the fax board is installed, you can receive faxes into memory.
If the Color Universal Send Kit is activated, you can receive e-mail and I-fax transmissions.
|