E-Mail Addresses
If you are using the imageRUNNER ADVANCE C2020, depending on the region, the optional product is required to use this function. For information on the optional product, see "Optional Products Required for Each Function."
1.
Press  (Settings/Registration).
(Settings/Registration).2.
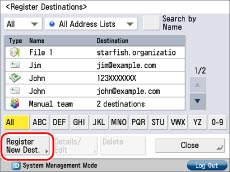
Press [Set Destination] → [Register Destinations] → [Register New Dest.].
3.
Press [E-Mail].
4.
Press the drop-down list → select an address list from Address List 1 to 10.
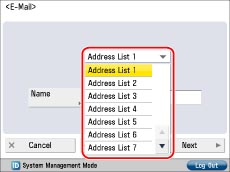
Address lists are a convenient way to classify destinations.
The e-mail address that you enter will be stored in the address list that you select here.
5.
Press [Name].
6.
Enter a name for the destination → press [OK].
|
NOTE
|
|
The first character that you enter for the name is used for sorting the destination list when you press keys, such as [ABC], [DEF], and [GHI], on the Address Book screen.
If [Search by Name] is pressed on the Address Book screen, a screen for narrowing the search in the Address Book appears.
For more information, see "Overview of This Function."
|
7.
Press [Next].
8.
Press [E-Mail Address].
9.
Enter the address → press [OK].
10.
Select one of the following for <Divide Data>.
Select [On] if the recipient's machine can combine received data that is divided.
Select [Off] if the recipient's machine does not have the capability to combine received data that is divided, or if you are not sending divided data.
If the size of the data being sent exceeds the value set for [Maximum Data Size for Sending] in [Function Settings] (Settings/Registration), the data is divided when sent. If the size of the data being sent exceeds the value set for [Maximum Data Size for Sending] when [Off] is selected, the data is divided by pages and sent as multiple e-mails.
|
IMPORTANT
|
|
Make sure to check the specifications of the destination's e-mail software before setting this mode. A sending error may occur if the destination's e-mail software is unable to combine divided data.
|
|
NOTE
|
|
For more information on the maximum data size for sending, see "Maximum Data Size for Send."
|
11.
Press [OK] → [Close].
If you are performing Access Number Management for the Address Book, perform the following operation.
Press [Next] → [Access Number] → [Access Number].
Enter the access number using  -
-  (numeric keys) → press [Confirm].
- (numeric keys) → press [Confirm].Enter the access number again for confirmation → press [OK] → [OK].