Installing Applications
You can install MEAP applications. There are two types of installation: installing a new MEAP application, and updating an existing MEAP application to a newer version.
|
IMPORTANT
|
|
You will need a valid license file in order to install a MEAP application. If your application comes with a License Access Number, you must access the License Management System at the following URL to acquire your license file:
http://www.canon.com/lms/license/ Follow the online directions to create and download your license file. You will need to have your License Access Number and your MEAP device serial number(s) available in order to complete the license generation process. If your application does not come with a License Access Number, your license file will be provided by your MEAP Application provider. For details, see the manual provided with the application.
|
1.
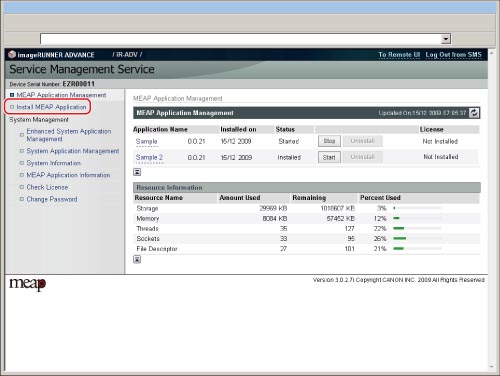
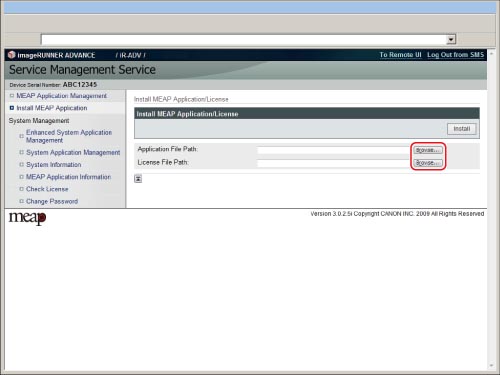
Click [Install MEAP Application].
2.
Click [Browse] for the file you want to install.
3.
Select the file you want to install in the dialog box that appears → click [OK].
Set application files and license files separately.
File extensions:
|
Application File:
|
A file with the 'jar' extension.
|
|
License File:
|
A file with the 'lic' extension.
|
|
NOTE
|
|
You can also specify the file path by entering it directly.
|
4.
Click [Install].
|
IMPORTANT
|
|
You cannot install license files only.
When installing an application, make sure you specify the license file. You cannot install the application without specifying the license file.
To add a license file for an application that is already installed, see "Managing Application Licenses."
|
5.
Click [Yes].
Depending on the application, a software license agreement screen may be displayed. Confirm the
information displayed on the screen → click [OK].
information displayed on the screen → click [OK].
If you are installing a new application, the following information appears on the screen.
[Application Information]
[License Information]
The following information appears when adding a license file. Depending on the application, a software license agreement screen may be displayed. Confirm the information displayed on the screen → click [OK].
|
<Current>:
|
Displays the validity period and counter information from when the application was installed.
|
|
<Add>:
|
Displays the additional validity period and counter information for the upgrade.
|
|
<Total>:
|
Displays the total of the validity periods and counter information in <Current> and <Add>.
|
Installation will start after the message <Installing... Please wait.> appears again.
|
IMPORTANT
|
|
To use the installed application, you must start the application. (See "Starting/Stopping Applications.")
|
|
IMPORTANT
|
|
If you are updating an existing MEAP application to a newer version, stop the application before installing the new version. You cannot update the application unless you stop it first. (See "Starting/Stopping Applications.")
The maximum number of applications that can be installed is 19.
The maximum amount of memory allocated to install MEAP applications is 1 GB. However, if you are using the imageRUNNER ADVANCE C2020, the maximum amount may be 220 MB, depending on the region.
You can confirm the memory allocated to MEAP applications in [Storage], under [Resource Information] displayed in the [MEAP Application Management] page.
There may be other system requirements for installation, depending on the applications. For instructions on settings, see the manual provided with the application.
If the machine enters the Shutdown mode while installing an application, an error message may be displayed on the [Install] page for SMS, and the installation cancelled.
In this case, try installing the MEAP application again after the machine is restarted (the main power switch is turned OFF, and then back ON again). For instructions on how to turn the machine ON/OFF, see "Main Power and Control Panel Power." After installation, an icon for the installed application may appear on the Main Menu screen on the touch panel display, depending on the application. If an icon for the installed application is not displayed on the Main Menu screen, press [Show All] to switch the display. If [Show All] is not displayed, see "Setting the Main Menu Screen."
|