Inner Finisher-C1
The Inner Finisher-C1 is equipped with the following modes: Collate, Group, Offset, and Staple. (See "Finishing Modes.")
Additionally, if the Inner Finisher Additional Tray-A1 is attached, prints can be delivered to two different locations.
 CAUTION CAUTION |
|
Do not place your hand in the part of the tray where stapling is performed (near the rollers) if a finisher is attached, as this may result in personal injury.
 Do not place your fingers or hands on the finisher when the finisher is in use. Doing so may result in personal injury or damage to the finisher.
|
|
IMPORTANT
|
|
Since the trays of the finisher move during copying/printing, do not place anything under the trays, as doing so may damage the trays.
|
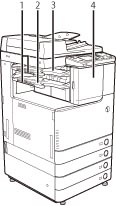
Parts and Their Functions
|
1
|
Auxiliary Tray
Pull out the auxiliary tray if you are outputting large size paper.
|
|
2
|
Output Tray
Paper is output to the output tray.
|
|
3
|
Inner Finisher Additional Tray-A1
The Inner Finisher Additional Tray-A1 can be attached to the Inner Finisher-C1 to provide an additional paper output tray.
|
|
4
|
Front Cover
Open this cover to replace the staple cartridge in the stapler unit, or to clear a staple jam. (See "Routine Maintenance" and "Troubleshooting" in the Basic Operation Guide.)
|
Finishing Modes
The Inner Finisher-C1 is equipped with the following finishing modes.
Collate Mode
The prints are automatically collated into sets arranged in page order.
Group Mode
All prints of the same original page are grouped together into sets.
Offset Mode
The print output is shifted alternately to the front and back of the tray, in a vertical (portrait) orientation, or a horizontal (landscape) orientation, depending on the orientation of your originals. For example, if you place A4R originals, the paper is output and shifted in the horizontal direction. If you place A4 originals, the paper is output and shifted in the vertical direction.
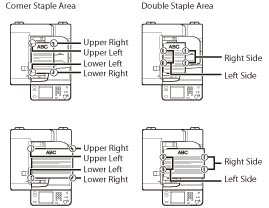
Staple Mode
The prints are automatically collated into sets arranged in page order and stapled. Prints are stapled in the following places:
If an original is placed on the platen glass:
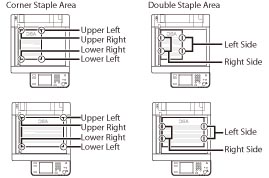
If originals are placed in the feeder:
The following are paper sizes that can be output from the output trays of the machine. However, some paper sizes may not be output depending on the set functions.
 : Available - : Unavailable
|
Paper Size
|
Output Tray
|
|
|
305 mm x 457 mm
|
|
|
|
SRA3
|
|
|
|
A3
|
|
|
|
A4
|
|
|
|
A4R
|
|
|
|
A5
|
|
|
|
A5R
|
|
|
|
B4
|
|
|
|
B5
|
|
|
|
B5R
|
|
|
|
Envelope
|
Nagagata 3
|
|
|
Yougatanaga 3
|
|
|
|
Kakugata 2
|
|
|
|
COM10 No.10
|
|
|
|
Monarch
|
|
|
|
DL
|
|
|
|
ISO-B5
|
|
|
|
ISO-C5
|
|
|
|
Custom Size
|
99 mm x 139.7 mm to 320 mm x 457.2 mm
|
|
|
IMPORTANT
|
|
The Inner Finisher-C1 cannot be attached with the Inner 2 Way Tray-F1.
Depending on the region, the 3 Way Unit-C1 may be required to attach the Inner Finisher-C1 to the main unit.
The following paper sizes can be stapled: A3, B4, A4, A4R, B5
You cannot staple envelopes, transparencies, tracing paper, or labels.
|
|
NOTE
|
|
The maximum number of sheets (including cover sheets) that can be stapled together is 30 sheets for A3, B4, and A4R paper, and 50 sheets for A4 and B5 paper.
If the machine stops while stapling and the message <Load staples.> appears, almost all of the staples have been used, and the staple cartridge must be replaced. To proceed, replace the staple cartridge. (See "Routine Maintenance" in the Basic Operation Guide.)
If the Collate, Group, or Staple mode is set, the output trays move downward as the stack of paper that is output increases in quantity and thickness, and printing may temporarily stop after the paper is output in the following cases. Remove all of the prints from the output tray, and printing resumes.
When the position of the tray reaches the lower limit
When 30 sets are printed (with the Staple mode is set)
If you press [Offset] when either the Collate or Group mode is set, each set of prints is shifted alternately to the front and back of the tray before it is delivered to the output tray.
|