Specifying Secure Watermark
Forced Secure Watermark
Forced Secure Watermark enables you to set the machine to always print the specified hidden watermark on prints and copies.
1.
Press  (Settings/Registration).
(Settings/Registration). 2.
Press [Function Settings] → [Common] → [Print Settings].
3.
Press [Secure Watermark Settings].
4.
Press [Forced Secure Watermark].
5.
Press [Set] for the function (Copy/Access Stored Files/Printer) to set the Forced Secure Watermark mode.
6.
Select the type of secure watermark to embed (Watermark, Date, Copy Set Numbering, Serial Number, or ID/User Name).
If you select [Watermark]:
Press [Watermark].
Press the drop-down list → select a preset watermark → press [Next].
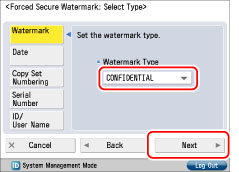
If you select [Custom] from the drop-down list, press [Enter] and enter the desired text → press [OK] → [Next].
|
NOTE
|
|
For instructions on entering characters, see "Entering Characters from the Touch Panel Display."
If you have registered characters in [Register Characters for Page Numbering/Watermark] in [Function Settings] (Settings/Registration), you can select the characters from the list.
|
If you select [Date]:
Press [Date].
Press the drop-down list → select the date format → press [Next].

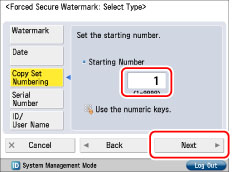
If you select [Copy Set Numbering]:
Press [Copy Set Numbering].
Enter the starting number → press [Next].
If you select [Serial Number]:
Press [Serial Number] → [Next].
|
NOTE
|
|
The serial number that appears in the bottom left-hand corner of the screen when you press the Counter Check key on the control panel is printed.
|
If you select [ID/User Name]:
Press [ID/User Name] → [Next].
|
NOTE
|
|
If a login service has been set, the ID or User Name of the user printing the document is printed.
|
|
The watermark "CONFIDENTIAL" is printed if a login service is not set.
|
7.
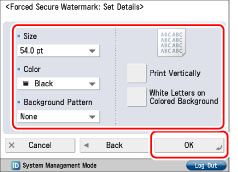
Set the background pattern, size, and text colour → press [OK].
|
NOTE
|
|
To print pattern on the background of copy, select the background pattern from the Background Pattern drop-down list.
|
|
You can select [36.0 pt], [54.0 pt], [72.0 pt] for the size of the text.
|
|
You can select [Magenta], [Cyan], or [Black] for the colour of the text.
|
|
To change the characterorientation, press [Print Vertically].
|
|
To use white letters on a coloured background, press [White Letters on Colored Background].
|
8.
Press [OK].
Printer Driver Secure Watermark
If you set the Printer Driver Secure Watermark mode, you can select whether to set the Secure Watermark function for each job.
1.
Press (Settings/Registration).
(Settings/Registration). 2.
Press [Function Settings] → [Common] → [Print Settings].
3.
Press [Secure Watermark Settings].
4.
Press [Printer Driver Secure Watermark].
5.
Press [Set].
6.
Select the type of secure watermark to embed (Watermark, Date, Copy Set Numbering, Serial Number, or ID/User Name).
If you select [Watermark]:
Press [Watermark].
Press the drop-down list → select a preset watermark → press [Next].
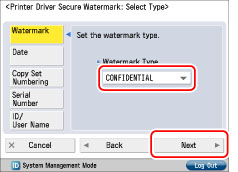
If you select [Custom] from the drop-down list, press [Enter] and enter the desired text → press [OK] → [Next].
|
NOTE
|
|
For instructions on entering characters, see "Entering Characters from the Touch Panel Display."
If you have registered characters in [Register Characters for Page Numbering/Watermark] in [Function Settings] (Settings/Registration), you can select the characters from the list.
|
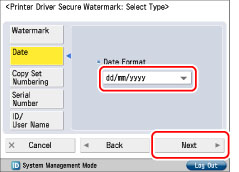
If you select [Date]:
Press [Date].
Press the drop-down list → select the date format → press [Next].
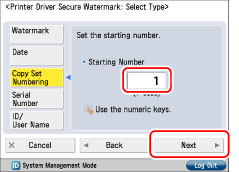
If you select [Copy Set Numbering]:
Press [Copy Set Numbering].
Enter the starting number → press [Next].
If you select [Serial Number]:
Press [Serial Number] → [Next].
|
NOTE
|
|
The serial number that appears in the bottom left-hand corner of the screen when you press the Counter Check key on the control panel is printed.
|
If you select [ID/User Name]:
Press [ID/User Name] → [Next].
|
NOTE
|
|
If a login service has been set, the ID or User Name of the user printing the document is printed.
|
|
The watermark "CONFIDENTIAL" is printed if a login service is not set.
|
7.
Set the background pattern, size, and text colour → press [OK].

|
NOTE
|
|
To print pattern on the background of copy, select the background pattern from the Background Pattern drop-down list.
|
|
You can select [36.0 pt], [54.0 pt], [72.0 pt] for the size of the text.
|
|
You can select [Magenta], [Cyan], or [Black] for the colour of the text.
|
|
To change the character orientation, press [Print Vertically].
|
|
To use white letters on a coloured background, press [White Letters on Colored Background].
|
8.
Press [OK].
|
IMPORTANT
|
|
If Printer Driver Secure Watermark and Forced Secure Watermark are set for a printer at the same time, Forced Secure Watermark is given priority.
|
|
NOTE
|
|
To use the Secure Watermark function for each job from the printer driver, on the [Printing Preferences] dialog box, click the [Finishing] tab → [Advanced Settings] → set [Secure Printing Function of Devices] to 'On'. For more information, see [Help] for the printer driver.
|