Switching the Colour Mode
1.
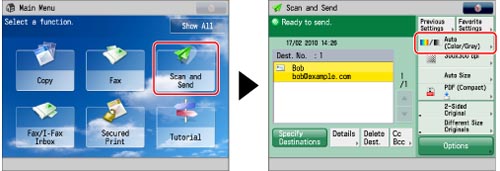
Press [Scan and Send] → specify the destination → press the select colour button.
2.
Select the desired colour mode → press [OK].
|
IMPORTANT
|
|
When [Auto(Color/Gray)] or [Auto(Color/Black)] is set and your originals contain colour sections, the machine scans them in the Full Color mode. However, the machine may scan the colour originals in the Black-and-White mode under the following conditions. To avoid this, set the colour mode to [Full Color].
If the originals contain very few colour sections
If the colour sections of the originals are close to black
If the originals contain light colour densities
If the colour sections are located only in the range indicated by the diagram below, when loading the originals in the feeder
 If the destination is an I-fax address or a group address that includes an I-fax address, the original is always scanned and sent in the Black-and-White mode.
|
|
NOTE
|
|
You can store the desired colour mode as a default in Change Default Settings, in Scan and Send Settings. (See "Changing the Default Settings for Send.")
If a black-and-white original is scanned in the Full Color mode, it is counted as a colour scan.
If you select JPEG as the file format, [Black & White] is changed to [Grayscale].
If you select TIFF as the file format, [Black & White] is set.
|