Erase Frame
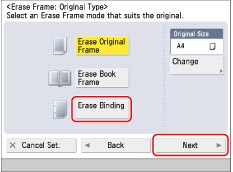
This mode enables you to remove the shadows and lines that appear when scanning various types of originals. There are three types of erase frame mode, [Erase Original Frame], [Erase Book Frame], and [Erase Binding].
|
IMPORTANT
|
|
If you place originals with binding holes in the feeder, it may damage the originals. Place your original with binding holes on the platen glass.
|
Erase Original Frame
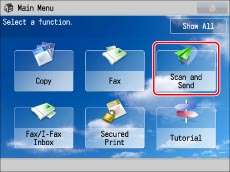
1.
Press [Scan and Send].
2.
Specify the destination → press [Options] → [Erase Frame].

3.
Press [Erase Original Frame] → [Next].
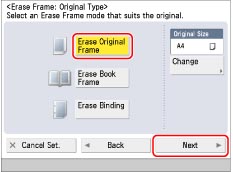
To specify the original size, press [Change] → select the size → press [OK].
|
IMPORTANT
|
|
You can only set the Erase Original Frame mode for the original sizes shown on the touch panel display.
|
4.
Sets the erase frame width.
If you want to set the same width for all four borders:
Press [-] or [+] to set the erase frame width.
If you want to set the top, left, right, and bottom widths independently:
Press [Adjust Independently].
Select the desired borders → press [-] or [+] to set their respective erase frame widths.
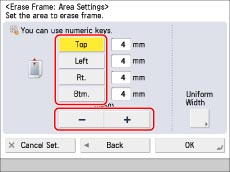
To return to the screen for setting the same width for all four borders, press [Uniform Width].
5.
Press [OK] → [Close].
Erase Book Frame
1.
Press [Scan and Send].

2.
Specify the destination → press [Options] → [Erase Frame].

3.
Press [Erase Book Frame] → press [Next].
To specify the original size, press [Change] → select the size → press [OK].
|
IMPORTANT
|
|
You can set the Erase Book Frame mode only for the original paper sizes shown on the touch panel display.
|
4.
Sets the erase frame width.
If you want to set the same width for all four borders:
Press [Center] or [Sides] → press [-] or [+].
If you want to set the top, left, centre, right, and bottom widths independently:
Press [Adjust Independently].
Select the desired erase frame borders → press [-] or [+] to set their respective erase frame widths.

To return to the screen for setting the same width for all four borders, press [Uniform Width].
5.
Press [OK] → [Close].
Erase Binding
1.
Press [Scan and Send].

2.
Specify the destination → press [Options] → [Erase Frame].

3.
Press [Erase Binding] → press [Next].
4.
Specify the location of the binding marks → press [-] or [+] to set their respective erase frame widths.
When you specify the location of the binding holes, assume that the original is face up.
5.
Press [OK] → [Close].
|
IMPORTANT
|
|
If you are using the Erase Binding mode, the borders you do not select are also erased by 4 mm.
|