Scanning Using Keys on the Operation Panel
You can scan a document using the keys on the operation panel.
1
Place documents.
2
Press [ ] (COPY/SCAN) to switch to the Scan mode screen.
] (COPY/SCAN) to switch to the Scan mode screen.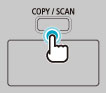
3
Press [ ] or [
 ] to highlight <Computer>, and then press [OK].
] or [] to highlight <Computer>, and then press [OK].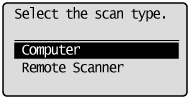
4
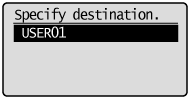
Press [] or [] to specify a destination, and then press [OK].
] or [] to specify a destination, and then press [OK].When multiple computers are connected:
The computer connected by a USB cable is listed at the top.
The computer connected by a USB cable is listed at the top.
When a computer is connected by a USB cable:
This screen is not displayed.
This screen is not displayed.
If more than ten computers are connected via a network:
The eleventh and subsequent computers are not displayed (you cannot scan).
Reduce the number of computers connected to this machine via a network.
 "Registering the Scanner in MF Network Scan Utility"
The eleventh and subsequent computers are not displayed (you cannot scan).
Reduce the number of computers connected to this machine via a network.
"Registering the Scanner in MF Network Scan Utility"
 |
You can change the names for the displayed computers.
|
5
Press [] or [] to specify the scan settings, and then press [OK].
] or [] to specify the scan settings, and then press [OK].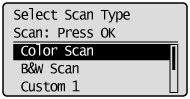
The scanner settings are specified by default as follows.
|
Scan Mode
|
Resolution
|
File Type
|
PDF Settings
|
|
|
Color Scan
|
Color
|
300 dpi
|
PDF
|
Searchable/Compact
|
|
B&W Scan
|
Black and White
|
300 dpi
|
TIFF
|
 |
|
Custom 1
|
Color
|
300 dpi
|
JPEG/Exif
|
|
|
Custom 2
|
Color
|
300 dpi
|
PDF
|
Searchable/Standard
|
Scanning operation starts.
 If you cannot scan: If you cannot scan: |
|
You cannot scan when the setting screen of the MF Toolbox is displayed.
Click [
 ] to close the setting screen before starting a scan. ] to close the setting screen before starting a scan.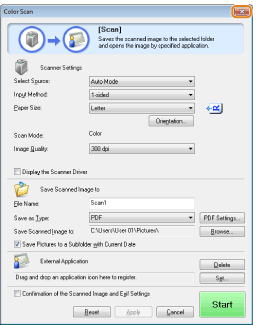 |
Scanning from the feeder:After saving the document, the display returns to the basic scanning screen.
Scanning from the platen glass:Proceed to step 6.
|
To continuously scan the document, press [] or [] to highlight <Scan Next Original>, and then press [OK].
] or [] to highlight <Scan Next Original>, and then press [OK].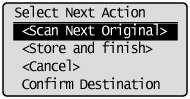
To Cancel the scan:
|
(1)
|
Press [
]or [] to highlight <Cancel>, and then press [OK]. |
|
(2)
|
Press [
] or [] to highlight <Yes>, and then press [OK]. |
To confirm the destination:
|
(1)
|
Press [
] or [] to highlight <Confirm Destination>, and then press [OK]. |
7
Press [] or [] to highlight <Store and Finish>, and then press [OK].
] or [] to highlight <Store and Finish>, and then press [OK].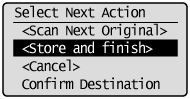
After saving the document, the display returns to the basic scanning screen.
|
NOTE
|
The location to save the scanned images:After scanning, the folder where the images have been saved to opens automatically.
By default, folders named with the date when the data was created are put in the [My Pictures] folder in [My Documents]. (On Windows Vista/7/8, the folder is created in the [Pictures] folder.)
|
To change the scanner settings:You can change the settings for the location to save, the file format, or the resolution from a computer.
For details on the setting procedure, see "Using the MF Toolbox."
|