Loading Paper In the Multi-Purpose Tray
|
Before loading paper in the multi-purpose tray, see "Attention (Loading Paper)."
|
Use the multi-purpose tray when you want to copy or print on a paper that is different from what is in the drawer.
1
Display the Copy mode screen.

2
Open the multi-purpose tray.

3
Adjust the slide guides to match the size of the paper.
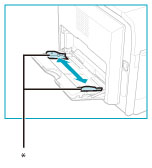
* Slide Guides
If you are feeding large size paper, pull out the auxiliary tray, and extend the tray extension.
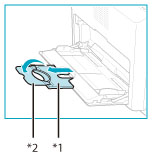
*1 Auxiliary Tray
*2 Tray Extension
4
Load the paper into the multi-purpose tray.
When the paper is loaded into the multi-purpose tray, the side facing down is the one printed on.
Make sure that the height of the paper stack does not exceed the loading limit mark.
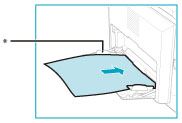
* Loading Limit Mark
When you use the multi-purpose tray to make copies, straighten out curled paper prior to use. Curled paper may cause a paper jam.

* Feeding Direction
To print on the back side of preprinted paper, load the preprinted paper face up into the multi-purpose tray.

* Feeding Direction
|
IMPORTANT
|
|
When loading paper into the multi-purpose tray, align the paper stack neatly between the slide guides. If the paper is not loaded correctly, a paper jam may occur.
If you are printing on heavyweight paper or envelopes using the multi-purpose tray, remove the paper or envelopes, curl their feeding edges upward approximately 3 mm, and then reload the paper or envelopes. Curling the feeding edges enables the rollers to grip the paper or envelopes as they are fed into the multi-purpose tray.
|
|
NOTE
|
|
If there are instructions on the paper package about which side of the paper to load, follow those instructions.
If problems, such as poor print quality or paper jams, occur, try turning the paper stack over and reload it.
|
If you are loading envelopes into the multi-purpose tray:
|
IMPORTANT
|
|
If envelopes are not neatly aligned before being loaded, a problem with the paper supply or a paper jam may occur. Fix any curls or bends before loading the envelopes.
|
Take five envelopes, loosen them as shown, and then stack them together.

Repeat this step five times for each set of five envelopes.
Place the envelopes on a clean, level surface, and press all the way around the envelopes by hand, in the direction of the arrows, to remove any curls.

Repeat this step five times for each set of five envelopes.
Hold down the four corners of the envelopes firmly, so that they and the sealed or glued portion stay flat.
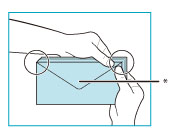
* Flap
Press the envelope in the direction of the arrows.

* Flap
|
IMPORTANT
|
|
Take special care to spread the envelopes out in the direction that they will be fed.
|
5
Load the envelopes, as illustrated on the bellow.

* Feeding Direction
|
IMPORTANT
|
|
The multi-purpose tray can hold 10 envelopes at a time.
Do not print on the back side of the envelopes (the side with the flap).
Envelopes may become creased in the printing process.
|
6
Select the desired paper size and type.
7
Place your originals and start copying.