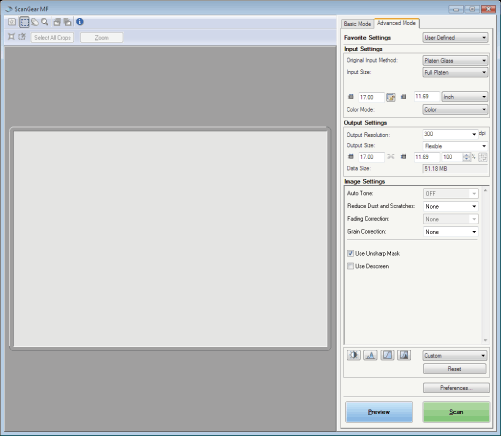
Using the Advanced Mode

Scanning using the advanced mode
1
Display the ScanGear MF.
Start the ScanGear MF using one of the following methods.
Selecting [Display the Scanner Driver] in the MF Toolbox
Starting from an application
2
Click [Advanced Mode].
3
Configure various settings.
4
Click [Preview].
The preview image is displayed.
5
You can specify the scan area of a document by creating a cropping frame.
6
Click [Scan].
Advanced mode toolbar

 |
To perform all the operations on the toolbar, the preview image is required.
|
|
[
 ] (Clear) ] (Clear) |
Deletes the preview image. The settings for the toolbar and color are reset.
|
|
[
 ] (Crop) ] (Crop) |
Specify the scanning area.
|
|
[
 ] (Move) ] (Move) |
Moves the enlarged image.
|
|
[
 ] (Zoom) ] (Zoom) |
Enlarges or reduces the preview image.
Left-clicking
Enlarges the image. Right-clicking
Reduces the image. |
|
[
 ] (Left Rotate) ] (Left Rotate) |
Rotates the image 90 degrees in the left.
|
|
[
 ] (Right Rotate) ] (Right Rotate) |
Rotates the image 90 degrees in the right.
|
|
[
 ] (Information) ] (Information) |
Displays the information of the scanned image.
|
|
[
 ] (Auto Crop) ] (Auto Crop) |
Selects the cropping area of the image automatically.
|
|
[
 ] (Remove Cropping Frame) ] (Remove Cropping Frame) |
Deletes the selected cropping frames.
|
|
[Select All Crops]
|
All the cropping frames reflect the settings made on the [Advanced Mode] tab.
|
|
[Zoom]
|
Rescan the focal cropping area of the preview image at a higher level of magnification.
Once clicked, this button changes to [Undo].
|
Various settings of the advanced mode
Favorite Settings
You can register the input settings, output settings, image settings, color settings, and detailed settings as a set of favorite settings. The registered favorite settings can be applied to the overall preview image or the scanning area.
|
[User Defined]
|
Enter and specify each setting value.
|
|
[Default]
|
Resets the current setting to the default value. The preview image is deleted.
|
|
[Add/Delete]
|
Displays the [Add/Delete Favorite Settings] dialog box. You can name and register the current preview image settings. This item is not displayed when there is no preview image.
|
Input Settings
|
[Input Size]
|
Select a size of the document to be scanned.
You can also enter values to specify the size.
Specifies the width of the input size.
Specifies the height of the output size.
|
||
|
[Color Mode]
|
Selects the type of document and the way in which it is scanned.
[Black and White]
To output documents in monochrome. The image color is divided into white and black at a certain level (threshold), and the image is expressed in 2 colors. See "Color Settings" for the instruction on how to specify a threshold value. [Grayscale]
Select when scanning black and white photos or monochrome images. The image is expressed in a 0 to 255 scale of black and white. [Color]
Select when scanning color photos. The image is expressed in 256 levels (8-bit) of R(ed), G(reen), and B(lue). [Color (Documents)]
Select when scanning documents that contain text or tables. The image is expressed in 256 levels (8-bit) of R(ed), G(reen), and B(lue). [Text Enhanced]
Scans text clearly. Select when scanning text using OCR software. The image is expressed in 2 colors of black and white. |
Output Settings
|
[Output Resolution]
|
Select the resolution for scanning. Select a value from 50 to 300 dpi from the drop-down list or directly enter a value from 25 to 9600 dpi.
|
|
[Output Size]
|
Select the output size of the scanned image.
If you select [Add/Delete]
The [Add/Delete the Output Size] dialog box will appear, and you can add and delete the custom output size. If you select [Flexible]
Enter values for width, height, or [%] (Scale). The ratio of width and height is proportionate to the width and height in [Input Settings]. The actual scanning resolution varies depending on a value specified in [%]. You can enter the value for [%] between 25 and 3,200, but the upper limit varies depending on the value of [Output Resolution]. Click [
 ] to change the layout orientation (landscape or portrait). When selecting [Flexible], you cannot use this button. ] to change the layout orientation (landscape or portrait). When selecting [Flexible], you cannot use this button. |
|
[Data Size]
|
Displays the data size of the image scanned using the specified settings.
|
Image Settings
Color Settings
Using Color Settings buttons, you can adjust the brightness and contrast of the whole image, specify highlights and shadows, and adjust the contrast and balance in an image.
The color setting buttons to be displayed vary depending on the selected [Color Mode]. When [Text Enhanced] is selected, no Color Settings button is displayed.
When a Color Settings button is clicked, the dialog box appears to specify the corresponding option. Clicking [Reset] resets all the color settings to the default values.
When [Color], [Color (Documents)], or [Grayscale] is selected in [Color Mode]:

When [Black and White] is selected in [Color Mode]:

If you select [Add/Delete] from the drop-down menu, a set of color settings can be registered. For details, see "Tone curve/threshold drop-down list."
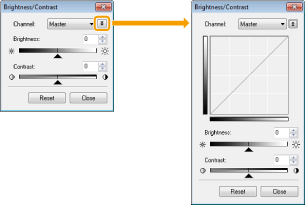
Brightness/Contrast 
This dialog box enables you to adjust the levels of brightness and contrast of the image.
Click [ ] to adjust the brightness and contrast diagrammatically.
 ] to adjust the brightness and contrast diagrammatically.
|
[Channel]
|
Select a color to adjust either [Red], [Green], or [Blue], or select [Master] to adjust all three colors together when [Color] or [Color (Documents)] is selected in [Color Mode].
When [Grayscale] is selected in [Color Mode], adjust gray color.
|
|
[Brightness]
|
Adjust the brightness by moving [
 ] on the slider or manually entering values from -127 up to 127. ] on the slider or manually entering values from -127 up to 127. |
|
[Contrast]
|
Adjust the contrast by moving [
 ] on the slider or manually entering values from -127 up to 127. ] on the slider or manually entering values from -127 up to 127. |
|
[Reset]
|
Resets all the current settings to their default values.
|
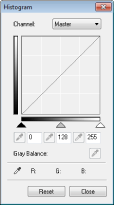
Histogram 
You can check how much data clusters at which level of the brightness. You can specify the darkest and brightest levels within an image, cut the levels and expand the middle of the tonal range of the image.
|
[Channel]
|
Select a color to adjust either [Red], [Green], or [Blue], or select [Master] to adjust all three colors together when [Color] or [Color (Documents)] is selected in [Color Mode].
When [Grayscale] is selected in [Color Mode], adjust gray color.
|
|
[
 ] (Black-point eyedropper tool) ] (Black-point eyedropper tool) |
Click this button and specify an area which you want to darken the most by clicking in the preview image (or the selected cropping area). You can also manually enter a value from 0 up to 245 or move [
 ] on the slider. ] on the slider. |
|
[
 ] (Mid-point eyedropper tool) ] (Mid-point eyedropper tool) |
Click this button and specify an area where you want to make halftone by clicking in the preview image (or the selected cropping area). You can also manually enter a value from 5 up to 250 or move [
 ] on the slider. ] on the slider. |
|
[
 ] (White-point eyedropper tool) ] (White-point eyedropper tool) |
Click this button and specify an area which you want to lighten the most by clicking in the preview image (or the selected cropping area). You can also manually enter a value from 10 up to 255 or move [
 ] on the slider. ] on the slider. |
|
[
 ] (Gray Balance eyedropper tool) ] (Gray Balance eyedropper tool) |
To adjust color images, click this button and specify a point at which gray balance is adjusted by clicking in the preview image (or the selected cropping area). The gray color in the scanned image becomes halftone, and other colors are reproduced in their original colors.
|
|
[Reset]
|
Resets all the current settings to their default values.
|
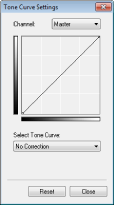
Tone Curve Settings 
This dialog box enables you to adjust the brightness of a specific area of an image by selecting the type of the tone curve.
|
[Channel]
|
Select a color to adjust either [Red], [Green], or [Blue], or select [Master] to adjust all three colors together when [Color] or [Color (Documents)] is selected in [Color Mode].
When [Grayscale] is selected in [Color Mode], adjust gray color.
|
|
[Select Tone Curve]
|
Select a tone curve type from [No Correction], [Over Exposure], [Under Exposure], [High Contrast], and [Invert the Negative/Positive Image].
|
|
[Reset]
|
Resets all the current settings to their default values.
|
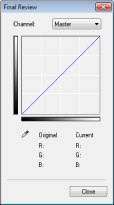
Final Review 
This dialog box enables you to confirm the color settings.
Threshold 
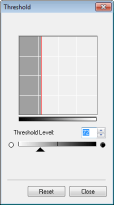
You can adjust the threshold setting. By adjusting the threshold, you can sharpen characters in a text document and reduce back-printing such as in newspapers.
|
NOTE
|
Threshold:Brightness of color and gray images is expressed by a value between 0 and 255, while brightness of black and white images is expressed by white or black, including colors between black and white. The boundary to divide colors into white and black is called "Threshold."
 |
|
[Threshold Level]
|
Adjust the threshold level by moving [
 ] on the slider or manually entering a value from 0 up to 255. ] on the slider or manually entering a value from 0 up to 255. |
|
[Reset]
|
Resets the current setting to the default value.
|
Tone curve/threshold drop-down list
You can save color settings in a cropping frame. If there are no cropping frames, settings for the whole preview area is saved. You can also read the saved settings to apply them to the selected cropping frame.
|
[Custom]
|
You can specify each setting value. The settings can be changed even after applying them.
|
|
[Add/Delete]
|
Opens the [Add/Delete Tone Curve Settings] dialog box ([Add/Delete Threshold Settings] dialog box for when [Black and White] is selected in [Color Mode]). This dialog box enables you to name and register a set of color settings.
|
Preferences
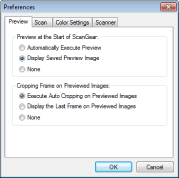
Clicking [Preferences] in the [Advanced Mode] tab displays the [Preferences] dialog box. You can change the settings for scanning and previewing.
[Preview] tab
|
[Preview at the Start of ScanGear]
|
Selects the preview operation when you open the ScanGear MF.
[Automatically Execute Preview]
The preview starts automatically when you open the ScanGear MF. [Display Saved Preview Image]
Displays the image last previewed. [None]
The preview image is not displayed. |
|
[Cropping Frame on Previewed Images]
|
Sets how the cropping frame is displayed when you preview images.
[Execute Auto Cropping on Previewed Images]
The image will be automatically cropped to match the document size. [Display the Last Frame on Previewed Images]
Displays the last frame. [None]
No frame is displayed. |
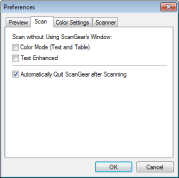
[Scan] tab
|
[Scan without Using ScanGear's Window]
|
If you are using an application such as OCR software that does not display the ScanGear MF window when scanning, documents are scanned with the application settings. If you want to scan in a specific color mode without using the application settings, specify the setting in this option.
[Color Mode (Text and Table)]
The document is scanned in a mode equivalent to [Color (Documents)] of [Color Mode], regardless of the application settings. [Text Enhanced]
The document is scanned in a mode equivalent to [Text Enhanced] of [Color Mode], regardless of the application settings. |
|
[Automatically Quit ScanGear after Scanning]
|
If this item is selected, the [ScanGear MF] dialog box closes automatically after scanning. Depending on the application, the ScanGear MF closes automatically after scanning, regardless of this setting.
|
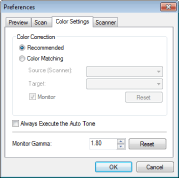
[Color Settings] tab
|
[Color Correction]
|
Selects the type of color correction.
[Recommended]
Vividly reproduces the tone of a document on the screen. [Color Matching]
Adjusts color to that of the scanner, monitor, and color printer. If this item is selected, the color setting buttons in the [Advanced Mode] tab are disabled. This setting is available when [Color], [Color (Documents)], or [Grayscale] is selected in [Color Mode]. |
|
[Always Execute the Auto Tone]
|
Always corrects the image color automatically. This setting is available when [Color], [Color (Documents)], or [Grayscale] is selected in [Color Mode].
|
|
[Monitor Gamma]
|
Adjusts the gamma. You can specify the gamma value (0.10 to 10.00) of the monitor which displays the scanned image. This setting is not reflected in the scanning result when [Black and White] is selected in [Color Mode].
|
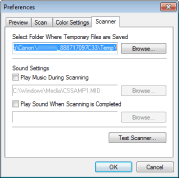
[Scanner] tab
|
[Select Folder Where Temporary Files are Saved]
|
Specifies the folder to save images temporarily. Click [Browse] to specify a folder to save the file.
|
|
[Sound Settings]
|
Sets the scanner to play music during scanning or play a sound when scanning is complete.
[Play Music During Scanning]
Music is played during scanning. Click [Browse] and specify a sound file. [Play Sound When Scanning is Completed]
Music is played when scanning is completed. Click [Browse] and specify a sound file. You can specify the following files:
MIDI files (*.mid, *.rmi, *.midi)
Audio files (*.wav, *.aif, *.aiff)
MP3 file (*.mp3)
|
|
[Test Scanner]
|
You can check if the scanner is functioning properly. The [Scanner Diagnostics] dialog box is opened. Click [Start].
|
 ] (maintaining the proportion of width and height) button in [Input Settings]