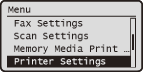
Printer Settings
 |
|
All the settings about the printer are listed with short descriptions. Default settings are marked with a dagger (
 ). ). |
|
NOTE
|
Asterisks (*)
Settings marked with an asterisk (*) are only available when the optional Barcode Printing Kit is enabled.
Priority of settingsSettings that are specified in an application or on the printer driver will override those specified on the machine. The settings described in this section are especially useful if you are printing on an operating system such as UNIX on which the printer drivers for the machine are not available.
|
Copies 
Set the number of copies to print.
|
1
to 99 (Copies) |
|
NOTE
|
|
This function is not available on the PCL5 printer driver.
|


2-Sided Printing
Select whether to make 2-sided printouts.
|
Off
On |
Default Paper
Select the default setting for the size and type of the paper to print on.
|
NOTE
|
|
<Default Paper Size> and <Default Paper Type> cannot be specified separately. Specify the paper size in the <Default Paper Size> screen, and then specify the paper type in the <Default Paper Type> screen.
|
Default Paper Size
Select the default setting for the size of the paper to print on.
|
A4
A5
B5
LTR
LGL STMT EXEC FOOLSCAP
OFICIO
No. 10 (COM10)
Monarch DL ISO-C5
Government-LTR
Government-LGL
AUS-FOOLSCAP
Brazil-OFICIO
Mexico-OFICIO
|
Default Paper Type
Select the default setting for the type of the paper to print on.
|
Plain (64-90 g/m²)
Recycled
Color Thin (60-63 g/m²)
Heavy 1 (91-105 g/m²)
Heavy 2 (106-128 g/m²) Transparency Labels Envelope
|
|
NOTE
|
|
If you select an envelope (<No. 10 (COM10)>, <Monarch>, <DL>, or <ISO-C5>) as the paper size in <Default Paper Size>, only <Envelope> is available as a paper type.
|
Paper Size Override
Select whether to switch between printing on A4 and Letter size paper if one of these paper sizes is loaded but the other is not. For example, if you are printing a Letter size document but only A4 paper is loaded in the machine, the machine will print your document on A4 paper.
|
Off
On |
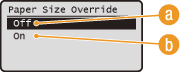
 <Off>
<Off>
Does not perform paper size substitution. Printing stops and an error message is displayed when the machine runs out of the paper that has been specified.
 <On>
<On>
Performs paper size substitution. However, if no paper to substitute is loaded in any paper sources, the substitution cannot be performed.
Print Quality
Specify the print quality such as toner density and toner consumption.
Density
Specify the print density. As the value gets bigger, the density becomes darker.
|
NOTE
|
|
The settings specified for <Density> are disabled when <Toner Save> is enabled.
|
Density
Adjust the density for printouts.
|
17 Levels
|
Density (Fine Adjust)
You can adjust the density separately for darker areas (<High>), medium areas (<Medium>), and lighter areas (<Low>).
|
High
17 Levels
Medium
17 Levels
Low
17 Levels
|
Toner Save
Specify whether to conserve the amount of toner used for printing from a computer.
|
Off
On |
|
IMPORTANT
|
|
When this setting is enabled, fine lines and portions with lighter print density may become blurred.
|
Image Refinement
Select whether to smooth edges of text and graphics.
|
Off
On
|
Layout
Specify the page layout settings such as binding position and margin values.
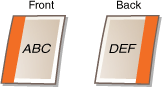
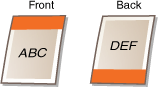
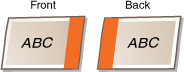
Binding Location
Select the binding position of the paper (along the long edge or the short edge). For 2-sided printing, image orientation is automatically arranged to produce the correct layout.  in the illustrations below represent margins.
in the illustrations below represent margins.When the binding position is on the long edge of the paper:
 |
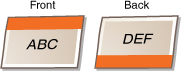 |
When the binding position is on the short edge of the paper:
 |
 |
|
Long Edge
Short Edge
|
|
NOTE
|
|
You cannot create a binding margin with this setting alone. Use this setting in combination with the <Gutter> setting to set the binding margin for the selected binding position.
|
Gutter
Specify the binding margin to apply to the binding position selected in the <Binding Location> setting.
|
-50.0 to ±0
to +50.0 (mm) |
|
IMPORTANT
|
|
If this setting moves any of the print data outside the printable area, the portion outside the printable area will not be printed.
|
Offset Short Edge (Front)
Specify the print position by setting the offset value for the short edge on the front side of the paper. Increasing the value moves the print position to the right. Decreasing the value moves the print position to the left.
|
-50.0 to ±0
to +50.0 (mm) |
|
IMPORTANT
|
|
If this setting moves any of the print data outside the printable area, the portion outside the printable area will not be printed.
|
|
NOTE
|
|
You can specify this setting in combination with the <Offset Long Edge (Front)>, <Offset Short Edge (Back)>, and <Offset Long Edge (Back)>. By specifying all four settings, for example, the print position is shifted as shown in the illustration below.
 If the offset settings are specified in combination with the <Gutter> setting, the specified values are added together.
|
Offset Long Edge (Front)
Specify the print position by setting the offset value for the long edge on the front side of the paper. Increasing the value moves the print position downward. Decreasing the value moves the print position upward.
|
-50.0 to ±0
to +50.0 (mm) |
|
IMPORTANT
|
|
If this setting moves any of the print data outside the printable area, the portion outside the printable area will not be printed.
|
Offset Short Edge (Back)
Specify the print position by setting the offset value for the short edge on the back side of the paper. Increasing the value moves the print position to the right. Decreasing the value moves the print position to the left.
|
-50.0 to ±0
to +50.0 (mm) |
|
IMPORTANT
|
|
If this setting moves any of the print data outside the printable area, the portion outside the printable area will not be printed.
|
Offset Long Edge (Back)
Specify the print position by setting the offset value for the long edge on the back side of the paper. Increasing the value moves the print position downward. Decreasing the value moves the print position upward.
|
-50.0 to ±0
to +50.0 (mm) |
|
IMPORTANT
|
|
If this setting moves any of the print data outside the printable area, the portion outside the printable area will not be printed.
|
Auto Error Skip
Select whether to automatically perform error skip to bypass errors and continue printing when an error occurs with the print data. If <Off> is selected, you can perform error skip by using the operation panel.
|
Off
On |
|
NOTE
|
|
Error skip bypasses errors in print data, so the document may not be printed correctly.
You can manually perform error skip.
Press  (Status Monitor) . (Status Monitor) . |
Timeout
Set the time period after which the machine deletes incomplete print data from memory. The machine deletes incomplete print data because it may have some errors and prevent the machine from printing the next document.
|
5 to 15
to 300 (sec.) |
|
NOTE
|
|
Provide the machine with enough time to receive all the print data from the computer, especially when printing large amounts of data. If you specify a time period that is too short, the machine may not receive all the print data in time for printing.
|
Personality
Select a page description language according to print data or the printer driver. If you select <Auto>, the machine automatically detects the data. Select <PS> or <PCL> if the desired language is not detected with <Auto>.
|
Auto
PS
PCL
|
PCL
Specify the PCL printing settings such as page layout and paper size.
Paper Save
Select whether to save paper by not outputting blank pages in documents. By selecting <On>, the machine will not output blank pages. To output all your document data when printing, including any blank pages that you have inserted in your document, select <Off>.
|
Off
On |
Orientation
Select <Portrait> (vertical orientation) or <Landscape> (horizontal orientation) for the page orientation.
|
Portrait
Landscape
|
Font Number
Specify the font to use by selecting a corresponding font ID number from 0 to 104. You can print the PCL font list with font samples from the operation panel. PCL Font List
|
0
to 104 |
Point Size
Set the font size in points, adjustable in 0.25 increments. You can specify this setting only when a proportionally-spaced scalable font is selected in <Font Number>.
|
4.00 to 12.00
to 999.75 (point) |
Pitch
Set the font pitch, or cpi (characters per inch), adjustable in 0.01 increments. You can specify this setting only when a fixed-pitch scalable font or a bitmap font is selected in <Font Number>.
|
0.44 to 10.00
to 99.99 (cpi) |
Form Lines
Set the number of lines printed on one page from 5 to 128. This setting is automatically changed according to the settings specified in <Default Paper Size> and <Orientation>.
|
5 to 64
to 128 (lines) |
Character Code
Select the character code that is most suited for the computer you send print data from. The specified setting is ignored when the character code is controlled by the font specified in <Font Number>.
|
Custom Paper
Select whether to set a custom paper size. Select <On> to set the dimensions of the paper in <X dimension> and <Y dimension>.
|
Off
On |
Unit of Measure
Select the unit of measurement to use to set a custom paper size.
|
Millimeters
Inches
|
X dimension
Specify the horizontal dimension (short edge) of the custom paper.
|
76 to 216
(mm) |
Y dimension
Specify the vertical dimension (long edge) of the custom paper.
|
127 to 356
(mm) |
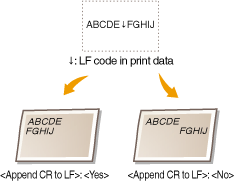
Append CR to LF
Select whether to append a carriage return (CR) when the machine receives a line feed code (LF). If <Yes> is selected, the print position moves to the beginning of the next line when the machine receives an LF code. If <No> is selected, the print position moves to the next line, just under the received LF code.
|
Yes
No
|
Enlarge A4 Print Width
Select whether to expand the width of the printable area of A4 size paper in portrait orientation to that of LTR size.
|
Off
On |
Halftones
Specify the data processing method to reproduce halftones (the intermediate range between the lighter and darker areas). You can select <Resolution>, <Color Tone>, <Gradation>, or <High Resolution> separately for text, graphics, and images.
|
Text
Resolution
Color Tone
Gradation
High Resolution
Graphics
Resolution
Color Tone
Gradation
High Resolution
Image
Resolution
Color Tone
Gradation
High Resolution
|
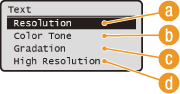
<Resolution>
Prints text and thin lines with clear edges.
<Color Tone>
Prints images with an enhanced contrast between dark and light portions.
 <Gradation>
Prints gradations such as those in graphics or photographic images with a smooth finish.
 <High Resolution>
Prints text and thin lines with edges clearer than <Resolution>.
BarDIMM *
Enable or disable BarDIMM, a barcode printing system.
|
Disable
Enable
|
FreeScape *
Specify the AEC (Alternate Escape Code) to be used for bar code commands when the host computer does not support the standard Escape Code.
|
Off
~
"
#
$
/
\
?
{
}
|
|
|
NOTE
|
|
This setting is available only when <BarDIMM> is enabled.
|
PS
Specify the PS printing settings such as halftone adjustment and grayscale conversion.
Job Timeout
Specify the time period to make the suspended print job automatically canceled. If you do not want to enable the timeout, specify "0".
|
0
to 3600 (sec.) |
Print PS Errors
Select whether to print an error report when a PostScript error occurs.
|
Off
On
|
Halftones
Specify the data processing method to reproduce halftones (the intermediate range between the lighter and darker areas). You can select <Resolution>, <Gradation>, or <High Resolution> separately for text, graphics, and images.
|
Text
Gradation
Resolution
High Resolution
Graphics
Gradation
Resolution
High Resolution
Image
Gradation
Resolution
High Resolution
|
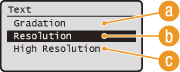
<Gradation>
Prints gradations such as those in graphics or photographic images with a smooth finish.
<Resolution>
Prints text and thin lines with clear edges.
<High Resolution>
Prints text and thin lines with edges clearer than <Resolution>.
Grayscale Conversion
Select a method to convert color values into a grayscale value when you print color print data. If the expected results are not achieved, you can try another conversion method.
|
sRGB
NTSC
Uniform RGB
|
|
NOTE
|
|
This setting is invalid for black-and-white data.
|
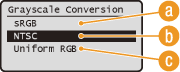
<sRGB>
Converts color values into a grayscale value to generate color-conscious smooth gradation.
<NTSC>
Converts color values into a grayscale value to generate appearances equivalent to television pictures (NTSC).
<Uniform RGB>
Converts color values into a grayscale value to equalize all RGB levels based on the brightness only.