Adjusting Density Manually
You can manually adjust the density to the most appropriate level for the original.
Setting Density Before Copying
1.
Press  (Main Menu) → [Copy].
(Main Menu) → [Copy].
2.
Press [Options] → [Density].

3.
Press  or
or  to adjust the density for the original → press [OK].
or to adjust the density for the original → press [OK]. 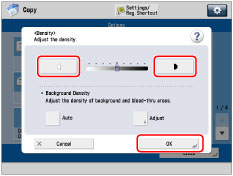
The density becomes lighter as the indicator is moved to the left and darker as the indicator is moved to the right.
4.
Press [Close].
Setting Density During Copying
1.
Press or to adjust the density for the original.
or to adjust the density for the original.
The density becomes lighter as the indicator is moved to the left and darker as the indicator is moved to the right.
IMPORTANT |
If you have changed the density in [Options], adjusting the density during copying may not have any effect on the output. |
NOTE |
If you want to adjust the background density, see "Adjusting Background Density." |