Automatically Correcting the Back Side Lead Edge Alignment of the Image
In this feature, the paper length is measured. Based on the measured paper length, the position of the image on the second side is adjusted to match the position of the image on the first side. However, setting this feature to 'Off' may result in a more accurate registration for some paper types.
Setting Back Side Lead Edge Alignment Correction to 'On' results in a more accurate registration for the following paper types:
Paper with expansion and contraction after printing
Paper with the different width and length
Setting Back Side Lead Edge Alignment Correction to 'Off' results in a more accurate registration for the following paper type:
Paper with the same width and length
1.
Press  (Settings/Registration).
(Settings/Registration).2.
Press [Preferences] → [Paper Settings] → [Paper Type Management Settings].
3.
Select the paper type that you want to edit from the list → press [Details/ Edit].
4.
Press [Change] for <Adjust Image Position>.
5.
Press [Do Not Use Scanner].
6.
Press [Auto Adj. Back Lead Edge Align.].
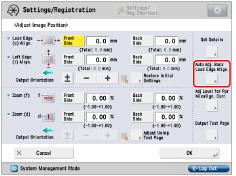
7.
Select [On] or [Off] → press [OK].
Details of each item are shown below:
[On]: | The paper length is accurately measured for two-sided printing. The measured value is then calculated to adjust the position of the image on the second side. |
[Off]: | The paper length is not measured for two-sided printing. The value set for the Lead Edge Alignment Adjustment mode is used directly to adjust the image position. |
8.
Press [OK].
NOTE |
If you switch between [On] and [Off], check the image position set for the back side of the Lead Edge Alignment Adjustment mode again. |