Setting a Rights Management Server
This machine can link with Adobe LiveCycle Rights Management to generate PDF files that have viewing and other privileges managed. This section describes the procedure for specifying the settings for connecting to an Adobe LiveCycle Rights Management server.
For instructions on generating a PDF file using a Rights Management server, see "Applying a Policy" in Scan and Send and "Applying a Policy" in Scan and Store.
|
IMPORTANT
|
|
The Adobe LiveCycle Rights Management ES series is required to set this function. For more information, contact your local authorized Canon dealer.
To set this function, the Adobe LiveCycle Rights Management server and this machine must be connected via the Internet or an intranet.
|
1.
Press  (Settings/Registration).
 (Settings/Registration).
2.
Press [Function Settings] → [Common] → [Generate File].
3.
Press [Rights Management Server Settings] → [Server URL].
4.
Enter the URL for the Adobe LiveCycle Rights Management server → press [OK].
Enter the URL for the server in the format "https://<IP address or host name>:<port number>."
Example:
https://192.168.1.21:8443
https://RMServer.host.canon.jp:8443
|
IMPORTANT
|
|
For information on the IP address, host name, and port number, contact the administrator of the Adobe LiveCycle Rights Management server.
|
5.
Set the method for entering the user name and password when logging in to the Adobe LiveCycle Rights Management server.
When generating a PDF file using this function, the login screen for the Adobe LiveCycle Rights Management server is displayed. On the login screen, enter the user name and password for logging in to the Adobe LiveCycle Rights Management server.
|
NOTE
|
|
If you want to allow storing of a name and password for each user of User Authentication or another login service, see "Specifying Authentication Method for Rights Management Server."
|
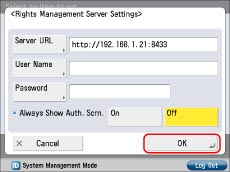
If you want to enter the user name and password every time:
Press [OK].

If you are managing users by User Authentication or another login service, press [Off] for <Always Show Auth. Scrn.> → press [OK].
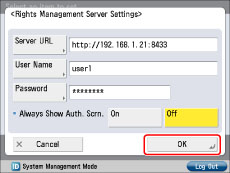
If you want to use a user name and password set on the machine:
Press [User Name].
Enter the user name for logging in to the Adobe LiveCycle Rights Management server → press [OK].
Press [Password].
Enter the password for the specified user → press [OK].
On the Confirm screen, enter the same password to confirm the password → press [OK].
If you want to show the login screen, press [On] for <Always Show Auth. Scrn.>.
The login screen for the Adobe LiveCycle Rights Management server is displayed with the set user name and password automatically entered.
If you do not want to show the login screen, press [Off] for <Always Show Auth. Scrn.>.
The login screen for the Adobe LiveCycle Rights Management server is skipped and the next screen you logged in is displayed.
Press [OK].
