Secure Watermark (Forced Secure Watermark/Printer Driver Secure Watermark)
You can select whether to set the Secure Watermark/Document Scan Lock mode for all copy and print jobs, or whether to set the Secure Watermark/Document Scan Lock mode for each print job from a printer driver.
For information on the optional products required to use this function, see "Optional Products Required for Each Function."
Forced Secure Watermark
Forced Secure Watermark enables you to set the machine to always print the specified hidden watermark on prints and copies.
1.
Press  (Settings/Registration).
(Settings/Registration).2.
Press [Function Settings] → [Common] → [Print Settings].
3.
Press [Secure Watermark Settings].
If the Document Scan Lock mode is available for use, press [Secure Watermark/Document Scan Lock].
4.
Press [Forced Secure Watermark].
If the Document Scan Lock mode is available for use, press [Forced Secure Watermark/Doc. Scan Lock].
5.
Press [Set] for the function (<Copy>/<Access Stored Files>/<Printer>) to set the Forced Secure Watermark mode.
If the Document Scan Lock mode is available for use, press [Forced Sec. Watermark] for the function (<Copy>/<Access Stored Files>/<Printer>) to set the Forced Secure Watermark mode.
6.
Select the type of secure watermark to embed (Watermark, Date, Copy Set Numbering, Serial Number, or ID/User Name).
To select Watermark:
Press [Watermark].
Select the watermark type from the drop-down list → press [Next].
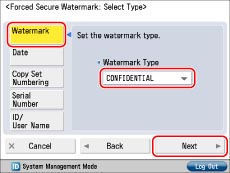
If you select [Custom] from the <Watermark Type> drop-down list, press [Enter] → enter the desired text → press [OK] → [Next].
|
NOTE
|
|
For instructions on entering characters, see "Entering Characters from the Touch Panel Display." If you have registered characters in [Register Characters for Page No./Watermark] in [Function Settings] (Settings/Registration), you can select the characters from the list.
|
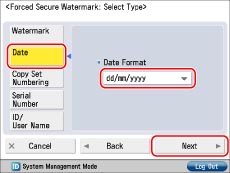
To select Date:
Press [Date].
Select the format of the date from the drop-down list → press [Next].
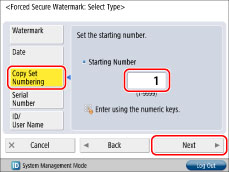
To select Copy Set Numbering:
Press [Copy Set Numbering].
Set the starting number → press [Next].
To select Serial Number:
Press [Serial Number] → [Next].
|
NOTE
|
|
The Serial Number, which appears at the bottom left of the screen when you press
 (Counter Check) on the control panel, is printed. (Counter Check) on the control panel, is printed. |
To select ID/User Name:
Press [ID/User Name] → [Next].
|
NOTE
|
|
If a login service has been set, the user name and Department ID of the user who is currently logged in to the machine are printed.
The watermark "CONFIDENTIAL" is printed if a login service is not set.
|
7.
Set the background pattern and size → press [OK].

|
NOTE
|
|
To print a pattern on the background of copy, select the background pattern from the Background Pattern drop-down list.
You can select [36.0 pt], [54.0 pt], or [72.0 pt] for the size of the text.
You can select [Magenta], [Cyan], or [Black] for the colour of the text.
To change the print orientation for characters, press [Print Vertically].
To use white letters on a coloured background, press [White Letters on Colored Background].
|
8.
Press [OK].
Printer Driver Secure Watermark
If you set the Printer Driver Secure Watermark mode, you can select whether to set the Secure Watermark function for each print job from printer drivers.
1.
Press (Settings/Registration).
(Settings/Registration). 2.
Press [Function Settings] → [Common] → [Print Settings].
3.
Press [Secure Watermark Settings].
If the Document Scan Lock mode is available for use, press [Secure Watermark/Document Scan Lock].
4.
Press [Printer Driver Secure Watermark].
If the Document Scan Lock mode is available for use, press [Printer Driver Watermark/Doc. Scan Lock].
5.
Press [Set].
If the Document Scan Lock mode is available for use, press [Driver Secure Watermark].
6.
Select the type of secure watermark to embed (Watermark, Date, Copy Set Numbering, Serial Number, or ID/User Name).
To select Watermark:
Press [Watermark].
Select the type of watermark from the drop-down list → press [Next].

If you select [Custom] from the <Watermark Type> drop-down list, press [Enter] → enter the desired text → press [OK] → [Next].
|
NOTE
|
|
For instructions on entering characters, see "Entering Characters from the Touch Panel Display." If you have registered characters in [Register Characters for Page No./Watermark] in [Function Settings] (Settings/Registration), you can select the characters from the list.
|
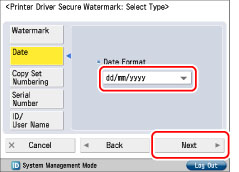
To select Date:
Press [Date].
Select the format of the date from the drop-down list → press [Next].
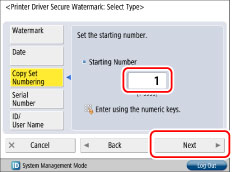
To select Copy Set Numbering:
Press [Copy Set Numbering].
Set the starting number → press [Next].
To select Serial Number:
Press [Serial Number] → [Next].
|
NOTE
|
|
The Serial Number, which appears at the bottom left of the screen when you press
(Counter Check) on the control panel, is printed. |
To select ID/User Name:
Press [ID/User Name] → [Next].
|
NOTE
|
|
If a login service has been set, the user name and Department ID of the user who is currently logged in to the machine are printed.
The watermark "CONFIDENTIAL" is printed if a login service is not set.
|
7.
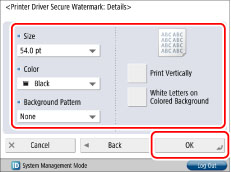
Set the background pattern and size → press [OK].
|
NOTE
|
|
To print a pattern on the background of copy, select the background pattern from the Background Pattern drop-down list.
You can select [36.0 pt], [54.0 pt], or [72.0 pt] for the size of the text.
You can select [Magenta], [Cyan], or [Black] for the colour of the text.
To change the print orientation for characters, press [Print Vertically].
To use white letters on a coloured background, press [White Letters on Colored Background].
|
8.
Press [OK].
|
IMPORTANT
|
|
If [Printer Driver Secure Watermark] and [Forced Secure Watermark] are set for a printer at the same time, Forced Secure Watermark is given priority.
|
|
NOTE
|
|
If you want to use the Secure Watermark function for each job from the printer driver, on the [Printing Preferences] dialog box, click the [Finishing] tab → [Advanced Settings] → select [On] for [Secure Printing Function of Devices]. For more information, see the on-line help for the printer driver.
|