Operations for Files Stored in a Mail Box
You can add, delete, and rename files stored in a mail box.
Deleting a File
1.
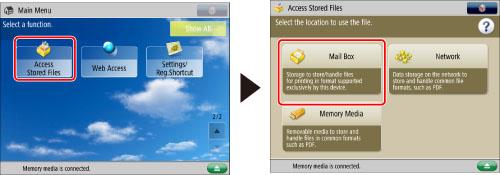
Press [Access Stored Files] → [Mail Box].
2.
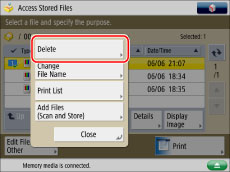
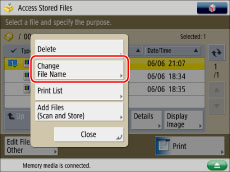
Select the desired Mail Box → select the desired file → press [Edit File/Other].

3.
Press [Delete].
4.
Press [Yes].
Changing a File Name (Change File Name)
1.
Press [Access Stored Files] → [Mail Box].
2.
Select the desired Mail Box → select the desired file → press [Edit File/Other].
3.
Press [Change File Name].
|
NOTE
|
|
If you select multiple files and press [Change File Name], the selected (highlighted) file name will be changed.
|
4.
Enter a file name → press [OK].
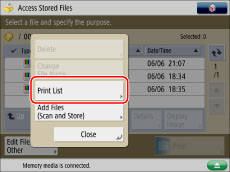
Printing Lists
You can print a list of files stored in a mail box.
1.
Press [Access Stored Files] → [Mail Box].
2.
Select the desired Mail Box → press [Edit File/Other].
|
NOTE
|
|
Even if you sort the list of stored files by pressing [Name] or [Date/Time], the list of files will be printed in the order that the files were stored in the mail box.
|
3.
Press [Print List].
4.
Press [Yes].
|
NOTE
|
|
Lists can be printed only if A3, 11"x 17", A4, LGL, LTR, A4R, or LTRR paper (plain, recycled, thin, or colour) is loaded in a paper drawer that is set to 'On' in [Other] in [Paper Drawer Auto Selection On/Off] in [Function Settings] (Settings/Registration). However, if [Consider Paper Type] for [Copy] is set to 'On' in [Paper Drawer Auto Selection On/Off], you cannot print from a paper drawer with colour paper specified. (See "Enabling Paper Drawer Auto Selection.")
The following information is printed: mail box number/name, type of file, file name, paper size, number of pages, user name, and date and time.
|
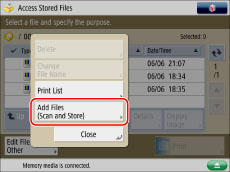
Adding a File (Scan and Store)
You can scan an original and store it as a file.
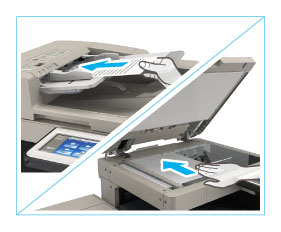
1.
Place your originals.
|
NOTE
|
|
For instructions on placing originals, see "Placing Originals."
|
2.
Press [Access Stored Files] → [Mail Box].
3.
Select the desired Mail Box → press [Edit File/Other].
4.
Press [Add Files (Scan and Store)].
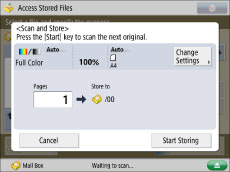
5.
Specify the desired scan settings.
6.
Press  (Start).
(Start).If the following screen is displayed, after the last batch of originals is scanned, press [Start Storing].
If you place your original on the platen glass, press (Start) to scan each original.
(Start) to scan each original.