Selecting the Paper Size
You can set the machine to automatically select the paper size (Automatic Paper Selection) or can manually specify the paper size (Manual Paper Selection).
The Automatic Paper Selection mode is applied as default and is suitable when you copy standard size originals on standard size paper. Use the Manual Paper Selection mode when you copy special types of originals (such as nonstandard size originals) whose sizes the machine cannot automatically detect. Also, by using the Manual Paper Selection mode with the Auto Zoom mode, you can make an enlarged or reduced copy to fit the image on the paper size you select. (Auto Zoom)
|
NOTE
|
|
If you are copying an original with an image that extends all the way to the edges onto the same size paper at a copy ratio of 100%, the periphery of the original image may be slightly cut off on the copy. For more information on how much may be cut off, see Appendix.
If you select [Envelope], [Transparency], or [Labels] as the paper type, you cannot use the Finishing modes (Rotate, Offset, or Staple).
The default setting is ‘Auto’.
|
Automatic Paper Selection
The machine automatically selects the copy paper size.
|
IMPORTANT
|
|
When you copy nonstandard size originals, the machine cannot automatically select the same size paper as that of the original’s. To copy nonstandard size originals, manually select the paper size. (Manual Paper Selection)
The machine automatically detects the size of the originals to select the optimal paper size. However, the machine cannot detect the size of the following originals:
Nonstandard size originals
Highly transparent originals, such as transparencies
Originals with an extremely dark background
STMT, STMTR, or smaller than STMT originals that are placed on the platen glass
STMTR originals that are placed into the feeder
For these originals, specify the size of the originals after pressing  (Start) as indicated in step 4 (when placing originals on the platen glass), or copy these originals by manually selecting the paper source instead. (Manual Paper Selection) (Start) as indicated in step 4 (when placing originals on the platen glass), or copy these originals by manually selecting the paper source instead. (Manual Paper Selection)You cannot use the Automatic Paper Selection mode for copying when:
You are copying in the Auto Zoom, Image Combination, or ID Card Copy mode.
The Drawer Eligibility For APS/ADS setting is set to ‘On’ for only one paper source for [Copy]. (Configuring the Machine's Basic Settings)
|
|
NOTE
|
|
You can activate or deactivate the Automatic Paper Selection mode for each paper drawer and the stack bypass. (Configuring the Machine's Basic Settings)
You can use the stack bypass for the Automatic Paper Selection mode when:
The paper is loaded in the stack bypass and the paper size and type are specified.
The Drawer Eligibility For APS/ADS setting is set to ‘On’ for the stack bypass for [Copy]. (Configuring the Machine's Basic Settings)
|
1
Place your originals.
2
Press [Paper Select] and make sure that <Auto> is selected.
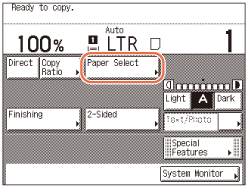
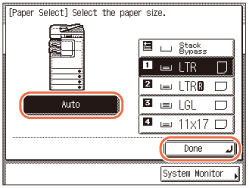
If not, press  (Reset) or press [Paper Select] → [Auto] → [Done].
 (Reset) or press [Paper Select] → [Auto] → [Done].
3
Enter the desired copy quantity (from 1 to 999) using  -
-  (numeric keys).
 -
-  (numeric keys).
4
Press  (Start).
 (Start).
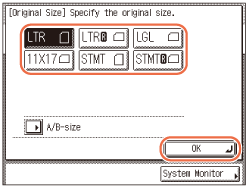
If the screen appears prompting you to specify the size of the original, select the original size → press [OK] →  (Start).
 (Start).
Copying starts.
Manual Paper Selection
You can manually select the paper size.
1
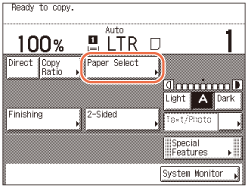
Place your originals → press [Paper Select].
IMPORTANT:
When you copy nonstandard size originals using the feeder, parts of the copied image may be missing even if you select the larger paper size than that of the original’s. Scan the originals using the platen glass.
2
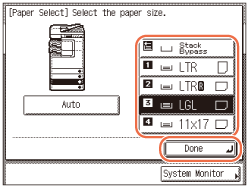
Select the desired paper size → press [Done].
NOTE:
The paper sizes and types in each paper source are indicated on the touch panel display.
The type of paper loaded in each paper source are displayed by icons. (Configuring the Machine's Basic Settings)
 indicates that the paper is loaded vertically, and
  indicates that the paper is loaded horizontally. The suffix <R> (such as in LTRR), used in paper size designations, indicates that the paper is loaded in a paper drawer or the stack bypass horizontally.
You can load envelopes in Paper Drawer 2 only when the optional Envelope Feeder Attachment-D1 is attached to the machine. For more information, see Optional Equipment.
3
Enter the desired copy quantity (from 1 to 999) using  -
-  (numeric keys).
 -
-  (numeric keys).
4
Press  (Start).
 (Start).
Copying starts.
Copying Using the Stack Bypass
|
IMPORTANT
|
|
If Stack Bypass Standard Settings is set to ‘On’, the specified paper size and type are applied as the default settings regardless of the actual paper size and type of the paper loaded in the stack bypass. Be sure to disable or change the settings when you are loading paper of different size/type from the currently specified size/type. (Configuring the Machine's Basic Settings)
|
1
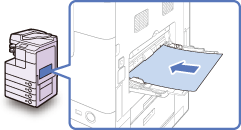
Load the paper into the stack bypass.
By loading paper or envelopes, the screens for specifying the paper size and type will be displayed.
IMPORTANT:
If you use STMT paper, place it horizontally. Placing it vertically may cause paper jams.
NOTE:
For instructions on how to load paper/envelopes into the stack bypass, see Basic Operations.
2
Specify the paper size and type.
NOTE:
When Stack Bypass Standard Settings is enabled, the screens for specifying the paper size and type shown in the following steps are not displayed even if you load paper or envelopes. Disable Stack Bypass Standard Settings to display the setting screens. (Configuring the Machine's Basic Settings)
If you want to select a standard paper size:
|
1
|
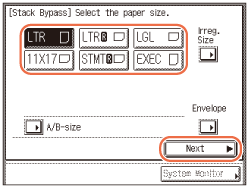
Select the paper size → press [Next].
 IMPORTANT:
Make sure that the paper size setting is correct. If the paper size loaded on the stack bypass and the paper size setting do not match, a paper jam may occur.
NOTE:
To select an A or B series size, press [A/B-size].
|
|
2
|
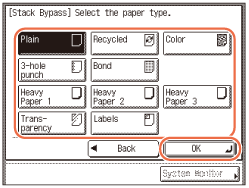
Select the paper type → press [OK].
 IMPORTANT:
Make sure that the paper type setting is correct. An incorrect paper type setting may adversely affect the image quality, damage the fixing unit, and cause paper jams.
NOTE:
[Transparency] can be selected only when [LTR] is selected as the paper size.
If [Transparency] or [Labels] is selected, you cannot select Rotate, Offset, or Staple as the Finishing mode.
For more information on paper sizes/types, see Appendix.
|
If you want to select a nonstandard paper size:
|
1
|
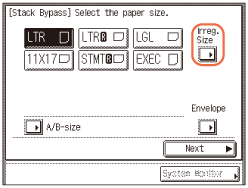
Press [Irreg. Size].
 |
|
2
|
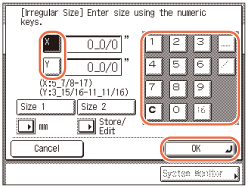
Press [X] → enter the length along the horizontal axis of the paper using the numeric keys.
The horizontal length can be set between 5 7/8" and 17" (148 mm and 432 mm).
 |
|
3
|
Press [Y] → enter the length along the vertical axis of the paper using the numeric keys.
The vertical length can be set between 3 15/16" and 11 11/16" (99 mm and 297 mm).
|
|
4
|
Press [OK].
|
|
IMPORTANT
|
|
Make sure that the paper size setting is correct. If the paper size loaded on the stack bypass and the paper size setting do not match, a paper jam may occur.
An underbar (_) must be entered between integer and fraction.
The following modes are not available for nonstandard size paper: Rotate Collate, Rotate Group, Offset Collate, Offset Group, Staple, 1 to 2-Sided, 2 to 2-Sided, Book to 2-Sided, 2-Page Separation, Image Combination, or ID Card Copy.
|
|
NOTE
|
|
If you make a mistake when entering values, press [C] (Clear) → enter the correct values.
To enter values in millimeters, press [mm].
When entering values in millimeters, you can also use
 - -  (numeric keys) and (numeric keys) and  (Clear) on the control panel. (Clear) on the control panel.You can store up to two sets of frequently used sizes. Press [Store/Edit] → [Size 1] or [Size 2] → enter the value for <X> and <Y> → press [OK].
To recall the stored size, press [Size 1] or [Size 2] → press [OK] and proceed to the next step to specify the paper type.
|
|
5
|
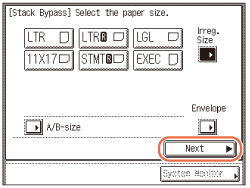
Press [Next].
 |
|
6
|
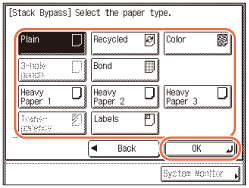
Select the paper type → press [OK].
 IMPORTANT:
Make sure that the paper type setting is correct. An incorrect paper type setting may adversely affect the image quality, damage the fixing unit, and cause paper jams.
NOTE:
[3-hole punch] and [Transparency] cannot be selected for a nonstandard paper size.
For more information on paper sizes/types, see Appendix.
|
If you want to select an envelope type:
|
1
|
Press [Envelope].
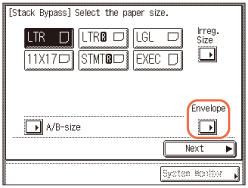 |
|
2
|
Select the envelope type → press [OK].
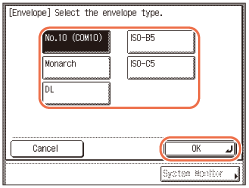 IMPORTANT:
Make sure that the envelope type setting is correct. If the envelopes loaded on the stack bypass and the envelope type setting do not match, a paper jam may occur.
If an envelope size is selected, the Finishing, 1 to 2-Sided, 2 to 2-Sided, Book to 2-Sided, 2-Page Separation, Image Combination, or ID Card Copy modes cannot be specified.
|
|
3
|
Press [OK].
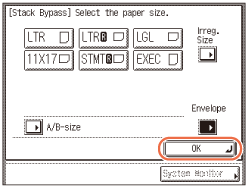 |
3
Press [Done].
The paper size and type you specified are displayed on the key for the stack bypass.
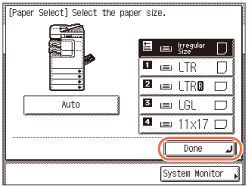
NOTE:
To change the paper size and type settings, remove the paper from the stack bypass, again load the paper, and reset the settings from step 2.
4
Press  (Start).
 (Start).
Copying starts.
NOTE:
You can load envelopes in Paper Drawer 2 only when the optional Envelope Feeder Attachment-D1 is attached to the machine. For more information, see Routine Maintenance.