Before Using Send and Fax Functions
The actions you need to take before using the machine depend on the functions you are using. Before using Send and Fax functions, check the list included in Chapter 2, "Before You Start Using the Machine," in the User’s Guide and take the required steps.
This section focuses on the setting registrations and procedures that must be done before sending and receiving faxes.
This section focuses on the setting registrations and procedures that must be done before sending and receiving faxes.
|
According to recent amendments to the FCC (Federal Communications Commission) rules governing the use of facsimile equipment in the United States, the following sender information must be printed on every facsimile transmission:
Your fax number
Your personal name or company name
Date and time of transmission
|
Setting the Telephone Line Type
To set the type of telephone line connected to the machine, check whether it is a rotary dial (rotary pulse) or a touch-tone type, and then make the correct setting. (Selecting the Type of Telephone Line)
Registering the Sending Record
The sending record is printed at the top of every document you send to the recipient.
The registered information is printed, as shown below. Depending on the model of the machine at the receiving side, this information may appear on the display while communication is taking place.
The registered information is printed, as shown below. Depending on the model of the machine at the receiving side, this information may appear on the display while communication is taking place.
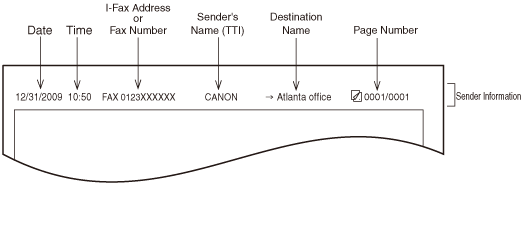
Date and Time
The date and time of the transmission are recorded. (Configuring the Machine's Basic Settings)
I-Fax Address or Fax Number
Your machine’s I-fax address or fax number is recorded. (Setting the Send Function, Registering Your Machine’s Fax Number)
Sender’s Name (TTI (Transmit Terminal Identification))
When you send fax documents, the name registered as the unit name is recorded. (Registering the Unit Name)
Destination Name
If you use the Address Book to specify the destination when you send I-fax documents, the register name is recorded. (Registering the Address Book)
Page Number
The current page number out of the total number of pages of the original is recorded.
|
IMPORTANT
|
|
If you attempt to use the machine without registering the necessary information correctly, the machine may not function properly.
If you decide to switch the display language, set Language Switch in Common Settings to ‘On’ before entering characters.
If Language Switch is set to ‘Off’, and then you set it to ‘On’ after entering characters, the characters may not be displayed correctly. In this case, re-enter the characters after setting Language Switch to ‘On’, or enter characters with Language Switch set to ‘Off’.
|
|
NOTE
|
|
If the machine is set so that the sending record is printed at the top of the recording paper, and not all of the items are registered, only the required registered items and the total number of original pages are printed. However, when using the Direct Sending mode, the total number of original pages is not printed.
|
Selecting the Type of Telephone Line
Set the type of telephone line that is connected to the machine.
If you are not sure what type of telephone line you have, check with your local telephone company. To operate the Fax function, you must know whether the machine is connected to a touch-tone or rotary pulse telephone line. The machine can be set to operate with either type of telephone line.
If this setting is incorrect, you will not be able to communicate with other machines.
|
NOTE
|
|
The default setting is ‘Tone’.
|
1
Press  (Additional Functions).
 (Additional Functions).
The Additional Functions menu appears.
2
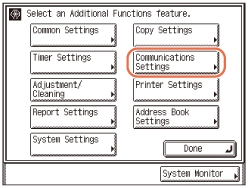
Press [Communications Settings].
3
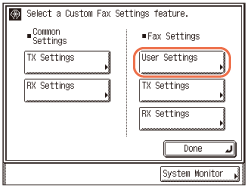
Press [User Settings] under <Fax Settings>.
4
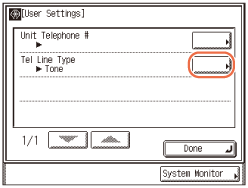
Press [Tel Line Type].
5
Select the type of telephone line → press [OK].
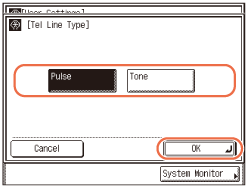
If you do not know the telephone line type, call your telephone service provider for details.
6
Press  (Reset) to return to the top screen.
 (Reset) to return to the top screen.
Registering Your Machine’s Fax Number
You must store your machine’s fax number. This number is printed on the top of every document you send to the recipient.
Your machine’s telephone number may also be displayed on the touch panel display of the recipient’s machine, depending on their type of machine.
1
Press  (Additional Functions) → [Communications Settings] → [User Settings] under <Fax Settings>.
 (Additional Functions) → [Communications Settings] → [User Settings] under <Fax Settings>.
For help, see steps 1 to 3 in Selecting the Type of Telephone Line.
2
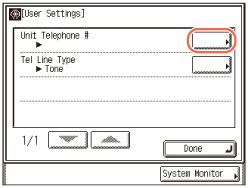
Press [Unit Telephone #].
3
Enter the unit’s telephone number (up to 20 digits) using  -
-  (numeric keys) → press [OK].
 -
-  (numeric keys) → press [OK].
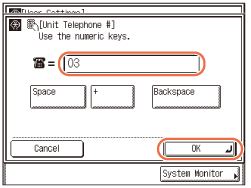
In this step the following keys are also available as necessary.
|
|
[Space]:
|
Press to insert a space between numbers.
|
|
[+]:
|
Press to insert a "+" sign between the country code and fax number.
|
|
|
[Backspace]:
|
Press to delete the number immediately to the left of the cursor.
|
NOTE:
If you make a mistake when entering the number, press  (Clear) → enter the correct number.
 (Clear) → enter the correct number.
4
Press  (Reset) to return to the top screen.
 (Reset) to return to the top screen.
Registering the Unit Name
Your name or company name must be registered as the unit name.
When you send a document via e-mail, I-fax, or fax, the unit name that you registered is displayed or printed as the sender information at the recipient’s machine.
When you send a document via e-mail, the registered unit name is displayed in the From field on the recipient’s e-mail application. If the unit name is not registered, the e-mail address of the machine is displayed in the From field.
When you send a document via I-fax, the registered unit name and the e-mail address of the machine are printed in the From field of the recording paper of the recipient’s I-fax machine. If the unit name is not registered, only the e-mail address of the machine is printed in the From field.
When you send a document via fax, the registered unit name is printed at the top of the recording paper of the recipient’s machine.
|
NOTE
|
|
You can register only one unit name.
If User ID Management is set to ‘On’ and Authentication at Send is not activated when you send e-mails or I-faxes, the user name and the e-mail address of the login user are used as the sender information, instead of the unit name.
When you send e-mails, the user name of the login user is displayed in the From field on the recipient’s e-mail application. If the user name is not registered, the e-mail address of the login user is displayed in the From field.
When you send I-faxes, the Sender field is printed at the recipient’s I-fax machine, as well as the From field. In the Sender field, the user name and the e-mail address of the login user are printed. If the user name is not registered, only the e-mail address is printed in the Sender field.
If Authentication at Send is activated with [Specify LDAP authentication user address as the sender name] selected when you send e-mails or I-faxes, the e-mail address of the user logging in to Authentication at Send is used as the sender information, instead of the unit name. (Customizing Settings)
When you send e-mails, the e-mail address of the login user is displayed in the From field on the recipient’s e-mail application.
When you send I-faxes, the Sender field is printed at the recipient’s I-fax machine, as well as the From field. In the Sender field, the e-mail address of the login user is printed.
For instructions on how to register the e-mail address of the machine, see Setting up the Machine for Your Network Environment.
For instructions on how to register the user name and the e-mail address of a login user, see Specifying Department ID and User Management.
|
1
Press  (Additional Functions) → [Communications Settings].
 (Additional Functions) → [Communications Settings].
For help, see steps 1 and 2 in Selecting the Type of Telephone Line.
2
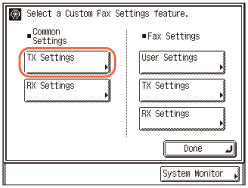
Press [TX Settings] under <Common Settings>.
3
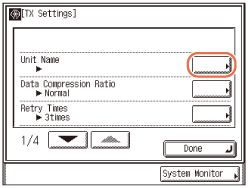
Press [Unit Name].
4
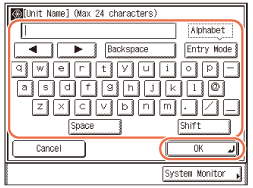
Enter the unit name (up to 24 characters) using the on-screen keyboard → press [OK].
IMPORTANT:
If the Language Switch setting is set to ‘On’, some characters are restricted and cannot be entered. To enter all characters, set the Language Switch setting to ‘Off’. (Configuring the Machine's Basic Settings)
NOTE:
For instructions on how to enter characters, see Basic Operations.
To delete all of the entered characters, press  (Clear).
 (Clear).
5
Press  (Reset) to return to the top screen.
 (Reset) to return to the top screen.