Customizing the System Settings
In the System Settings page in the [Add.Func.] (Additional Functions) menu, you can specify the System Settings of the machine. Although many of the settings can be specified both on the Remote UI and on the machine’s control panel, some settings can be specified only on the machine.
You can find the System Settings on the machine’s control panel by pressing  (Additional Functions). For more information, see System Settings.
(Additional Functions). For more information, see System Settings.|
IMPORTANT
|
|
You can edit the System Settings on the Remote UI only when it is in the System Manager Mode.
|
|
System Settings on the Machine
|
Menus or Buttons on the Remote UI to access the settings listed left
|
|
System Manager Settings (System Manager’s name and other information)
|
[Add.Func.] → [System Settings] → [Edit] (To specify the System Settings:)
|
|
System Manager Settings (System Manager's ID and System Password)
|
[Add.Func.] → [System Settings] → [Edit] → [Register ID and Password] (To specify the System Manager's ID and System Password:)
|
|
Device Info Settings
|
[Add.Func.] → [System Settings] → [Edit]
|
|
Department ID Management
|
[Add.Func.] → [Department ID/User Management] (Managing the Department IDs)
|
|
User ID Management
|
[Add.Func.] → [Department ID/User Management] (Managing the User IDs)
|
|
Network Settings
|
[Add.Func.] → [Settings] → [Network Settings]
|
|
Communications Settings
|
[Add.Func.] → [System Settings] → [Edit]
|
|
Forwarding Settings
|
[Add.Func.] → [Forwarding Settings] (Editing the Forwarding Settings)
|
|
Store/Print When Forwarding
|
[Add.Func.] → [System Settings] → [Edit]
|
|
RUI Settings
|
[Add.Func.] → [System Settings] → [Edit] (The Remote UI On/Off setting is available only on the machine’s control panel.) Restricting the Remote UI
|
|
Restrict the Send Function
|
[Add.Func.] → [System Settings] → [Edit] → [Restrict the Send Function] (To specify the Restrict the Send Function settings:)
|
|
Register LDAP Server
|
[Add.Func.] → [Register LDAP Server] (Editing the LDAP Server Settings)
|
|
Job Log Display
|
[Add.Func.] → [System Settings] → [Edit]
|
|
Memory Media Send Log*
|
[Add.Func.] → [System Settings] → [Edit]
|
|
Use USB Device
|
[Add.Func.] → [System Settings] → [Edit]
|
|
PDL Selection (Plug-n-Play)
|
[Add.Func.] → [System Settings] → [Edit]
|
|
Memory Media Settings
|
[Add.Func.] → [System Settings] → [Edit]
|
|
Secure Print Settings
|
[Add.Func.] → [System Settings] → [Edit]
|
|
Mem. Used When Warning Displayed
|
[Add.Func.] → [System Settings] → [Edit]
|
|
Other Settings
|
Available only on the machine’s control panel.
|
|
* [Memory Media Send Log] is displayed only when the Use Scan to Memory Media setting in Memory Media Settings is set to ‘On’.
|
|
1
Click [Add.Func.] → [System Settings] in the [Add.Func.] menu.
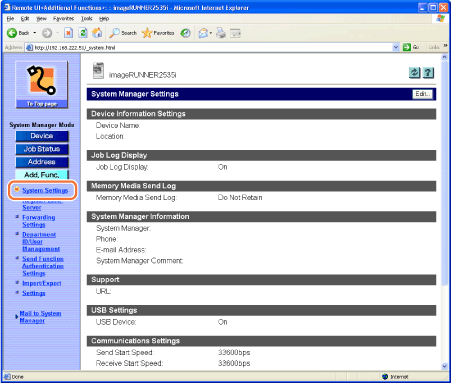
The System Manager Settings page is displayed.
2
Click [Edit].
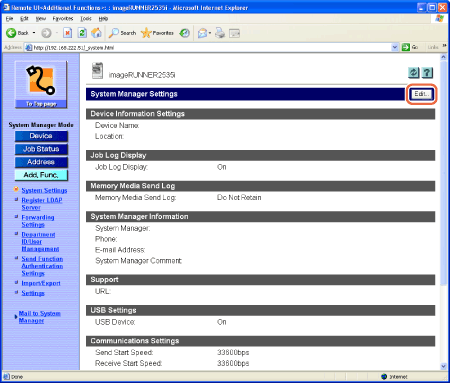
The Edit System Settings page is displayed.
To specify the System Settings:
|
1
|
Specify the necessary settings → click [OK].
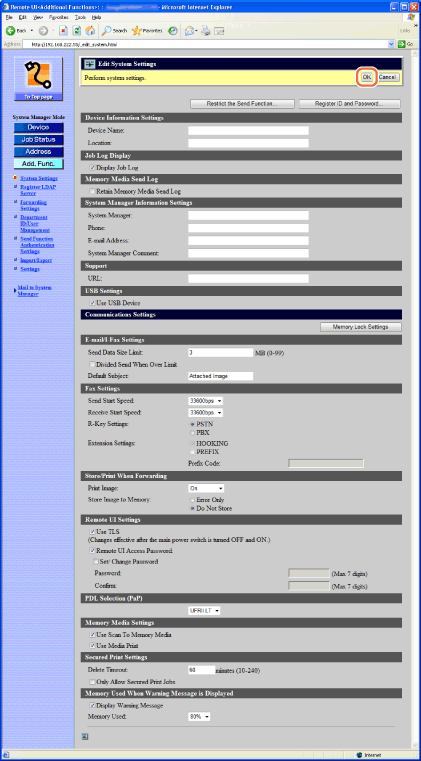 The settings are as follows:
<System Manager Information Settings>
IMPORTANT:
<Phone>, <E-mail Address>, and <System Manager Comment> can be specified only on the Remote UI.
NOTE:
For instructions on how to specify the System Manager's ID and System Password, see To specify the System Manager's ID and System Password:.
<Support>
IMPORTANT:
<Support> can be specified only on the Remote UI.
NOTE:
For information on the settings except described above, see the following chapters:
|
To specify the Restrict the Send Function settings:
|
1
|
Click [Restrict the Send Function] displayed on the Edit System Settings page.
For help, see the screen shot in To specify the System Settings:.
The Restrict Send Function page is displayed.
|
|
2
|
Specify the necessary settings → click [OK].
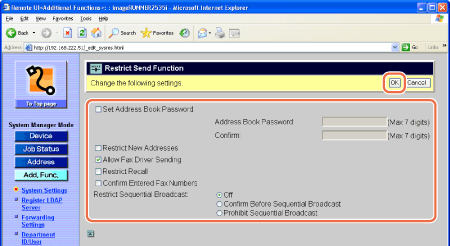 NOTE:
For information on the settings, see Setting the Send Function.
|
To specify the System Manager's ID and System Password:
|
1
|
Click [Register ID and Password] on the Edit System Settings page.
For help, see the screen shot in To specify the System Settings:.
The Register ID and Password page is displayed.
|
||||||||||||
|
2
|
Specify the necessary settings → click [OK].
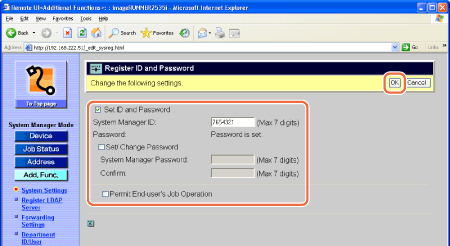 The settings are as follows:
IMPORTANT:
The System Manager ID and System Password are both set to ‘7654321’ at purchase. Change them before using the machine.
Be sure to remember the PIN that you have set. If you have forgotten the PIN, contact your local authorized Canon dealer or the Canon help line.
IMPORTANT:
<Permit End-user’s Job Operation> can be specified only on the Remote UI.
|